Hello! Welcome to the first lesson in our module on "System Security and Hardening."
In our last module, we finished by exploring how to automate system tasks with Ansible. We saw how a declarative playbook could ensure a service like Nginx was installed and running. Today, we'll tackle one of the most fundamental security tasks for any Linux server, and it's a perfect example of a process that, once learned, can be automated.
This lesson focuses on the learning outcome: Implement SSH key-based authentication and harden the SSH service configuration. We will move away from less-secure password-based logins and transition to using cryptographic keys, which are the industry standard for secure remote access. We'll then lock down the SSH service itself to enforce these higher security standards.
1. Why SSH Keys are Superior to Passwords
Before we start configuring things, it's important to understand why this change is so crucial. You're familiar with using a command-line interface, so you've likely used SSH with a password before. While convenient, passwords have significant weaknesses:
- They can be guessed, stolen, or "brute-forced" by automated bots that try thousands of combinations per second.
- Users often choose weak or reused passwords, creating a single point of failure.
- They are transmitted over the network (though in an encrypted channel), but the reliance on human memory and habits is the main risk.
SSH keys solve these problems. A key pair consists of two related files: a private key and a public key.
- The Private Key stays on your local machine. It is secret, protected, and should never be shared. It's your proof of identity.
- The Public Key is placed on the remote server. It can be shared freely without any security risk. It's the "lock" that only your private key can open.
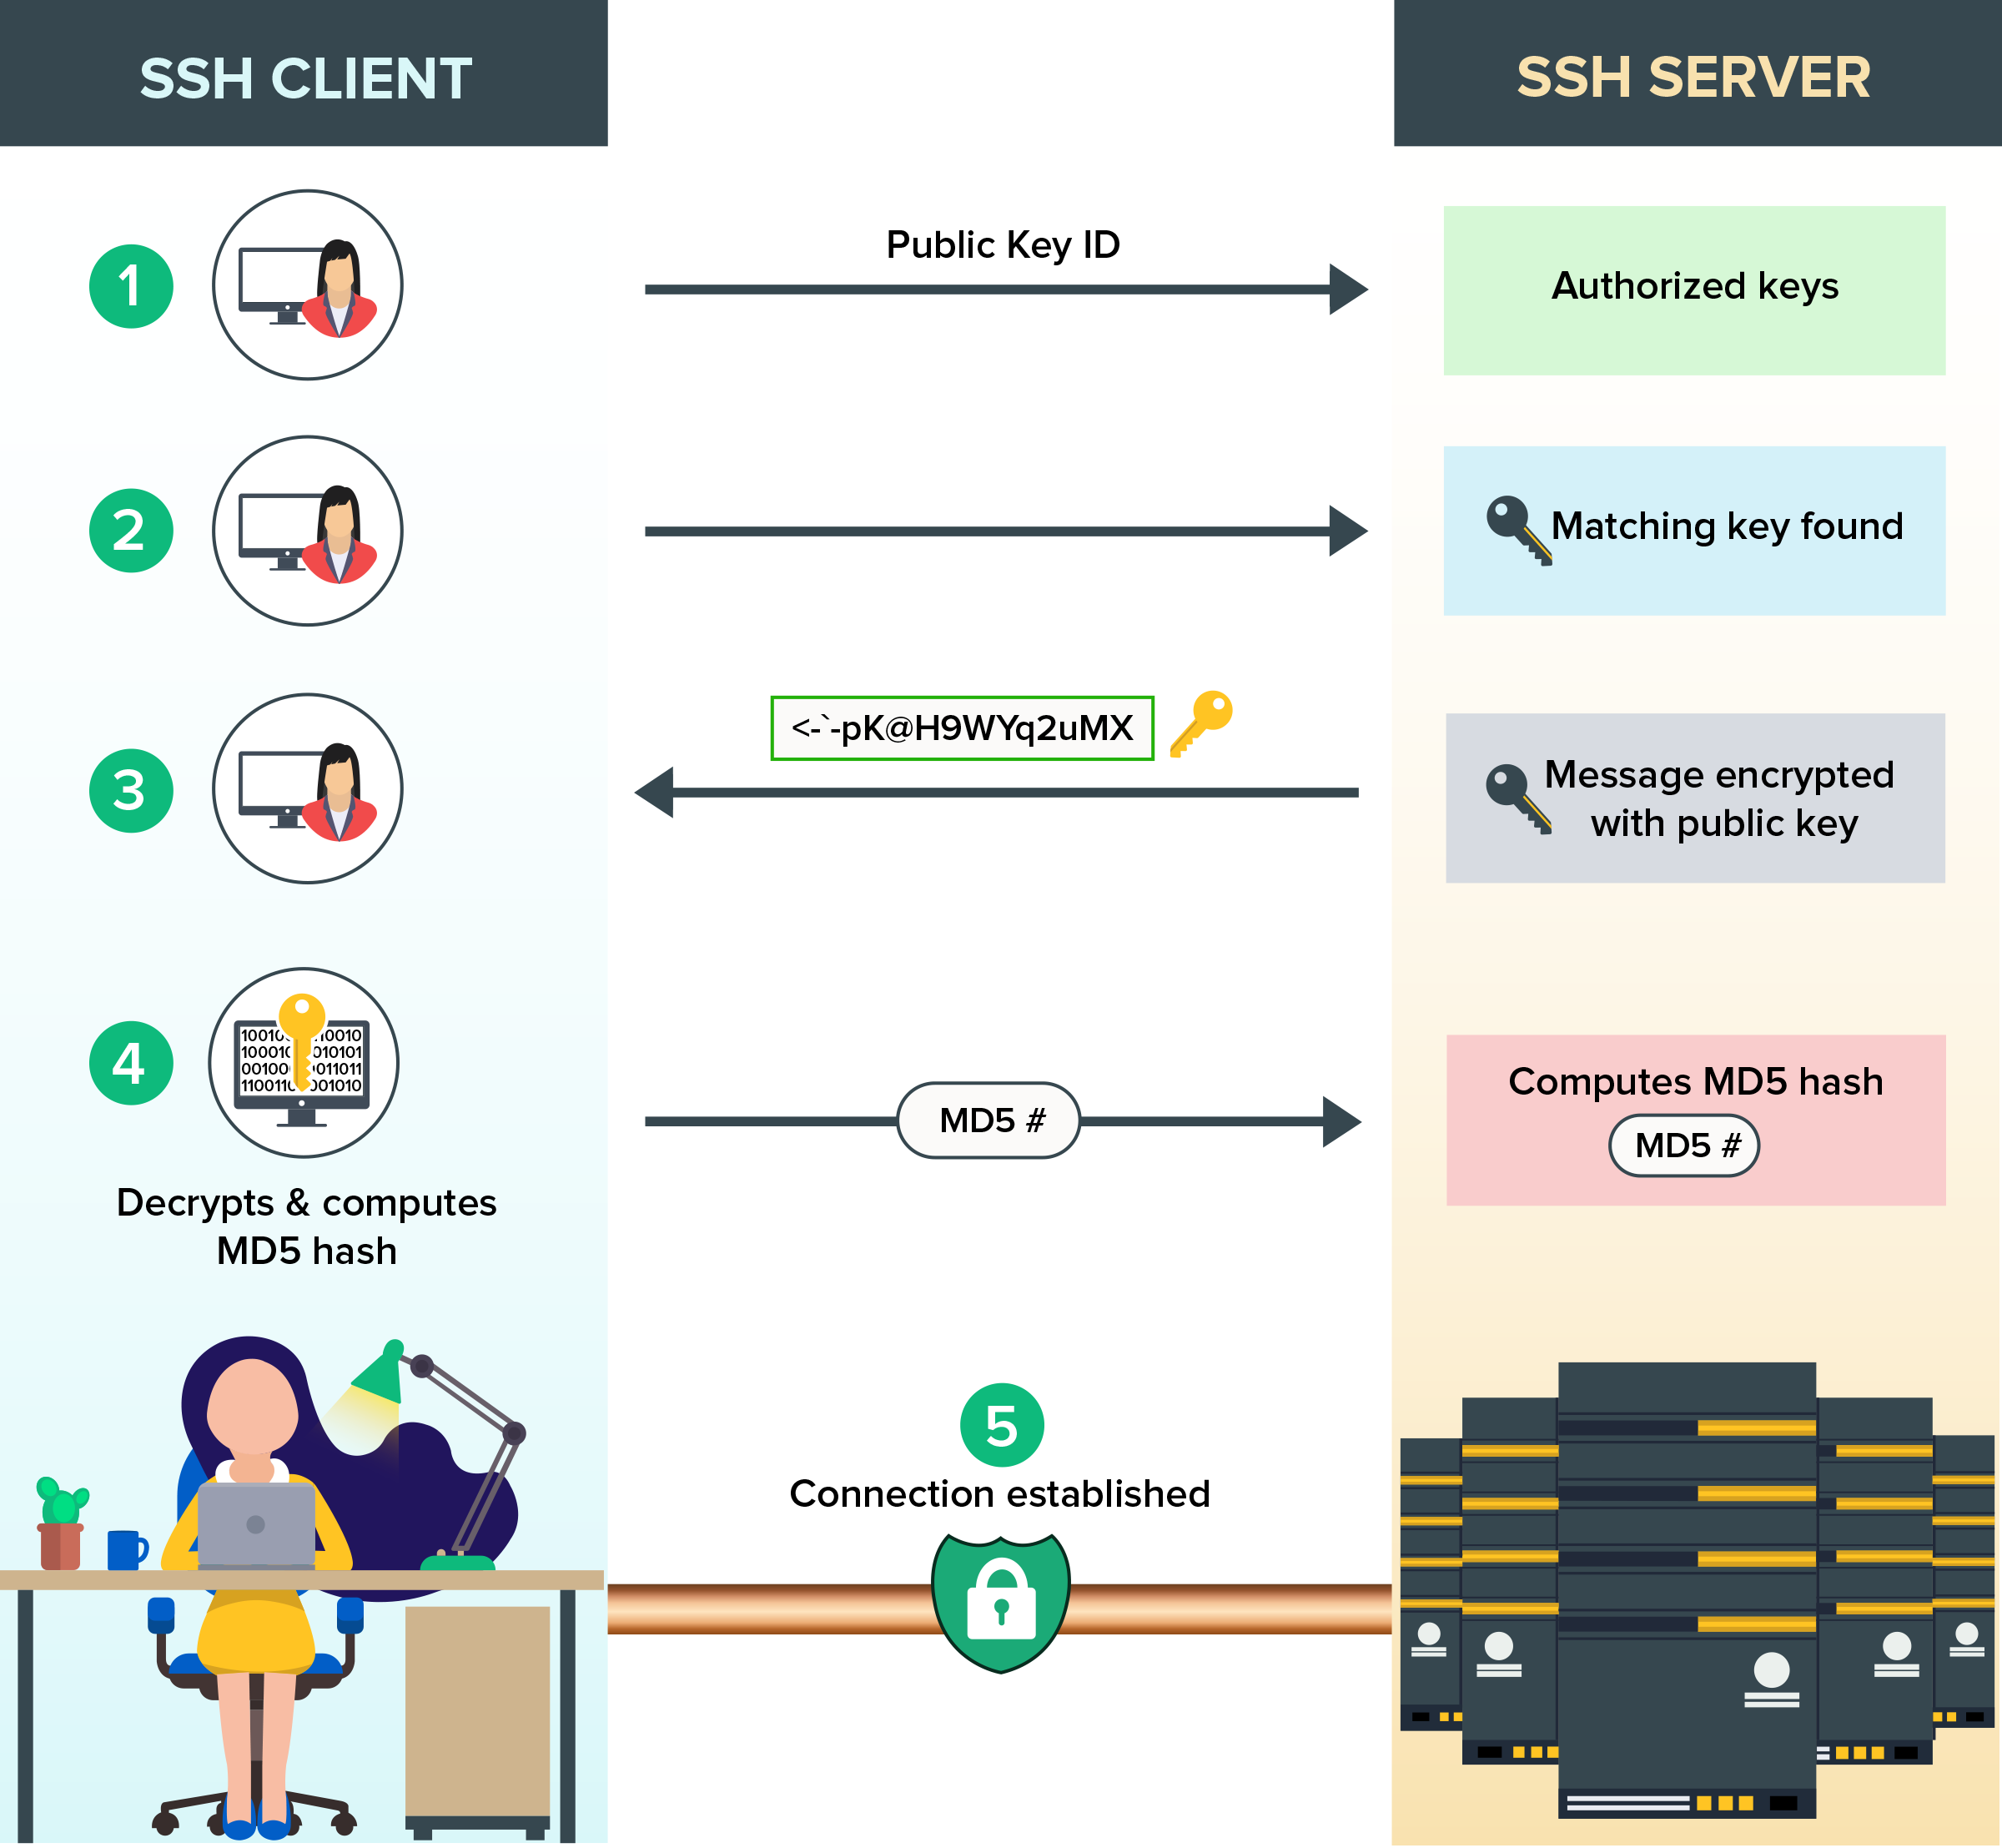
When you connect, the server uses the public key to issue a challenge that only your private key can solve. This happens automatically and proves your identity without ever sending a password over the network.
To get a solid grasp of this concept, let's start with a short reading.
How to Create an SSH Key in Linux
This first section from a DigitalOcean tutorial titled "How to Configure SSH Key-Based Authentication on a Linux Server" provides an excellent, clear explanation of how SSH keys work and why they are more secure than passwords.
Please read the section under the heading 'How Do SSH Keys Work?'. Focus on understanding the roles of the public key and the private key.
The process described in the article is visualized nicely in the diagram below.
2. Implementing SSH Key-Based Authentication
Now for the practical part. We'll generate a key pair on your local machine (the client) and copy the public key to your Linux server (your VM).
The following video provides a clear, step-by-step demonstration of this entire process.
5 Steps to Secure Linux (protect from hackers)
The video "5 Steps to Secure Linux" by NetworkChuck demonstrates how to generate SSH keys and copy them to a server to enable passwordless login. The presenter has an energetic style and provides a great analogy of the public key being a padlock.
Watch from 06:58 to 12:10. Follow along to perform these steps on your own system. Note that the video shows a few different commands for copying the key depending on the operating system; for Linux-to-Linux, the ssh-copy-id command is the simplest and is mentioned at the end of the clip.
Let's summarize the key steps from the video for your Linux environment:
Step 1: Generate your SSH key pair
On your local machine (the one you connect from), run the ssh-keygen command.
ssh-keygen -b 4096
- The
-b 4096flag creates a more secure 4096-bit key, which is a recommended practice. - When prompted, it's usually best to accept the default file location (
~/.ssh/id_rsa). - You'll be asked for a passphrase. This is an optional, extra layer of security that encrypts your private key on your local disk. If someone were to steal your computer, they still couldn't use your private key without knowing the passphrase. We highly recommend using one.
Step 2: Copy your public key to the server
The easiest way to do this on Linux is with the ssh-copy-id utility.
ssh-copy-id your_username@server_ip
This command automatically finds your public key (~/.ssh/id_rsa.pub), connects to your server, and appends the key to the correct file (~/.ssh/authorized_keys) on the server. You will be prompted for your user's password one last time to authorize this copy.
Step 3: Test your key-based login
Now, try to SSH into your server again.
ssh your_username@server_ip
If you set a passphrase for your key, you will be prompted for it. Otherwise, you should be logged in immediately without a password prompt. Success!
3. Hardening the SSH Server Configuration
You can now log in with a secure key, but the server will still accept password-based logins. This leaves a door open for attackers. The next step is to configure the SSH service (the "daemon") to disallow these less secure methods.
All the main settings for the SSH daemon are in a single file on your server: /etc/ssh/sshd_config. We'll edit this file to make three key changes.
The second half of the NetworkChuck video walks through this process. It also gives a critically important tip about testing your changes before logging out.
5 Steps to Secure Linux (protect from hackers)
Let's return to the NetworkChuck video to see how to edit the SSH configuration file to improve security.
Watch from 12:10 to 15:50. This section covers editing /etc/ssh/sshd_config to change the port, disable root login, and disable password authentication. Pay close attention to the process of restarting the service and testing from a new terminal window.
Here are the essential changes to make in the /etc/ssh/sshd_config file on your server. You'll need to use sudo and a text editor like nano or vim to edit it.
sudo nano /etc/ssh/sshd_config
1. Disable Password Authentication (Most Important)
This is the single most effective security improvement you can make. It forces all users to use SSH keys. Find the line for PasswordAuthentication, uncomment it (by removing the #), and set it to no.
PasswordAuthentication no
2. Disable Direct Root Login
Logging in directly as the root user is risky. It's a prime target for attackers, and it bypasses the accountability that comes from users logging into their own accounts and using sudo for administrative tasks. Find PermitRootLogin, uncomment it, and set it to no.
PermitRootLogin no
3. (Optional but Recommended) Change the Default Port
Automated bots constantly scan the default SSH port (22) on every IP address they can find. Changing it to a non-standard port (e.g., something above 1024, like 2222) significantly reduces the "noise" of these automated attacks in your logs. While it won't stop a determined, targeted attacker, it's an easy way to hide from casual scans.
#Port 22
Port 2222
Applying and Testing Your Changes
After saving the /etc/ssh/sshd_config file, you must restart the SSH service for the changes to take effect.
sudo systemctl restart sshd
CRITICAL STEP: TEST BEFORE YOU LOG OUT!
You may have made a mistake that prevents you from logging back in.
-
Keep your current SSH session open.
-
Open a new terminal window.
-
Try to log in using the new settings. If you changed the port, you must specify it with the
-pflag:# If you changed the port to 2222 ssh -p 2222 your_username@server_ip -
Only after you have successfully logged in on the new terminal should you close your original session. If the new connection fails, you can use your original session to fix the configuration file and try again.
Test your understanding!
You've successfully set up key-based authentication for your user alex. You then edit /etc/ssh/sshd_config and set PasswordAuthentication no. After restarting the SSH service, what will happen if you try to SSH as alex from a computer that does not have your private key?
Show answer
The connection will be immediately rejected. The server will not prompt for a password because you explicitly disabled that authentication method. It will likely give a "Permission denied (publickey)" error, indicating that the only allowed authentication method (the SSH key) failed.
Conclusion
In this lesson, you've taken a massive step forward in securing your Linux server. By moving from passwords to SSH keys, you've replaced a fallible, human-based system with a robust, cryptographic one.
Key Takeaways:
- SSH Keys provide a much more secure authentication method than passwords by using a public/private key pair for a challenge-response verification.
- Key Generation and Transfer: Keys are created locally with
ssh-keygenand the public key is copied to a server usingssh-copy-id. - Server Hardening: The SSH daemon is configured via
/etc/ssh/sshd_config. - Essential Hardening Directives:
PasswordAuthentication no: Disables password logins entirely.PermitRootLogin no: Prevents therootuser from logging in via SSH.Port <number>: Changes the listening port to avoid automated scans.
- Always test changes from a separate terminal before logging out of your active session to avoid locking yourself out.
Preview of the Next Lesson:
Securing your server's entry point with SSH is a vital first step. The next layer of defense is at the network level. In our next lesson, we will explore the role of netfilter and how to manage firewall rules using firewalld. You'll learn how to control which services are exposed to the network and how to block unwanted traffic, building a powerful defense for your entire system.