Hello! Welcome to the first lesson of Module 2, "Command Line and File System Navigation."
In our last lesson, we concluded our tour of Linux fundamentals by exploring the different types of shells, like bash and zsh. We established that the shell is your primary tool for interacting with the Linux system. Now, it's time to put that tool to work.
This lesson addresses the learning outcome: Use basic commands to view system information and current user details. We'll cover a set of fundamental commands that every Linux user and administrator needs to know. These commands will help you answer basic but critical questions: Who am I? Who else is using this system? What kind of machine am I working on? Answering these questions is the first step in diagnostics, security monitoring, and general system administration.
Let's fire up your Ubuntu VM and open the terminal. It's time to start gathering some intelligence about your system.
1. Identifying User Activity
One of the first things you'll often need to know is who is logged in and what your own user identity is. This is crucial in a multi-user environment, which Linux is designed to be.
Who am I? (whoami and id)
The simplest question to answer is: "Who am I logged in as?" The whoami command does exactly what it says.
whoami
This will print your current username. It's especially handy when you've switched users or are running commands as another user (something we'll cover later) and need a quick reminder of your current context.
However, your identity in Linux is more than just a name. Every user has a unique numeric ID (UID) and belongs to one or more groups, each with its own group ID (GID). The id command gives you this detailed breakdown.
id
You'll see output showing your uid, your primary gid, and a list of all the groups you belong to. These numeric IDs are what the system uses internally to manage permissions for files and processes.
Linux Commands - Documentation
For a concise written reference on these commands, please review a section from the Rocky Linux documentation.
In this resource, find the sub-heading 'id, who and whoami commands'. Read this short section to reinforce your understanding of what id and whoami display.
Who is on the system? (who and w)
To see everyone currently logged into the system, you can use the who and w commands. While similar, w provides more detailed information.
who: Shows who is logged in, on which terminal (ttyorpts), and since when.w: Shows everythingwhodoes, plus the system's uptime, load average, and, most importantly, what command each user is currently running.
The w command is particularly valuable for a system administrator to get a quick snapshot of system activity.
Linux Commands: How To Use "who" And "w" Commands
The video 'Linux Commands: How To Use "who" And "w" Commands' from Learn Linux TV offers an excellent, in-depth comparison of these two essential commands.
Please watch the following parts of the video: Start with the introduction (00:22 - 01:19) for a high-level overview. Then, watch the detailed breakdown of the who command and its options (02:35 - 08:26). Finally, watch the section on the w command (09:17 - 14:31) to understand the additional information it provides, especially the 'what' column.
After watching the video, try running both who and w in your own terminal. Since you are likely the only one logged into your VM, the output might be simple, but you'll be able to recognize all the columns explained in the video.
Test your understanding!
You log into a server and suspect it's running slowly. You run who and see that another administrator, "jane," is also logged in. How could you get a better idea of what "jane" might be doing that could be slowing down the system?
Show answer
You would use the w command. The "WHAT" column in its output would show the command that jane's session is currently running, which could give you a clue about the cause of the slowdown (e.g., a resource-intensive backup or compilation process).
2. Viewing System Information
Next, let's find out more about the system itself—its name, operating system version, and how long it's been running.
Kernel and OS Information (uname)
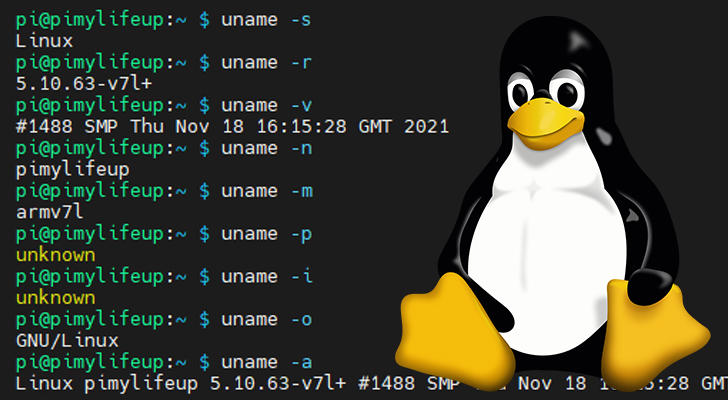
The uname (short for Unix Name) command prints key information about the machine and the operating system kernel. Running uname by itself just prints "Linux," which isn't very helpful. The real power comes from its options.
The most common option is -a (for "all"):
uname -a
This will give you a single line packed with information:
- Kernel Name:
Linux - Hostname: The name of your machine.
- Kernel Release: The specific version of the Linux kernel (e.g.,
5.15.0-78-generic). This is critical for checking compatibility and security vulnerabilities. - Kernel Version: More details about the build.
- Machine Architecture: e.g.,
x86_64(for 64-bit). - Operating System:
GNU/Linux.
System Uptime and Load (uptime)
The uptime command tells you how long the system has been running since its last reboot. It's a quick way to check system stability.
uptime
The output also includes:
- The current time.
- The number of users currently logged in.
- Load average: Three numbers representing the average system load over the last 1, 5, and 15 minutes. A higher number means the system is busier. This is a key metric for performance monitoring.
Getting Started with Linux CLI: Must-Know Commands | Linux Basics
For a quick visual demonstration of uname and uptime, let's refer back to the 'Getting Started with Linux CLI' video.
Watch the segment from 08:53 to 09:27. It gives a clear, concise explanation of the uname -a and uptime commands and their output.
System Date and Time (date)
Finally, a simple but essential command is date, which displays the current date and time configured on the system.
date
This command is highly versatile and can be used to format the date and time in many different ways, which is particularly useful in scripts. For example, date +%F will print the date in YYYY-MM-DD format.
3. Gathering Basic Hardware Information
While there are advanced tools for deep hardware inspection, a few basic commands can give you a quick overview of your system's core components.
7 Linux commands to gather information about your system
The article '7 Linux commands to gather information about your system' from Red Hat provides a great overview of commands for hardware discovery. We'll focus on a couple of the most common ones.
Please read two sections from this article: 'Display CPU information' to learn about the lscpu command. 'Show RAM information' to learn about the free command. Don't worry about dmidecode for now; lscpu and free are the essential starting points.
After reading, try these commands yourself:
-
CPU Information:
lscpuThis command gives you a detailed report on the CPU, including the model, number of cores, architecture, and virtualization capabilities.
-
Memory Information:
free -hThe
freecommand shows your system's total, used, and free RAM. The-hoption makes the output "human-readable" (e.g., showing MB or GB instead of just bytes).
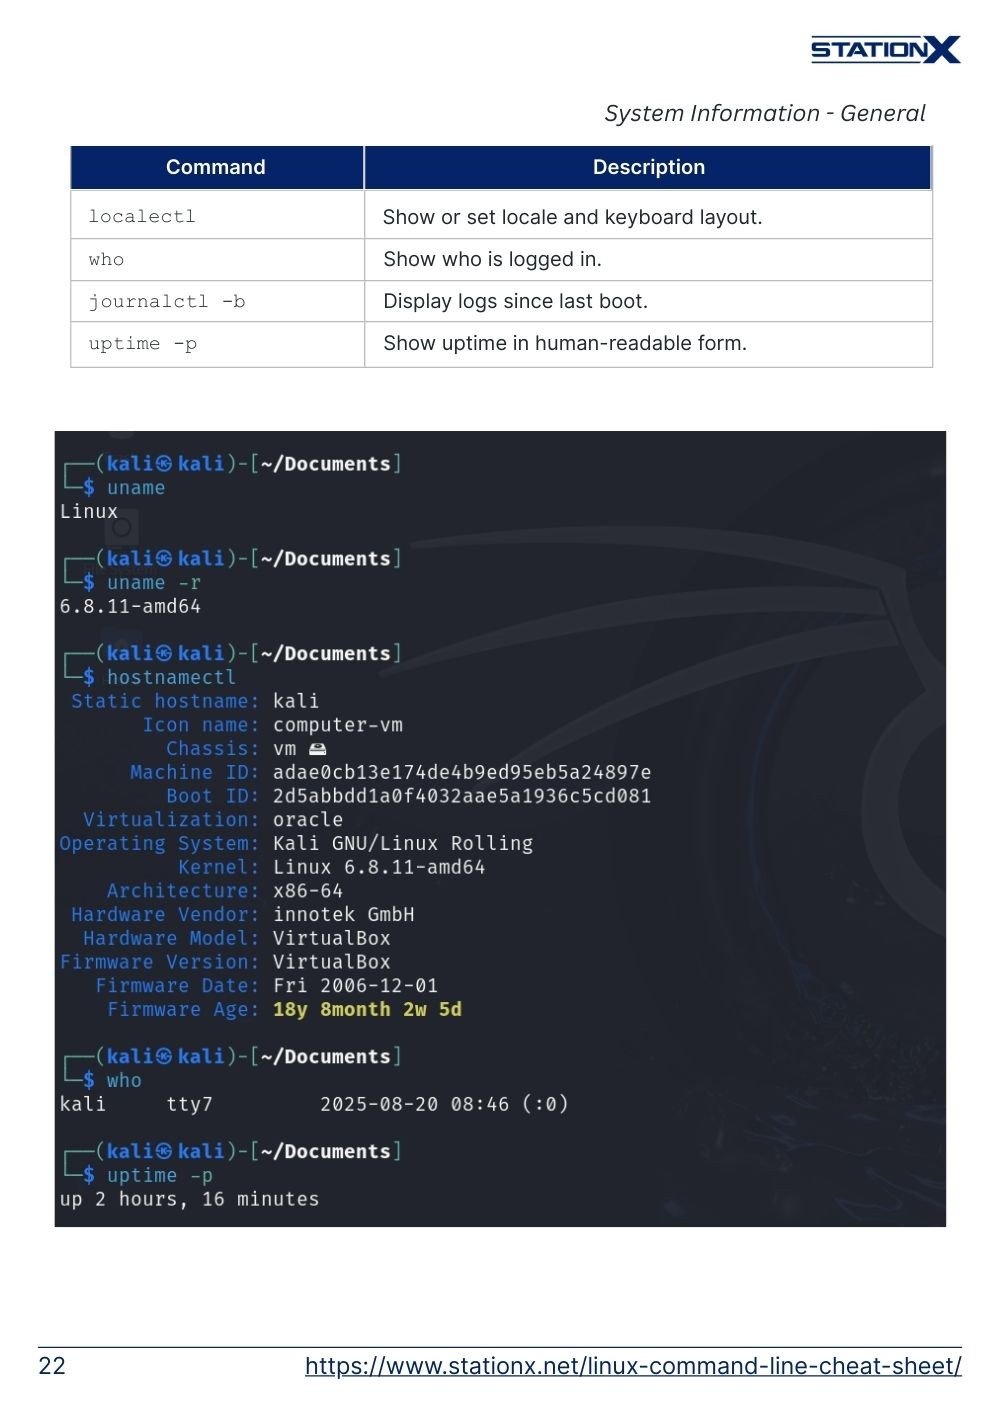
Here is a handy cheat sheet that summarizes some of the commands we've discussed today.
Conclusion
In this lesson, you've learned to use a foundational set of commands to inspect your Linux environment. These tools are your first port of call when you log into a new system or start a troubleshooting session.
Key Takeaways:
- User Information:
whoami: Displays your current username.id: Shows your user ID (UID), group ID (GID), and group memberships.who: Lists all users currently logged into the system.w: Provides a more detailed list of users and what they are doing.
- System Information:
uname -a: Displays detailed kernel and OS information.uptime: Shows how long the system has been running and its load average.date: Displays the current system date and time.
- Hardware Information:
lscpu: Shows detailed CPU specifications.free -h: Displays RAM usage in a human-readable format.
Now that you know how to get your bearings on a system, you're ready to start exploring it. In our next lesson, we will dive into the Linux filesystem. You'll learn about the standard directory structure, known as the Filesystem Hierarchy Standard (FHS), which organizes where files and programs are stored.