Hello and welcome to your next lesson!
In our previous lessons, we've frequently used the sudo command to execute administrative tasks like managing users with passwd and chage. This was a necessary step to gain the required permissions. Now, it's time to pull back the curtain and understand exactly how sudo works and how you, as a system administrator, can control it.
This lesson directly addresses the learning outcome: Grant sudo privileges and use the visudo command to safely manage the sudoers file. Mastering sudo configuration is a fundamental skill for any Linux administrator, as it is the primary mechanism for securing and delegating administrative power on a system.
We will cover why sudo is preferred over logging in as the root user, explore the two primary methods for granting sudo access, and, most importantly, learn the safe and correct way to edit its powerful configuration file.
1. The "Why": sudo vs. The Root User
On a Linux system, the root user is all-powerful. It can do anything, anywhere, without restriction. While this is necessary for some tasks, operating as root for daily administration is risky. A single mistyped command can have catastrophic consequences. Furthermore, if multiple people use the root account, it's impossible to know who did what.
The sudo (short for "superuser do") command solves these problems. It allows a permitted user to run a specific command with root privileges without having to log in as the root user.
To understand the core purpose of sudo and why it's the modern standard for privilege escalation, please watch this first segment.
This clip from the "Linux Crash Course - sudo" video by Learn Linux TV explains the fundamental concept of sudo and why it's a more secure alternative to using the su command to become the root user.
Watch from 02:33 to 03:52. Focus on the distinction between running a command as a normal user, becoming root with su, and using sudo to temporarily elevate privileges for a single command.
Key benefits of using sudo:
- Accountability: Commands run with
sudoare logged, showing which user ran which command and when. - Security: You don't need to share the root password. Users use their own password to authenticate with
sudo. - Least Privilege: You can grant users permission to run only the specific commands they need, rather than giving them full root access.
- Reduced Risk: Since privileges are elevated only for the duration of a single command, it reduces the window for accidental damage.
2. Granting Privileges: The Group-Based Method
The most common and recommended way to grant a user full administrative privileges is to add them to a special administrative group. On Debian-based systems (like Ubuntu), this group is typically named sudo. On Red Hat-based systems (like CentOS, Fedora, RHEL), it's usually wheel.
By default, the sudo configuration is set up to grant all privileges to any member of this group.
To see how this works, let's look at the process of identifying the correct group and adding a user to it.
The next part of the same video will show you how to inspect the sudo configuration to find the administrative group and then add a user to it using the usermod command.
Watch from 03:52 to 07:52. Pay close attention to how the /etc/sudoers file is inspected to identify the group (look for the line starting with a %), and the syntax of the usermod -aG command used to add a user to a group. Note the important tip about logging out and back in for the change to take effect.
Here is a visual of the rule you saw in the video that grants privileges to the sudo group:

Important: When you add a user to a new group, the change doesn't apply to their current shell session. The user must log out and log back in for their new group membership to be recognized.
Test your understanding!
A new junior system administrator, charlie, has joined your team. You need to grant him full administrative rights on an Ubuntu server so he can perform system updates and manage software. What is the single command you should execute?
Show answer
sudo usermod -aG sudo charlie
This command adds (-a) the user charlie to the supplementary group (-G) named sudo.
3. The sudoers File and the visudo Command
The heart of sudo is its configuration file, located at /etc/sudoers. This file, along with any files in the /etc/sudoers.d/ directory, dictates who can run what.
This is the most critical rule of this lesson: You must never edit the /etc/sudoers file directly with a standard text editor like nano or vim. A tiny syntax error in this file can break sudo completely, locking you and all other users out of administrative privileges.
The only safe way to edit this file is with the visudo command.
How To Edit the Sudoers File Safely
The article "How To Edit the Sudoers File Safely" from DigitalOcean provides an excellent explanation of what visudo is and why it's essential.
Read the section titled "What Is Visudo?". Focus on its two main safety features: the exclusive lock and syntax validation.
To run it, you simply type:sudo visudo
This will open the /etc/sudoers file in your system's default command-line editor (often nano or vim). When you try to save and exit, visudo will parse the file. If it finds a syntax error, it will prevent you from saving the broken file and give you a chance to fix your mistake.
Let's see a demonstration of visudo's life-saving syntax-checking feature.
This final clip from the Learn Linux TV video demonstrates what happens when you make a mistake while editing with visudo. This is the single most important reason to always use this command.
Watch from 22:30 to 25:18. The presenter intentionally adds a syntax error to the file. Observe how visudo catches the error upon saving and prompts the user with options to either re-edit (e) or exit without saving (x).
4. Writing Custom sudo Rules
While adding users to the sudo group is great for full access, the real power of sudo lies in granting very specific, limited permissions. This adheres to the Principle of Least Privilege.
Let's break down the syntax of a sudoers rule.
who where = (run_as) what
A typical example for the root user is:root ALL=(ALL:ALL) ALL
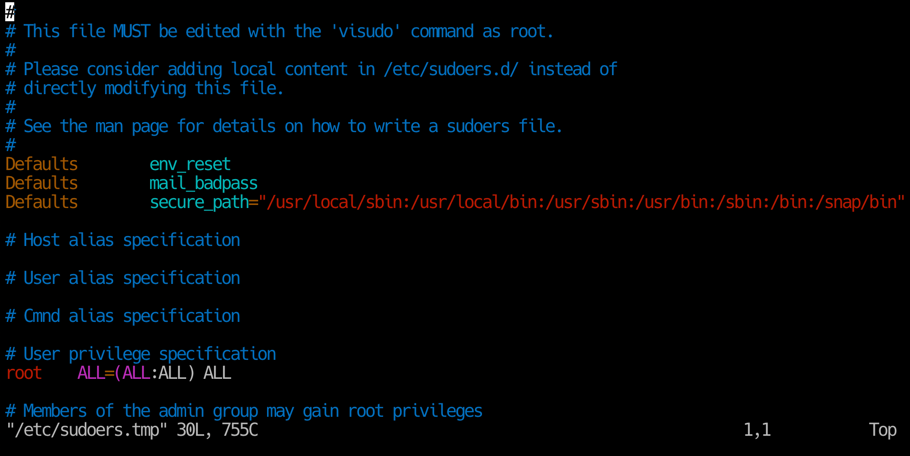
Let's watch a detailed breakdown of what each part of this rule means.
This segment explains the structure of a sudoers rule, decoding the meaning of each ALL in the user ALL=(ALL:ALL) ALL format.
Watch from 10:22 to 14:07. Focus on understanding the four components: the user, the host, the user/group to run as, and the command.
Here's a summary of the rule structure:
- User/Group: Who the rule applies to (e.g.,
root,%sudo). - Host: Which machine(s) the rule applies to (
ALLmeans any). - (RunAs User:Group): Whom the command can be run as (
(ALL:ALL)means as any user and any group).sudodefaults torootif not specified. - Command: The absolute path to the command(s) the user is allowed to run.
Practical Examples
Let's see how to write rules for specific scenarios.
Example 1: Allow a user to update packages.
To allow user jerry to run apt update and apt upgrade, you would add this line using sudo visudo:jerry ALL = /usr/bin/apt update, /usr/bin/apt upgrade
Example 2: Allow a service account to restart a service without a password.
For an automated script running as user webapp, you might need it to restart the webserver without a password prompt.webapp ALL = NOPASSWD: /usr/bin/systemctl restart nginx
The NOPASSWD: tag is powerful but should be used with extreme caution and only for very specific, low-risk commands.
This next video demonstrates creating specific rules like these.
Watch how to use visudo to add rules that restrict a user to a specific set of commands, and how to apply the NOPASSWD tag.
Watch from 14:07 to 21:25. Observe how a new user tux is first given full access, and then is restricted to only being able to run the apt and rm commands. Finally, see how the NOPASSWD tag is added.
Test your understanding!
You have a user named db_admin who needs to be able to restart the postgresql database service. They should not be prompted for a password when doing so. Write the sudoers rule you would add using visudo. Assume the systemctl command is at /usr/bin/systemctl.
Show answer
db_admin ALL = NOPASSWD: /usr/bin/systemctl restart postgresql
5. Verifying Privileges
After configuring sudo, how can a user check what permissions they actually have? The sudo -l (list) command is the answer. It lists all the rules that apply to the current user.
sudo -l
This is an invaluable command for troubleshooting and verifying your configurations.
Conclusion
In this lesson, we demystified the sudo command, transforming it from a tool you simply use into one you can configure and control. This is a crucial step in your journey to becoming a proficient Linux administrator and is vital for the CompTIA Linux+ exam.
Key Takeaways:
sudoprovides secure, audited, and temporary privilege escalation, making it superior to logging in asroot.- Always use the
visudocommand to edit the/etc/sudoersfile. Its syntax checking is a critical safety feature that can prevent you from locking yourself out of the system. - The simplest way to grant full administrative rights is to add a user to the predefined
sudo(orwheel) group withusermod -aG <group> <user>. - You can write fine-grained rules in
/etc/sudoersto grant users limited access to specific commands, enforcing the Principle of Least Privilege. - The
sudo -lcommand is used to verify whichsudopermissions a user has.
We've now seen how sudo manages privileges related to command execution. In our next lesson, we will explore a different type of access control: Access Control Lists (ACLs). ACLs allow you to set highly specific file and directory permissions, moving beyond the traditional owner, group, and other model we've used so far.