Hello! Welcome to your next lesson in our "System Security and Hardening" module.
In our last lesson, we built a perimeter defense for our server using firewalld. We configured it to block unwanted traffic, effectively acting as a digital gatekeeper. But how do we know if anyone is trying to pick the lock or rattle the gate? A silent defense is good, but an observed defense is better.
This lesson will teach you how to become a digital detective, addressing the learning outcome: Analyze systemd journal entries and traditional log files for security events. We will explore the records your system keeps, learning how to read them to investigate suspicious activity, troubleshoot issues, and verify that our security measures are working.
1. The Two Worlds of Linux Logging
Just as Linux has evolved over time, so have its methods for recording system events. For a system administrator, it's crucial to understand the two primary logging systems you'll encounter, as they store and present information differently. Your preference for understanding the architecture first will serve you well here.
To get a clear picture of these two systems, please read the following brief introduction.
A Complete Guide to Linux Log File Locations and Their ...
The article "A Complete Guide to Linux Log File Locations and Their..." provides an excellent explanation of the two main logging mechanisms in modern Linux.
Read the section titled 'How Linux Logging Systems Work and Store Data'. Focus on the distinction between 'Traditional rsyslog (syslog)' and 'Journald (from systemd)', and the brief explanation of 'How They Work Together'.
To summarize the key points:
- Traditional
rsyslog: This is the classic logging daemon. It collects messages from different parts of the system and writes them as plain text into various files, primarily located in the/var/logdirectory. Think of it as a collection of ship's logs, with each book dedicated to a different topic (authentication, kernel, etc.). systemdJournal (journald): This is the modern, integrated logging system built intosystemd. It captures the same information but stores it in a structured, indexed binary format. Instead of reading multiple text files, you use a single, powerful command-line tool,journalctl, to query and filter this central database of log entries.
In most modern distributions, these two systems work together. journald captures everything, and rsyslog often pulls from the journal to write the traditional text log files for backward compatibility. For the CompTIA Linux+ exam, you need to be comfortable working in both worlds.
2. Investigating Traditional Log Files
Let's start with the traditional /var/log directory. While there are many files here, a few are critical for security analysis.
The article "Linux Security Logs: Complete Guide" provides a great overview of these files.
Linux Security Logs: Complete Guide for DevOps and ...
This guide gives a comprehensive rundown of the most important log files for security monitoring.
Read the section 'Key Linux Security Log Files You Should Know'. Pay attention to the purpose of auth.log/secure, messages/syslog, and faillog. Note the differences in filenames between Debian/Ubuntu and RHEL/CentOS systems.
The most important security-related logs are:
/var/log/auth.log(Debian/Ubuntu) or/var/log/secure(RHEL/CentOS): Records authentication events like logins,sudocommand usage, and user account modifications. This is your primary source for tracking user activity./var/log/btmp: A binary file that records failed login attempts./var/log/wtmp: A binary file that records successful login and logout events.
Let's see how to use these logs in a practical way. The following video demonstrates how to access them and interpret their contents, focusing on events relevant to security.
Learn How to Access and Read Linux Log Files For Information and Troubleshooting
The video "Learn How to Access and Read Linux Log Files" provides a clear, hands-on tour of the most common log files.
Watch the following segments to see how to analyze authentication logs: Successful Logins (06:08 - 07:48): See how the last command is used to read the binary wtmp file to audit who logged in and when. Failed Logins (07:48 - 10:22): This is crucial. Watch how the lastb command is used to read the btmp file, revealing failed login attempts—a key indicator of a potential attack. Real-time Monitoring (12:10 - 15:10): See a demonstration of using tail -f on the auth.log file to watch SSH login attempts live. This is an essential skill for active troubleshooting.
Practical Analysis: Detecting a Brute-Force Attack
Watching individual failed logins is useful, but the real power comes from aggregating data. A common security event is a "brute-force" attack, where an automated script tries thousands of passwords against a user account. You can detect this by counting the number of failed attempts from a single IP address.

You can create a summary of these attacks using a pipeline of commands you've seen before (grep, sort, uniq). This command, found in the "Linux Security Logs" article, is a classic example:
# On a Debian/Ubuntu system
grep "Failed password" /var/log/auth.log | awk '{print $11}' | sort | uniq -c | sort -nr
grep "Failed password" /var/log/auth.log: Finds all lines containing the phrase "Failed password".awk '{print $11}':awkis a powerful text-processing utility. Here, we use it to print only the 11th field (the IP address) from each matching line.sort: Sorts the IP addresses alphabetically.uniq -c: Counts the number of consecutive identical lines (our sorted IPs) and prefixes the count.sort -nr: Sorts the results numerically (-n) and in reverse order (-r), putting the most frequent attackers at the top.
This single command transforms a massive log file into a concise, actionable list of potential threats.
3. Analyzing systemd Journal Entries with journalctl
While traditional logs are simple text files, the systemd journal is a structured database. This structure is its greatest strength, as it allows for powerful filtering. The tool to access it is journalctl.
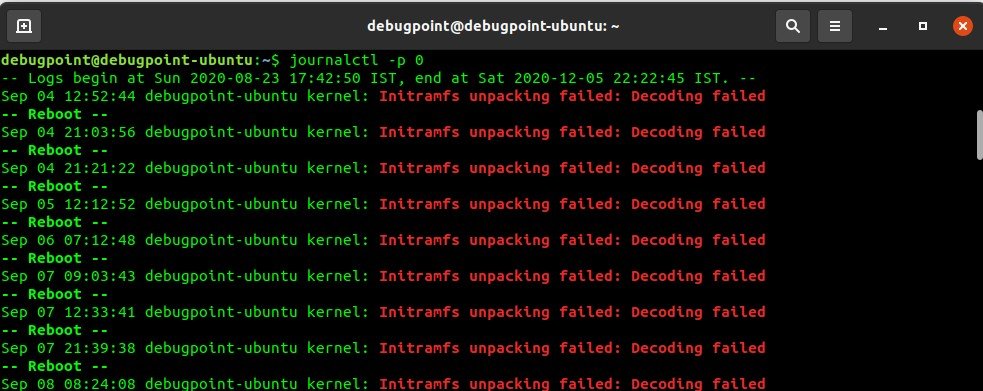
Let's explore the capabilities of journalctl.
A Complete Guide to Linux Log File Locations and Their ...
The article "A Complete Guide to Linux Log File Locations and Their..." has an excellent section dedicated to journalctl.
Read the section 'Systemd Journal Logs Using journalctl'. Familiarize yourself with the basic operations (-r, -f, -b) and pay close attention to the 'Service-Specific and Advanced Filtering' examples. This is where journalctl truly shines.
Key journalctl Filtering Techniques
Since you have CLI experience, you'll appreciate how journalctl flags can replace complex grep and awk pipelines. Here are the most useful filters for security analysis:
-
Filter by Service (Unit): In our last lesson, we allowed the
sshservice through the firewall. We can view all logs related only to that service.sudo journalctl -u sshd -
Filter by Time: Investigate events within a specific timeframe.
# See all logs from the last hour sudo journalctl --since "1 hour ago" # See logs between two specific times sudo journalctl --since "2023-10-26 09:00:00" --until "2023-10-26 10:00:00" -
Filter by Priority: Focus on messages of a certain severity. Priorities range from
0(emerg) to7(debug). For security, you're often interested inerr(3),warning(4), andnotice(5).# Show all logs with a priority of 'error' or higher sudo journalctl -p err -
Follow the Journal in Real-Time: Similar to
tail -f.sudo journalctl -f
You can combine these flags to create highly specific queries.
Test your understanding!
You suspect someone was trying to break into your SSH server yesterday afternoon. How would you use a single journalctl command to view all messages of "notice" priority or higher for the sshd service from yesterday?
Show answer
You would combine the unit, priority, and time flags:sudo journalctl -u sshd -p notice --since "yesterday 12:00:00" --until "today 00:00:00"
(Note: You can also use --since yesterday --until today for a similar effect).
4. A Glimpse at Advanced Auditing with auditd
For high-security environments, even standard logs may not be enough. The Linux Audit Daemon (auditd) provides a much more granular level of logging. It hooks directly into the kernel to record every system call (syscall) that occurs. This creates a detailed, non-repudiable audit trail perfect for forensics and compliance.
The "Crash Course" video gives a quick but effective demonstration.
Crash Course: Linux Log Analysis | Beginner Guide for SOC Analyst | Security Investigation
The video "Crash Course: Linux Log Analysis" introduces the powerful auditd system.
Watch the segment from 00:32:37 to 00:36:56. The key concepts to grasp are: auditd's purpose: to track security policy violations. How to add a rule with auditctl to watch a specific command or file. How to search the audit logs with ausearch.
For example, to monitor for any changes to the /etc/passwd file, you could add a rule like this:sudo auditctl -w /etc/passwd -p wa -k user_modification
Then, you could search for any event that triggered this rule using the key (-k):sudo ausearch -k user_modification
While deep configuration of auditd is an advanced topic, knowing that it exists and understanding its purpose is important for the Linux+ exam.
Conclusion
You've now learned how to read the stories your Linux system tells about itself. By analyzing logs, you can move from a passive defensive posture to an active monitoring one, spotting trouble as it happens.
Key Takeaways:
- Linux uses two main logging systems: traditional text files in
/var/log(read withless,grep,tail) and thesystemdjournal (queried withjournalctl). - The most critical security logs include
auth.log/securefor authentication attempts andbtmp(read withlastb) for failed logins. journalctlis a powerful tool that allows you to filter logs by service (-u), time (--since), priority (-p), and more.- Command-line pipelines (e.g., using
grep,awk,sort,uniq) can transform raw log data into actionable security intelligence. auditdprovides an even deeper level of security monitoring by tracking kernel-level system calls.
Preview of the Next Lesson:
We've secured our server's network entry points with firewalld and learned how to monitor the logs for suspicious activity. Now, let's adopt the mindset of an attacker. In the next lesson, we will use nmap to perform network discovery and basic port scanning. This will allow us to probe our own system from the outside to verify that our firewall rules are working as expected and to see what an external party can discover about our server.