Hello! Welcome to your next lesson on system security and hardening.
In our previous lesson, we explored how Mandatory Access Control (MAC) systems like SELinux and AppArmor confine applications to prevent them from causing widespread damage. We learned how to check their status and interpret denial logs, turning them from a source of frustration into a powerful security tool.
Today, we're going to add another critical layer to our system's defenses. We will focus on the storage itself and learn how to harden filesystems by setting appropriate mount options in the /etc/fstab file. This is a fundamental skill for any Linux administrator, as it allows you to enforce security policies directly at the filesystem level, mitigating risks such as privilege escalation and the execution of malicious code from mounted drives.
1. Understanding the /etc/fstab File
Before we can harden filesystems, we first need to understand the tool we'll be using: the /etc/fstab file. Its name stands for "file systems table," and it's a configuration file that tells your Linux system which storage devices to mount automatically at boot, where to mount them, and how.
An introduction to the Linux /etc/fstab file
For a quick, high-level overview of what /etc/fstab does, let's start with this introductory article from Red Hat.
Read the sections 'What is it?' and 'Table structure'. This will give you a solid conceptual understanding of the file's purpose and its six-column format.
As the article explains, every line in /etc/fstab represents a filesystem and is organized into six specific fields:
- Device: Identifies the storage device.
- Mount Point: The directory in the filesystem where the device will be accessible.
- Type: The filesystem format (e.g.,
ext4,xfs,swap). - Options: This is where the magic happens for hardening. It's a comma-separated list of rules for the mount.
- Dump: An outdated flag for a backup utility called
dump. This is almost always set to0. - Pass: Controls the order of filesystem checks (
fsck) at boot.0means no check,1is for the root filesystem, and2is for others.
A Critical Best Practice: Using UUIDs
How you identify the device in the first field is extremely important. While you can use device names like /dev/sdb1, this is not recommended. These names can change if you add or remove other drives, causing your fstab entry to fail and potentially preventing your system from booting.
The reliable and standard method is to use the Universally Unique Identifier (UUID), a permanent and unique "name" assigned to the filesystem itself.
Linux Crash Course - The /etc/fstab file
The video "Linux Crash Course - The /etc/fstab file" from Learn Linux TV has an excellent segment that explains why UUIDs are essential and how to find them.
Watch from 18:28 to 24:27. Pay close attention to the explanation of why device names like sdb1 are not static and how the blkid command is used to find the stable UUID for your device.
To find a device's UUID, you'll use the command sudo blkid. You can then use this UUID in your /etc/fstab file like this: UUID=a1b2c3d4-e5f6-....
2. Hardening Filesystems with Mount Options
The fourth field, options, is where we apply our security policies. The default option, defaults, is a shorthand for a set of standard options, including rw (read-write), suid, dev, and exec. For hardening, we will often want to override these defaults with more restrictive settings.
Using fstab for Automatic Disk Mounting: Complete Configuration ...
This comprehensive guide on fstab has a dedicated section on security options. It's the perfect reference for the options we'll be discussing.
Read the section 'Common Mount Options', paying special attention to the subsection 'Security Options'. This lists and explains the key options for hardening a filesystem.
Let's break down the most important security options and why they matter:
nosuid: Disables the effect ofsetuidandsetgidbits on executable files. Asetuidbinary runs with the permissions of the file owner (oftenroot), not the user who executed it. This is a common vector for privilege escalation attacks. If an attacker can place a malicioussetuidbinary on a partition (like a user's home directory) and trick someone into running it, they could gainrootaccess. Thenosuidoption completely prevents this on the mounted filesystem.nodev: Prevents the interpretation of character or block special devices. In Linux, devices (like your hard drive,/dev/sda) are represented as files. This option prevents a user from creating a device file on the mounted partition that could be used to access hardware directly, bypassing other security controls.noexec: Prohibits the execution of any binaries from the filesystem. This is an incredibly effective hardening technique. If a partition is meant only for data storage (e.g., user home directories, web server assets, backups), there is no legitimate reason to run programs from it. Usingnoexecon/home, for instance, prevents users from downloading and running potentially malicious scripts or programs from their own home directory.ro: Mounts the filesystem as read-only. This is the ultimate lockdown for data that should not change. It's perfect for partitions containing backups, archives, or critical system data that is only modified during updates.
By combining these, you can create a very secure mount. For example, a partition for user data that does not need to contain executable programs could be mounted with:
defaults,nosuid,nodev,noexec
3. The Safe Workflow for Editing /etc/fstab
Warning: An incorrect entry in /etc/fstab can prevent your system from booting. You must be very careful and always test your changes before rebooting.
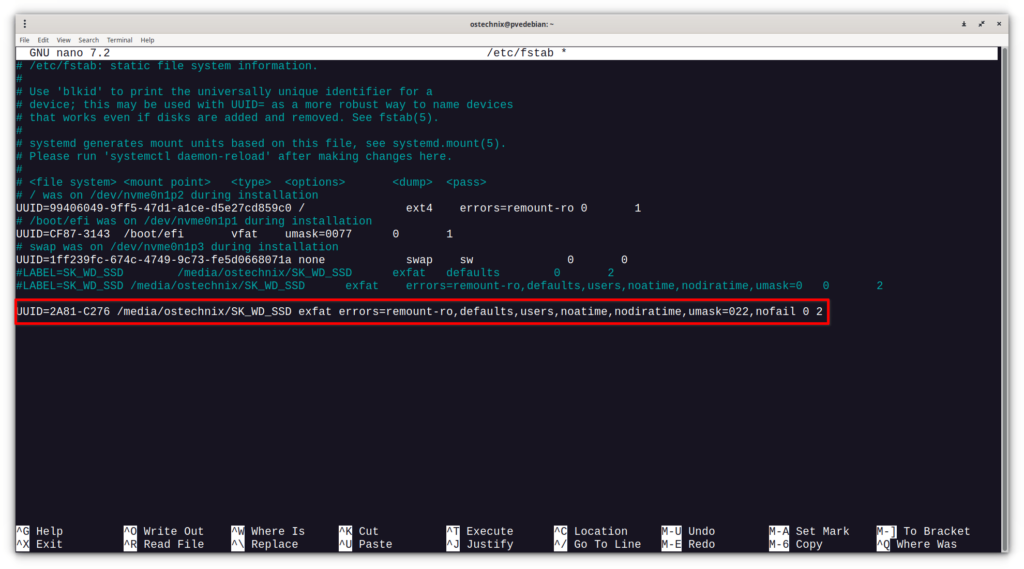
Here is the safe, step-by-step process for adding or modifying an entry:
- Back up the file: Before you open
fstab, make a copy.sudo cp /etc/fstab /etc/fstab.bak - Get device information: Find the UUID of the partition you want to mount.
sudo blkid /dev/sdXN # Replace with your device, e.g., /dev/sdb1 - Create the mount point: If it doesn't already exist, create the directory where you'll mount the filesystem.
sudo mkdir /data - Edit
/etc/fstab: Add the new line with your chosen options. Usesudo nano /etc/fstabor your preferred editor. For a separate data partition, a hardened entry might look like this:# Data partition for user files UUID=YOUR-COPIED-UUID-HERE /data ext4 defaults,nosuid,nodev,noexec 0 2 - Test without rebooting: This is the most important step. The command
mount -awill attempt to mount everything listed in/etc/fstabthat isn't already mounted. If there's a syntax error in your new line, this command will fail and report it immediately.
If you get an error, fix yoursudo mount -a/etc/fstabfile and try again. If it runs without error, your syntax is correct. - Verify the mount: Check that the filesystem is mounted correctly and with the right options.
The output should show your device mounted onmount | grep /data/dataand include the options you specified (nosuid,nodev,noexec).
By following this process, you can safely edit /etc/fstab and avoid boot-time surprises.
Test your understanding!
You are tasked with automatically mounting a new partition at /srv/backups. This partition will only be used to store backup archives and should be as secure as possible. It has an ext4 filesystem. Which of the following /etc/fstab entries is the most appropriate and secure for this purpose?
A. UUID=... /srv/backups ext4 defaults 0 2
B. /dev/sdc1 /srv/backups ext4 defaults,noexec 0 2
C. UUID=... /srv/backups ext4 defaults,ro,nosuid,nodev,noexec 0 2
D. UUID=... /srv/backups ext4 defaults,rw,exec 0 2
Show answer
The correct answer is C. Here's why:
- It uses the UUID, which is the most reliable method.
- It includes
ro(read-only), which is perfect for a backup partition that should not be modified by normal system processes. - It includes the full set of
nosuid,nodev, andnoexec, providing the strongest security posture by preventing privilege escalation, device file interpretation, and program execution.
Option A uses defaults, which is not hardened. Option B uses an unreliable device name (/dev/sdc1). Option D explicitly allows read-write (rw) and execution (exec), which is insecure for a backup partition.
Conclusion
You have now learned how to apply security policies at the filesystem level, a fundamental aspect of system hardening. By carefully choosing mount options in /etc/fstab, you can significantly reduce your system's attack surface.
Key Takeaways:
- The
/etc/fstabfile defines how storage devices are mounted at boot. - Always use stable UUIDs instead of device names like
/dev/sda1. - The
optionsfield is used to control mount behavior and enforce security. - Key hardening options are
nosuid,nodev,noexec, andro(read-only). - Always follow a safe workflow: backup
fstab, edit, and test withsudo mount -abefore rebooting.
Preview of the Next Lesson:
We've hardened our system at the network, application, and filesystem layers. In our final lesson for this module, we will go even deeper to the heart of the operating system. We will learn how to configure kernel runtime parameters for security using sysctl, allowing you to tune the behavior of the Linux kernel itself to resist certain types of network attacks and improve overall system stability.