Hello! Welcome to your fifth lesson. In the "Linux Fundamentals and System Startup" module, we've covered the entire theoretical boot process, from the moment you power on your machine, through the BIOS/UEFI and GRUB, to the final handover to the systemd init system which brings your system to life.
Now it's time to shift from theory to practice. To install, use, and safely experiment with Linux for your CompTIA Linux+ preparation, you need a lab environment. This lesson is dedicated to creating that lab by guiding you through setting up a virtual machine (VM).
This lesson directly addresses the learning outcome: Set up a virtual machine environment for Linux installation. We will cover what virtualization is, why it's essential for learning, and the step-by-step process of installing the necessary software and creating your first virtual machine.
1. What is Virtualization?
Before we start installing things, let's build a solid understanding of what we're actually doing. At its core, virtualization allows you to run a complete, separate "guest" operating system (like Linux) inside your main "host" operating system (like Windows or macOS). It's essentially a computer inside your computer.
This is made possible by a piece of software called a hypervisor, which creates and manages these virtual machines.
you need to learn Virtual Machines RIGHT NOW!! (Kali Linux VM, Ubuntu, Windows)
To get a quick and energetic overview of this concept, watch this introductory clip from the video 'you need to learn Virtual Machines RIGHT NOW!!' by NetworkChuck.
Watch from 00:45 to 02:22. The video explains the core concept of a VM as a 'computer inside a computer' and how a hypervisor borrows resources from your physical machine.
This virtual environment is the perfect sandbox for learning. The key benefits for us are:
- Safety: You can experiment, make mistakes, and even break the Linux system inside the VM without any risk to your main computer.
- Flexibility: You can easily delete a VM and start over, or even have multiple VMs with different Linux distributions.
- Cost-Effective: It allows you to run Linux without needing to buy a separate physical computer.
For a more structured definition of the key terms, the following article provides a clear analogy.
What Is Virtualization Technology Explained
The article 'What Is Virtualization Technology Explained' from MindMesh Academy reinforces these concepts with helpful definitions and an apartment building analogy.
Read the first two sections, 'What Is Virtualization Technology Explained' and 'Demystifying Virtualization Technology: The Core Concept'. Focus on the table that defines Host Machine, Hypervisor, VM, and Guest OS.
2. Hypervisor Types: Bare-Metal vs. Hosted
Hypervisors come in two main "flavors." Understanding the difference is important for your general IT knowledge and for the Linux+ exam.
- Type 1 (Bare-Metal): This hypervisor is installed directly on the physical hardware, acting as a lightweight operating system itself. It's highly efficient and used in enterprise data centers and cloud environments (like AWS and Azure).
- Type 2 (Hosted): This hypervisor runs as an application on top of your existing operating system (e.g., Windows or macOS). It's easier to set up and perfect for desktop use, development, and learning.
For this course, we will be using a Type 2 hypervisor.
This diagram visually contrasts the two architectures:

To deepen your understanding, let's review a resource that breaks down these differences in detail.
What Is Virtualization Technology Explained
We'll return to the MindMesh Academy article, which provides an excellent breakdown of Type 1 and Type 2 hypervisors, including their use cases and examples.
Read the section titled 'The Two Flavors of Hypervisors: Type 1 vs. Type 2'. Pay close attention to the summary table comparing the two types.
Test your understanding!
You want to set up a small test lab on your personal Windows 11 laptop to practice Linux commands for the CompTIA Linux+ exam. Which type of hypervisor is the most appropriate choice for this task and why?
- Type 1, because it offers the best performance.
- Type 2, because it can be installed as a simple application on your existing Windows OS.
- Type 1, because it provides the strongest security and isolation.
- Type 2, because it is the standard for large-scale enterprise data centers.
Show answer
The correct answer is 2. Type 2, because it can be installed as a simple application on your existing Windows OS.
A Type 2 (hosted) hypervisor is ideal for this scenario. It's designed for ease of use on a personal computer, allowing you to run a VM alongside your regular applications. While Type 1 hypervisors offer better performance and are used in data centers, they would require you to wipe your existing Windows installation, which is not practical for a personal lab.
3. Step 1: Prepare Your Computer
Before we install anything, we need to perform two crucial checks on your host machine.
A. Enable Hardware Virtualization Support
Modern CPUs have built-in features (Intel VT-x or AMD-V) that significantly speed up virtualization. Most hypervisors require this to be enabled. While it's often on by default, it's essential to check.
The following video shows how to check this setting in Windows Task Manager.
How to use VirtualBox - Tutorial for Beginners
This clip from Kevin Stratvert's 'How to use VirtualBox' tutorial demonstrates the quickest way to see if virtualization is enabled on your Windows PC.
Watch from 00:46 to 01:06 to see how to check for virtualization support in the Task Manager.
If it is disabled, you must enable it in your computer's UEFI/BIOS. This can seem intimidating, but it's a straightforward process. The main challenge is that the menu looks different for every computer manufacturer.
The following Microsoft support article provides the standard steps to access the UEFI/BIOS from Windows and includes links to specific instructions for major manufacturers.
Enable Virtualization on Windows
This official Microsoft support page is the best guide for accessing your computer's UEFI/BIOS settings.
Read the steps under the heading 'Here's how to get to the UEFI from Windows'. If you find virtualization is disabled, use the table under 'Instructions based on your PC manufacturer' to find a guide specific to your computer.
Important: When in the UEFI/BIOS, only change the virtualization setting (often labeled Intel VT-x, AMD-V, SVM Mode, or Virtualization Technology). Do not change any other settings.
B. Download the Linux Operating System
Your virtual machine needs an operating system to run. These are distributed as .iso files, which are digital images of an installation disc. For this course, we will use Ubuntu Desktop 22.04 LTS. "LTS" stands for Long-Term Support, which means it's a very stable and reliable version.
Please start downloading the file now, as it can be large.
How to use VirtualBox - Tutorial for Beginners
The following clip demonstrates where to get the Ubuntu ISO file. This is what we will install in our next lesson.
Watch from 03:08 to 04:18. This shows you how to navigate the Ubuntu website and download the correct ISO file. You can find the download page by searching for 'Download Ubuntu Desktop'.
4. Step 2: Install VirtualBox and Create a VM
With your host machine prepared and the Ubuntu ISO downloading, it's time to install our Type 2 hypervisor: Oracle VM VirtualBox. It's free, open-source, and available for Windows, macOS, and Linux.
The process involves two installations: the main VirtualBox application and an "Extension Pack" that adds features like USB device support.
This video provides a complete, step-by-step walkthrough.
you need to learn Virtual Machines RIGHT NOW!! (Kali Linux VM, Ubuntu, Windows)
The video 'you need to learn Virtual Machines RIGHT NOW!!' provides a clear demonstration of installing VirtualBox and creating a new VM. We will follow its steps to create the 'shell' for our Linux system.
Follow the video from 10:24 to 14:23. This covers: Downloading and installing VirtualBox. Downloading and installing the Extension Pack. Creating a new VM, including naming it, allocating memory (RAM), and creating a virtual hard disk. Pause the video as needed to follow along on your own computer. You can stop when he clicks 'Create' at the end of the hard disk setup (around 14:23). We will configure the remaining settings and install the OS in the next lesson.
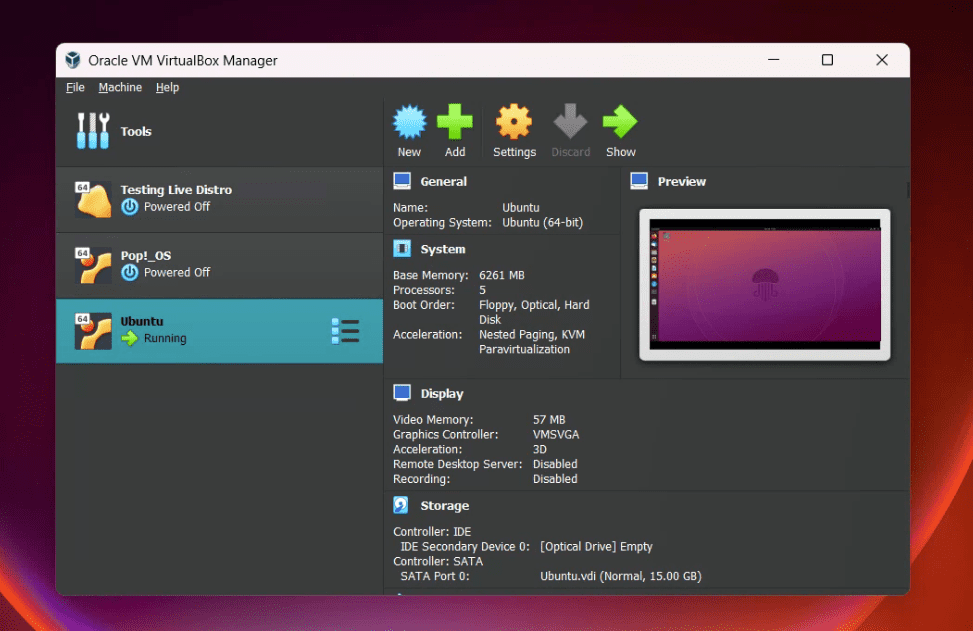
After installation, your VirtualBox Manager should look something like this, with your newly created (but empty) VM listed on the left.
Conclusion
Congratulations! You have now set up a virtual lab environment, a critical first step for any hands-on Linux practice. This isolated sandbox gives you the freedom to explore, learn, and prepare for the CompTIA Linux+ exam without any risk.
Key Takeaways:
- Virtualization creates a software-based "guest" computer that runs inside your physical "host" computer.
- The software that enables this is a hypervisor. We are using VirtualBox, a Type 2 (hosted) hypervisor that runs as an application on our main OS.
- Before installing, it's crucial to enable hardware virtualization support (VT-x/AMD-V) in your computer's BIOS/UEFI.
- Creating a VM involves installing VirtualBox and using its manager to define the virtual hardware (RAM, CPU, storage) for your guest system.
In our next lesson, we will take the empty VM shell you just created, "insert" the Ubuntu ISO file we downloaded, and walk through the process of installing the Linux operating system.