Hello! Welcome to your third lesson in the "Linux Fundamentals and System Startup" module.
In our last lesson, we explored the vast landscape of Linux distributions, understanding that each "distro" is a unique combination of the Linux kernel and a collection of user-space software. Now that we know what a distribution is, it's time to learn how the computer brings one to life from a cold start.
This lesson will address the learning outcome: Describe the boot sequence from power-on to kernel loading (BIOS/UEFI, GRUB). We will trace the journey from the moment you press the power button, through the initial hardware checks, to the point where the Linux kernel itself is loaded into memory and ready to take control. Understanding this sequence is fundamental for troubleshooting startup problems, a key skill for any Linux system administrator.
Let's break down this process into its key stages.
1. The First Spark: Firmware (BIOS and UEFI)
When you power on a computer, before any operating system even begins to load, a special piece of software stored on a chip on the motherboard kicks in. This is called firmware. Its job is to perform initial hardware checks and then find and start the operating system's bootloader.
There are two main types of firmware you'll encounter:
- BIOS (Basic Input/Output System): The older, traditional firmware that has been used for decades.
- UEFI (Unified Extensible Firmware Interface): The modern replacement for BIOS, offering more features, better security, and support for larger hard drives.
Regardless of the type, the first thing the firmware does is run a POST (Power-On Self-Test) to make sure critical hardware like the CPU, memory (RAM), and storage devices are working correctly.
To understand the roles of BIOS and UEFI and their key differences, let's watch a segment from a video designed specifically for the Linux+ exam.
The Linux Boot Process (Linux+ Objective 1.1.2)
This clip from Shawn Powers' video 'The Linux Boot Process' clearly explains the functions of BIOS and UEFI, their differences, and how they initiate the boot process.
Please watch from 00:39 to 04:02. Pay close attention to how each firmware type stores its configuration and finds the bootable device.
As the video explained, a critical difference between BIOS and UEFI is how they locate the next stage of the boot process on a hard drive:
- BIOS systems typically use a disk partitioned with a Master Boot Record (MBR). The BIOS looks for executable code in the first 512 bytes of the disk (the MBR) and runs it.
- UEFI systems use a more modern partitioning scheme called GUID Partition Table (GPT). The UEFI firmware looks for a special EFI System Partition (ESP) which contains bootloader files (as
.efifiles).
This diagram provides a simple visual comparison of the two boot paths.

2. The Hand-off: The Bootloader (GRUB)
Once the firmware (BIOS or UEFI) has done its job, it hands over control to a bootloader. The bootloader is a small but powerful program whose main responsibility is to load the operating system's kernel into memory.
For the vast majority of modern Linux distributions, the bootloader is GRUB 2 (GRand Unified Bootloader, version 2).
The key functions of GRUB are:
- Providing a menu: If you have multiple operating systems (e.g., Linux and Windows) or multiple Linux kernels installed, GRUB displays a menu allowing you to choose which one to boot.
- Loading the kernel: Once a selection is made (or after a timeout), GRUB locates the chosen Linux kernel file on the disk.
- Loading the initial RAM disk: Along with the kernel, GRUB also loads a crucial file called the initial RAM disk. We'll cover this in the next step.
- Executing the kernel: Finally, GRUB places these files into memory (RAM) and passes control to the kernel, effectively starting Linux.
To get a more detailed look at the role of GRUB 2, let's return to the video from Shawn Powers.
The Linux Boot Process (Linux+ Objective 1.1.2)
This next segment explains the concept of boot sources and firmly establishes GRUB 2 as the standard bootloader for Linux.
Watch from 04:02 to 08:07. Focus on how GRUB acts as a 'software-based' boot source and its role as the successor to the older GRUB Legacy.
While GRUB's function is the same on both BIOS and UEFI systems, its technical implementation differs. For a practical look at how GRUB is stored on MBR vs. GPT disks, the following resource is very helpful.
In this segment from the video 'How Linux Boots', Joe Collins demonstrates where the bootloader components reside on both a BIOS/MBR system and a UEFI/GPT system, using the lsblk command.
Watch from 15:19 to 21:07. You don't need to memorize the commands yet, but focus on the conceptual difference: the tiny MBR space in BIOS vs. the dedicated /boot/efi partition in UEFI.
3. The Core Awakens: Kernel and initramfs
At this point, GRUB has loaded the Linux kernel into memory and handed over control. The kernel is now running! The kernel file is typically named something like vmlinuz-version. The 'z' at the end indicates that it is compressed to save space, so its first action is to decompress itself.
Now, the kernel faces a classic chicken-and-egg problem: to finish booting, it needs to access files on the main hard drive (the "root filesystem"). To do that, it needs the correct drivers for the storage hardware (e.g., SATA, NVMe, etc.). But those drivers are files located on the very drive it can't yet read!
The solution is the initial RAM filesystem (initramfs).
The initramfs is a small, temporary root filesystem that GRUB loads into memory alongside the kernel. It contains just the essential kernel modules (drivers) needed to access the actual storage devices.
The process is as follows:
- GRUB loads the kernel (
vmlinuz) and theinitramfsfile into RAM. - The kernel starts and uses the
initramfsas its temporary root filesystem. - Using the drivers from
initramfs, the kernel can now "see" and mount the real root filesystem from your hard disk. - Once the real filesystem is available, the kernel switches over to it and discards the temporary
initramfs. The boot process can now continue by loading all other system services.
This final video segment provides a clear, exam-focused explanation of this critical step.
The Linux Boot Process (Linux+ Objective 1.1.2)
This last clip from 'The Linux Boot Process' walks through the loading of the kernel (vmlinuz) and explains the essential role of the initial RAM disk in the boot process.
Watch from 08:07 to 11:30. Focus on understanding why the initrd or initramfs is necessary to bridge the gap between the generic kernel and your specific hardware.
Test your understanding!
Arrange the following four events in the correct order they occur during the Linux boot process.
- GRUB loads the
vmlinuzandinitramfsfiles into memory. - The kernel uses drivers from the
initramfsto mount the main root filesystem. - The firmware runs the Power-On Self-Test (POST).
- The BIOS/UEFI locates and executes the GRUB bootloader.
Show answer
The correct order is:
- 3. The firmware runs the Power-On Self-Test (POST). (This is the very first step after powering on).
- 4. The BIOS/UEFI locates and executes the GRUB bootloader. (After POST, the firmware finds the next stage).
- 1. GRUB loads the
vmlinuzandinitramfsfiles into memory. (This is GRUB's primary job). - 2. The kernel uses drivers from the
initramfsto mount the main root filesystem. (This is the purpose ofinitramfs).
Summary and Visual Guide
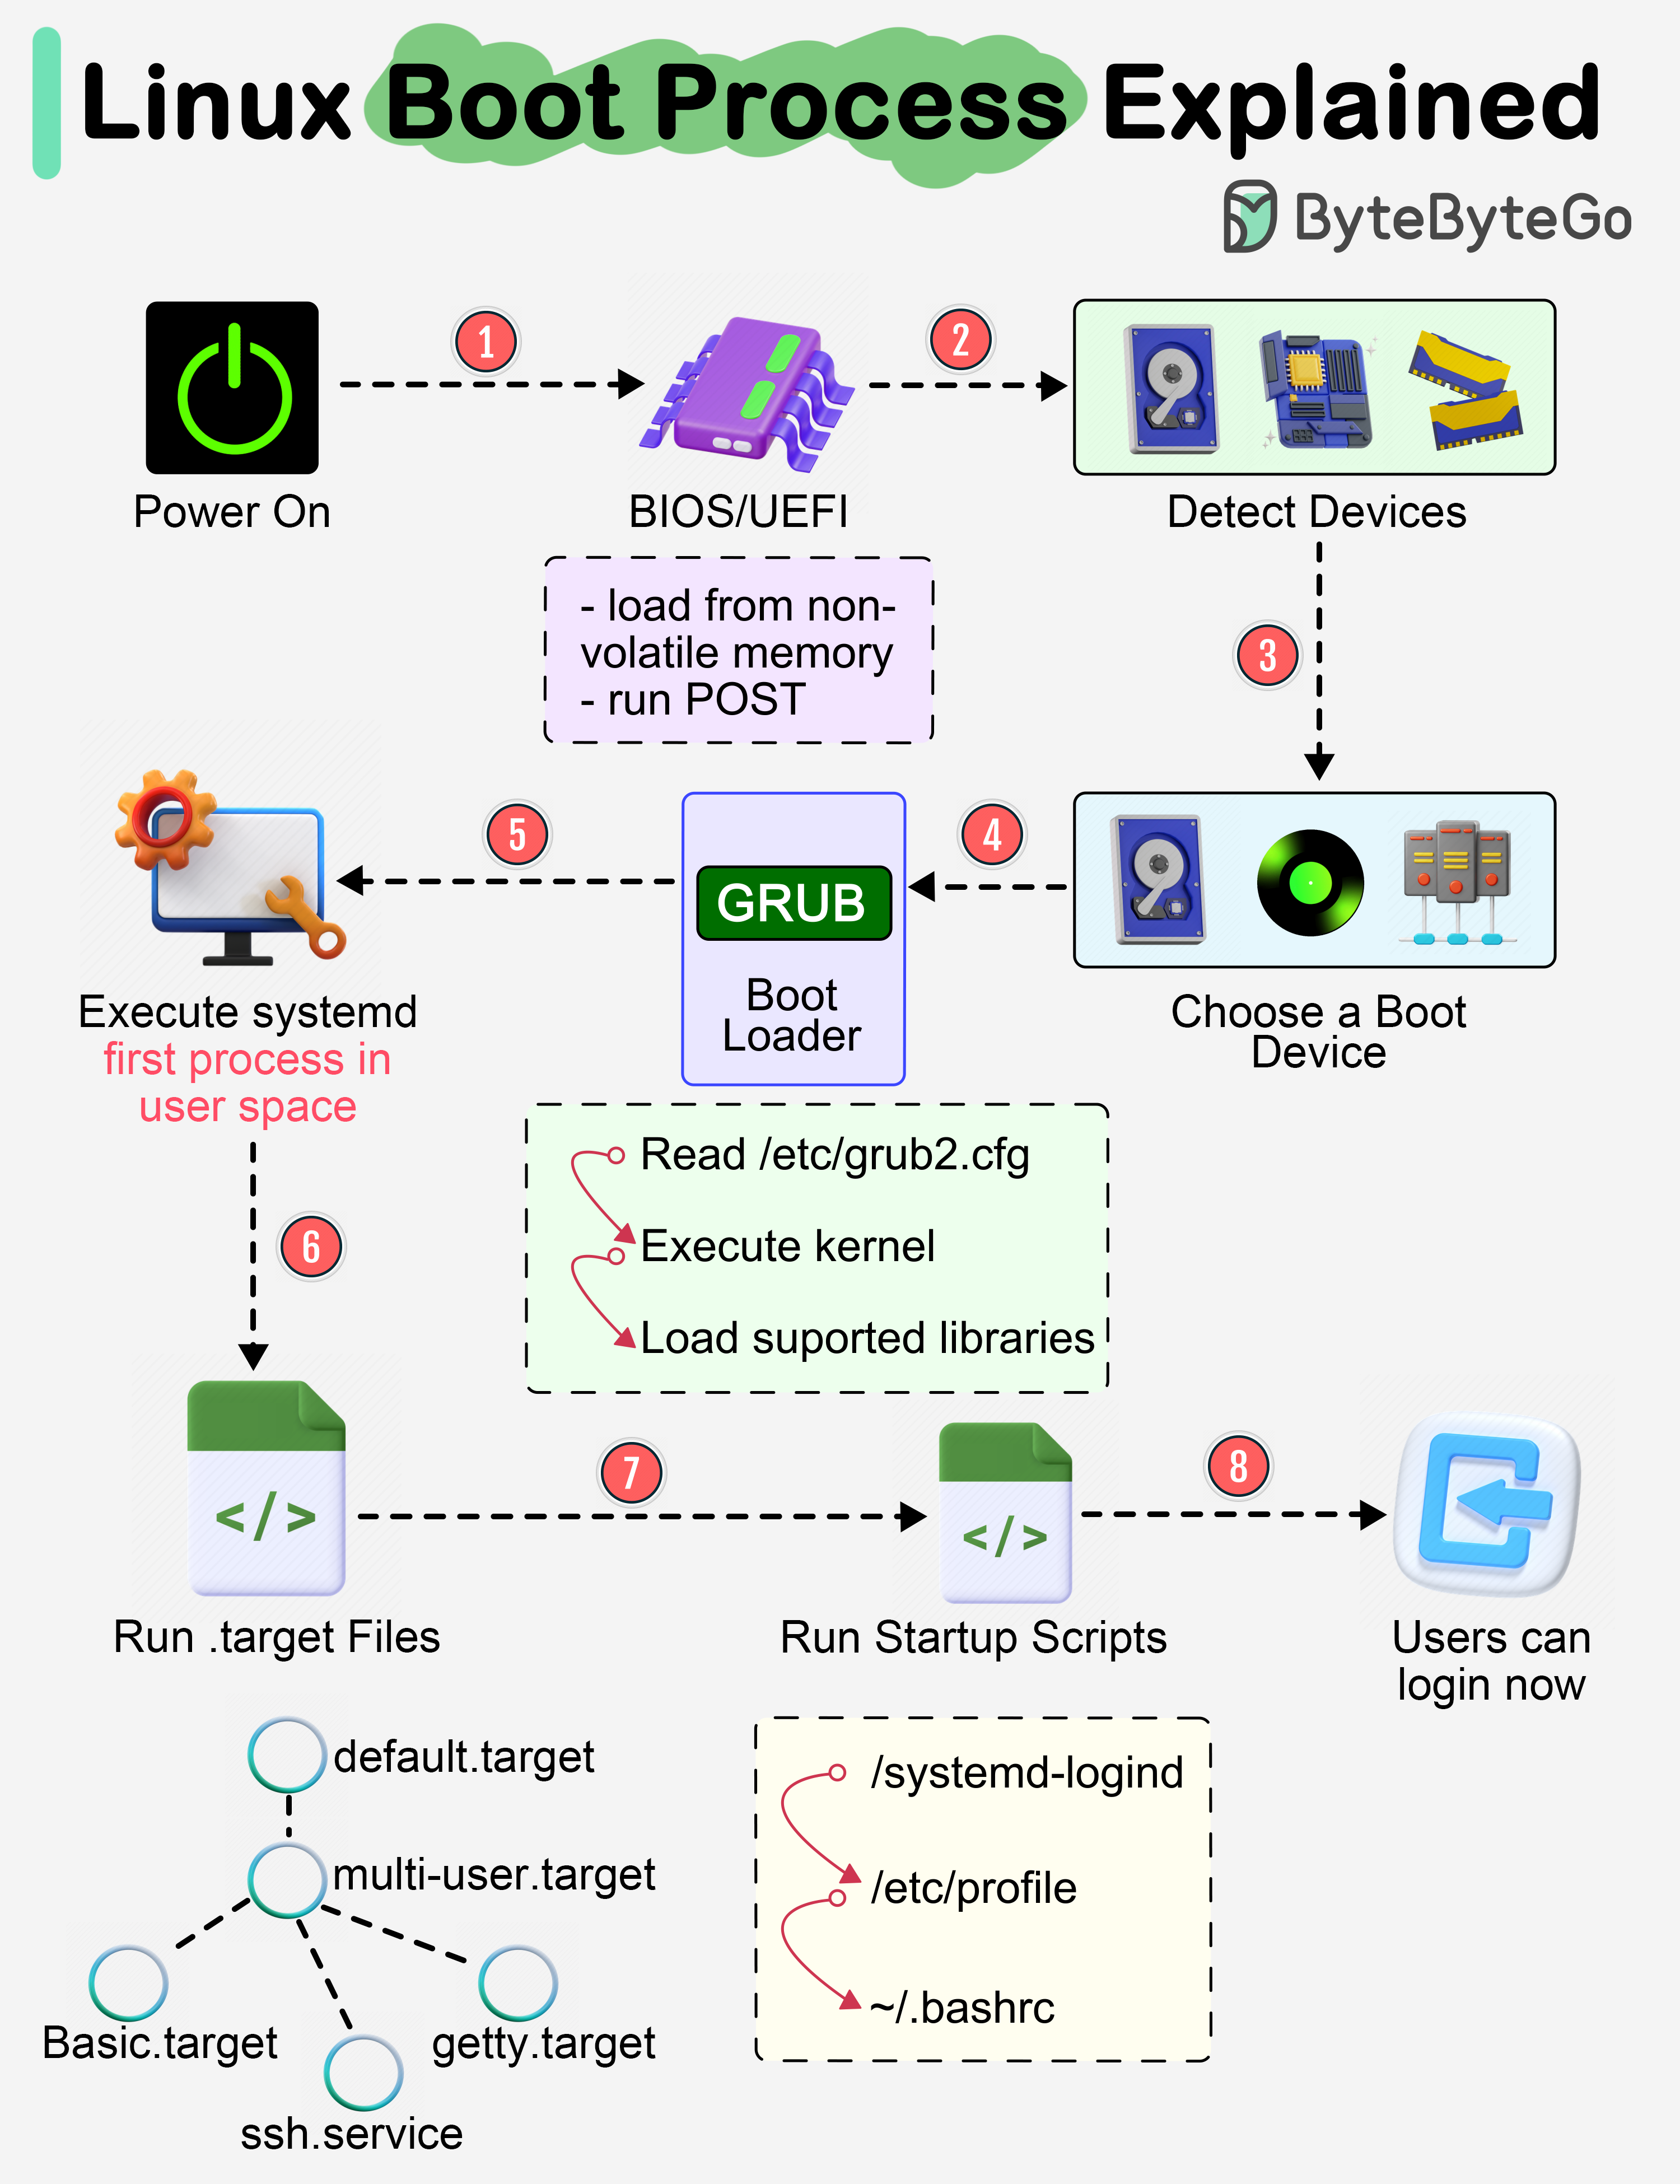
We have covered the entire sequence from power-on to the point where the kernel is in charge. This flowchart provides an excellent visual summary of the steps we've discussed.
Conclusion
In this lesson, we have traced the critical initial moments of a Linux system's startup. Understanding this chain of events is not just theoretical; it's the foundation for diagnosing why a system might fail to boot.
Key Takeaways:
- The boot process begins with the system's firmware (either BIOS or UEFI), which performs a POST.
- The firmware's job is to locate and execute the bootloader, which is GRUB 2 on most Linux systems.
- GRUB presents a menu and then loads the Linux kernel (e.g.,
vmlinuz) and a temporary filesystem calledinitramfsinto RAM. - The
initramfscontains the necessary drivers for the kernel to mount the real root filesystem, after which the boot process can continue.
So, the kernel is loaded and has access to all the system's files. What happens next? The kernel's very first task is to start a single, special process with Process ID 1. This process is responsible for starting all the other services and programs that make up a running system. In our next lesson, we will explore this crucial next step: explaining the role of the init system (systemd) in initializing the system.