Hello! Welcome back to your course on preparing for the CompTIA Linux+ exam.
In our previous lesson, you learned how to manage individual user accounts with the useradd, usermod, and userdel commands. We concluded by noting that managing permissions on a user-by-user basis is impractical in any real-world scenario. This lesson provides the solution: groups.
Today, your learning outcome is to create, modify, and delete groups and manage group membership. We will build on your knowledge of user management to see how groups provide a scalable and efficient way to control access to files and resources. Following your preference, we will first explore the concept and purpose of groups before diving into the practical commands.
1. The Purpose and Types of Groups
In Linux, a group is simply a collection of user accounts. Instead of assigning permissions to individual users, you can assign them to a group. Any user who is a member of that group automatically inherits those permissions. This is the cornerstone of scalable access control on a Linux system.
Create delete and modify local groups ...
To start, let's explore the fundamental reason for using groups. This resource from KodeKloud provides a clear, practical explanation.
Please read the short section titled "Why Use Groups?". It gives a perfect example of managing a shared project directory for a development team.
Every user in Linux has two types of group memberships:
- Primary Group: Each user must belong to exactly one primary group. When a user creates a new file, that file is, by default, owned by the user's primary group. On most modern Linux distributions, when you create a new user (e.g.,
useradd bfranklin), a User Private Group (UPG) with the same name (bfranklin) is also created and set as the user's primary group. - Secondary (or Supplementary) Groups: A user can belong to zero or many secondary groups. These are used to grant access to shared resources. For example, the user
bfranklinmight be in the secondary groupsinventors,diplomats, andprintersto access different project files and hardware.
2. The Group Lifecycle: groupadd, groupmod, and groupdel
Just like user accounts, groups have a lifecycle managed by a dedicated set of command-line tools. As these are administrative tasks, they must be run with sudo.
Creating a New Group: groupadd
The groupadd command is used to create a new group. The system will assign it a unique Group ID (GID) and add an entry to the /etc/group file.
Syntax: sudo groupadd <groupname>
For example, to create a group for a new project:sudo groupadd myproject
Chapter 4. Managing Users and Groups
The Red Hat System Administrator's Guide provides the formal syntax for the groupadd command. While we will use the basic form, it's good to be aware that options exist.
Review the section "Adding a New Group" to see the command syntax. You don't need to memorize the options in the table, but note that they exist for specialized cases (like setting a specific GID with -g).
Modifying a Group: groupmod
The groupmod command allows you to modify a group's properties. The most common use is to rename a group.
Syntax: sudo groupmod -n <new_name> <old_name>
For example, if the myproject group is renamed to project_alpha:sudo groupmod -n project_alpha myproject
Deleting a Group: groupdel
The groupdel command removes a group from the system.
Syntax: sudo groupdel <groupname>
Important: You cannot delete a group if it is the primary group for any user. This is a safety feature to prevent users from being left in an invalid state. You must first change the user's primary group to something else before deleting the original group.
Create delete and modify local groups ...
This KodeKloud resource concisely covers renaming and deleting groups, including the crucial warning about primary groups.
Read the section "Renaming and Deleting Groups." Pay close attention to the groupdel warning and the required steps to resolve it.
3. Managing Group Membership
Creating groups is only the first step. The real power comes from managing which users are members.
Adding Users to Secondary Groups
There are two common commands for adding a user to a group: usermod and gpasswd.
-
Using
usermod: In the previous lesson, you usedusermodto modify user properties. You can also use it to manage group membership with the-aGoptions.-Gspecifies the group(s), and the crucial-aflag stands for append, which adds the user to the new group without removing them from their existing groups.- Syntax:
sudo usermod -aG <groupname> <username>
- Syntax:
-
Using
gpasswd: This command is dedicated to group administration. The-aoption stands for add.- Syntax:
sudo gpasswd -a <username> <groupname>
- Syntax:
Both commands achieve the same result. The usermod approach is useful if you are already modifying other user properties at the same time, while gpasswd is more direct if you are only focused on group management.
The image below shows both usermod to add a user and gpasswd to remove a user.
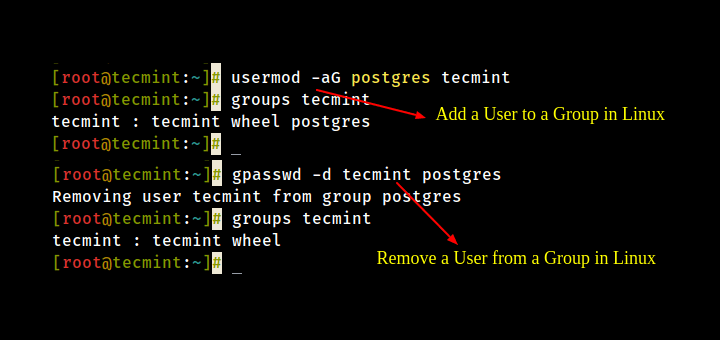
Removing a User from a Group
The most straightforward way to remove a user from a secondary group is with gpasswd and the -d (delete) flag.
Syntax: sudo gpasswd -d <username> <groupname>
Changing a User's Primary Group
To change a user's primary group, you use the usermod command with the lowercase -g option.
Syntax: sudo usermod -g <new_primary_group> <username>
For example, to change user bfranklin's primary group to inventors:sudo usermod -g inventors bfranklin
Verifying Group Membership
How do you check if your commands worked? Use the groups or id command.
groups <username>: Lists all groups a user belongs to.id <username>: Shows the user's UID, primary GID, and all supplementary GIDs.
The image below shows a complete workflow: creating a group, adding several users, and verifying the result.

Test your understanding!
You have a user marie and a group scientists. You need to perform the following actions:
- Add
marieto thescientistsgroup as a secondary membership. - After confirming her membership, you need to change her primary group to
scientists.
What two commands would you run, and how would you verify the changes?
Show answer
-
Add
marieto thescientistsgroup (secondary):sudo usermod -aG scientists marie
(orsudo gpasswd -a marie scientists) -
Verify the secondary membership:
groups marie
(The output should now includescientists) -
Change
marie's primary group:sudo usermod -g scientists marie -
Verify the primary group change:
id marie
(The output will now showgid=scientists)
Conclusion
You have now learned how to manage groups, the essential mechanism for handling permissions for multiple users in Linux. This is a fundamental skill for the CompTIA Linux+ exam and for day-to-day system administration.
Key Takeaways:
- Purpose: Groups simplify permission management by bundling users together.
- Types: Users have one primary group (for file creation defaults) and can have many secondary groups (for shared access).
- Group Lifecycle:
groupadd <group>creates a new group.groupmod -n <new> <old>renames a group.groupdel <group>deletes a group (but fails if it's a primary group for any user).
- Membership Management:
usermod -aG <group> <user>orgpasswd -a <user> <group>adds a user to a secondary group.gpasswd -d <user> <group>removes a user from a group.usermod -g <group> <user>changes a user's primary group.
- Verification: The
groupsandidcommands are essential for confirming your changes.
In the last two lessons, we have created users and groups by running commands. In the background, these tools were editing simple text files. In our next lesson, we will look directly at the structure and content of the /etc/passwd, /etc/shadow, and /etc/group files to understand exactly how the system stores this information.