Hello! Let's build on our networking knowledge.
Introduction
In our last lesson, we configured the system's routing table, which acts as a "GPS" for your network traffic, directing packets toward their destinations. Now that you know how to tell your system where to send data, it's time to learn how to verify that the data is actually arriving and to diagnose problems when it isn't.
This lesson addresses the learning outcome: Test network reachability using ping and traceroute. These two commands are the most fundamental and frequently used tools for network troubleshooting. We will explore what each command does, how it works, and how to interpret its output to solve real-world connectivity issues. Mastering these tools is non-negotiable for any Linux administrator and is a core competency tested on the CompTIA Linux+ exam.
1. ping: The Network Sonar
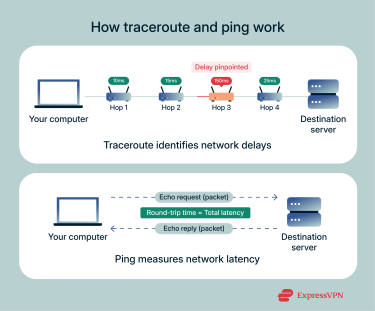
The ping command is your first-line tool to answer the most basic question of networking: "Can my computer reach another computer?" It's like a submarine's sonar ping—you send out a signal and wait for an echo.
How ping Works
ping operates using the Internet Control Message Protocol (ICMP). Specifically, it sends an ICMP Echo Request packet to the target host. If the target host is reachable and configured to respond, it sends back an ICMP Echo Reply. This simple exchange tells you several important things about the connection.
To get a solid practical understanding, let's watch a video that walks through the ping command from the ground up.
Linux Crash Course - The ping Command
This video, 'Linux Crash Course - The ping Command' from Learn Linux TV, provides an excellent and clear introduction to the command's purpose and basic use.
Please watch from the beginning to 06:45. Focus on: The concept of echo request/reply. How to run ping with a domain name or IP address. How to stop the command (using Ctrl+C). The role of the ICMP protocol.
Using ping and Interpreting Its Output
As the video demonstrated, running ping <hostname> will send pings continuously. In most practical situations, you'll want to send a limited number of packets. This is done with the -c (count) flag.
For example, ping -c 4 google.com will send exactly four pings and then automatically stop and provide a summary.
Let's refine our understanding of how to read the output and use it for troubleshooting.
Linux Crash Course - The ping Command
Let's continue with the same video, which now covers how to limit the ping count and, most importantly, how to interpret the results for troubleshooting.
Watch the segment from 06:45 to 09:54. Pay close attention to the explanation of the final statistics, especially packet loss and response time.
Let's break down a successful ping output line:64 bytes from milan07s19-in-f14.1e100.net (142.250.193.110): icmp_seq=1 ttl=115 time=10.8 ms
icmp_seq=1: This is the sequence number of the packet. It helps you see if any packets were dropped in order.ttl=115: Time To Live. We'll explore this in detail withtraceroute. For now, just know it's a value that decreases at each network hop to prevent packets from looping forever.time=10.8 ms: This is the round-trip time (RTT) or latency. It's the time from sending the request to receiving the reply. Lower is better.
At the end of the command, the summary is crucial:--- google.com ping statistics ---4 packets transmitted, 4 received, 0% packet loss, time 3005ms
0% packet loss is the key indicator of a stable connection.

A common troubleshooting technique is to use ping to isolate DNS problems.
Linux Crash Course - The ping Command
This final clip from the 'ping' video demonstrates a classic troubleshooting scenario: using ping to determine if a problem is related to network connectivity or DNS.
Watch from 09:54 to 11:53. The video explains how pinging a known public IP address like Google's DNS server (8.8.8.8) can help you diagnose issues.
Here's the logic:
- Try to ping a domain name:
ping google.com. - If it fails, try to ping a reliable IP address:
ping 8.8.8.8.- If
ping 8.8.8.8works, your internet connection is fine, but your system is failing to resolve domain names. The problem is likely with your DNS configuration (covered in a previous lesson). - If
ping 8.8.8.8fails, the problem is more fundamental. It could be your local network connection, your router, your firewall, or your ISP.
- If
Test your understanding!
You are trying to access a website, but it won't load. You open a terminal and run ping -c 3 www.the-website.com, which results in 100% packet loss. You then run ping -c 3 1.1.1.1 (a public DNS server), and it succeeds with 0% packet loss.
What can you conclude from these results?
Show answer
You can conclude that your general internet connectivity is working, as you can reach 1.1.1.1. The failure to reach www.the-website.com could mean that the website's server is down, or there is a routing issue specifically to that server, or a firewall is blocking your pings. You have successfully ruled out a problem with your own local internet connection.
2. traceroute: Mapping the Journey
While ping tells you if you can reach a destination, traceroute tells you how you get there. It shows the path, or sequence of routers (called "hops"), that your packets traverse to reach the final destination. This is invaluable for pinpointing exactly where a connection problem is occurring.
How traceroute Works: The TTL Trick
The mechanism behind traceroute is clever. It manipulates the Time To Live (TTL) field in an IP packet.
To get a clear, step-by-step explanation of this process, please read the following section from an article on Varonis.
What is Traceroute? How It Works and How to Read Results
This article, 'What is Traceroute?', has a section that breaks down the technical workings of traceroute into five easy-to-understand steps. This is a core concept you need to grasp.
Read the section titled 'How traceroute works in five steps'. Focus on how the TTL value is incremented to discover each successive hop.
In summary:
traceroutesends a packet withTTL=1. The first router it hits decrements TTL to 0, discards the packet, and sends back an ICMP "Time Exceeded" message.tracerouterecords this router's IP.- It then sends a packet with
TTL=2. It passes the first router, but the second router decrements TTL to 0 and sends back the ICMP error.tracerouterecords the second router's IP. - This process repeats, incrementing the TTL by one each time, until the packet finally reaches the destination.
Using traceroute and Interpreting Its Output
On some minimal Linux installations, you might need to install the tool first:
- On Debian/Ubuntu:
sudo apt-get install traceroute - On RHEL/CentOS/Fedora:
sudo dnf install traceroute
Let's learn how to run the command and make sense of its results.
What is Traceroute? How It Works and How to Read Results
The same article provides a great guide on running traceroute and reading its output. This is the practical application of the theory.
Now, read the sections 'How to run a traceroute on Linux' and 'How to read traceroute output'. Pay attention to what each column in the output represents and what asterisks (*) mean.
Key points from the reading:
- Each line is a hop (a router).
- You'll see the router's name (if resolvable) and its IP address.
- The three time values (e.g.,
10.1 ms 10.3 ms 10.2 ms) are the round-trip times for three separate probes sent to that hop. - Asterisks (
* * *) mean that no reply was received from that hop. This can happen for several reasons:- The router is configured not to send ICMP "Time Exceeded" messages (a common security practice).
- The router is down or unreachable.
- There is high latency or packet loss, and the reply timed out.
A sudden, large jump in latency between two hops often indicates a significant geographical distance (like crossing an ocean) or a network bottleneck.
An Important Note: Linux traceroute vs. Windows tracert
By default, the traceroute command on Linux sends UDP packets, while the tracert command on Windows sends ICMP packets (just like ping). Some firewalls may block one type of traffic but not the other. If your standard traceroute seems to be blocked (showing only asterisks), you can force it to use ICMP with the -I flag. This requires root privileges.
sudo traceroute -I google.com
Conclusion
You now have the two most essential network diagnostic tools in your arsenal. With ping and traceroute, you can effectively diagnose a wide range of connectivity issues, from simple misconfigurations to complex routing problems across the internet.
Key Takeaways:
pingis for testing end-to-end reachability. It answers the question: "Are you there?" Key metrics are packet loss and round-trip time.tracerouteis for mapping the network path. It answers the question: "How do I get there?" It helps pinpoint where a delay or failure is occurring.tracerouteworks by sending packets with progressively increasing Time-To-Live (TTL) values.- A common troubleshooting workflow is to use
pingto confirm a problem exists, and then usetracerouteto find out where the problem lies.
Preview of the Next Lesson:
We have spent a lot of time on manual network configuration and troubleshooting. The next step in becoming a proficient Linux administrator is learning how to automate these tasks. In our next lesson, we will shift gears and explore a different domain: "Explain the purpose of configuration management (e.g., Ansible)". We'll see how tools like Ansible can be used to manage not just one, but hundreds of systems in a consistent and repeatable way.