Hello! Welcome back to our course on building advanced Go applications.
In the last lesson, we successfully applied the repository pattern by creating a concrete MemoryStorage struct that implements our Storage interface. We now have a contract (the interface) and a working implementation (the in-memory struct). The missing piece is how to connect them to the rest of our application in a clean, flexible way.
Today's Learning Outcome: Use dependency injection via constructor functions to wire interface implementations with compile-time compliance checks.
This lesson is all about "wiring up" our components using one of the most important principles in modern software design: Dependency Injection (DI). We'll explore why DI is crucial for building flexible and testable systems, and you'll learn the idiomatic Go approach using constructor functions. By the end, you'll have connected your MemoryStorage to a new API server component, setting the stage for easily swapping in a real database later.
What is Dependency Injection?
At its core, Dependency Injection is a design pattern where a component's dependencies (the other objects it needs to work) are "injected" from the outside, rather than being created internally. This inverts the control of dependency management, leading to more decoupled and modular code.
Given your experience in system design, you might recognize this as the core mechanism that enables patterns like Hexagonal Architecture (Ports and Adapters). The "ports" are our interfaces, and the "adapters" are our concrete implementations. DI is how we plug an adapter into a port.
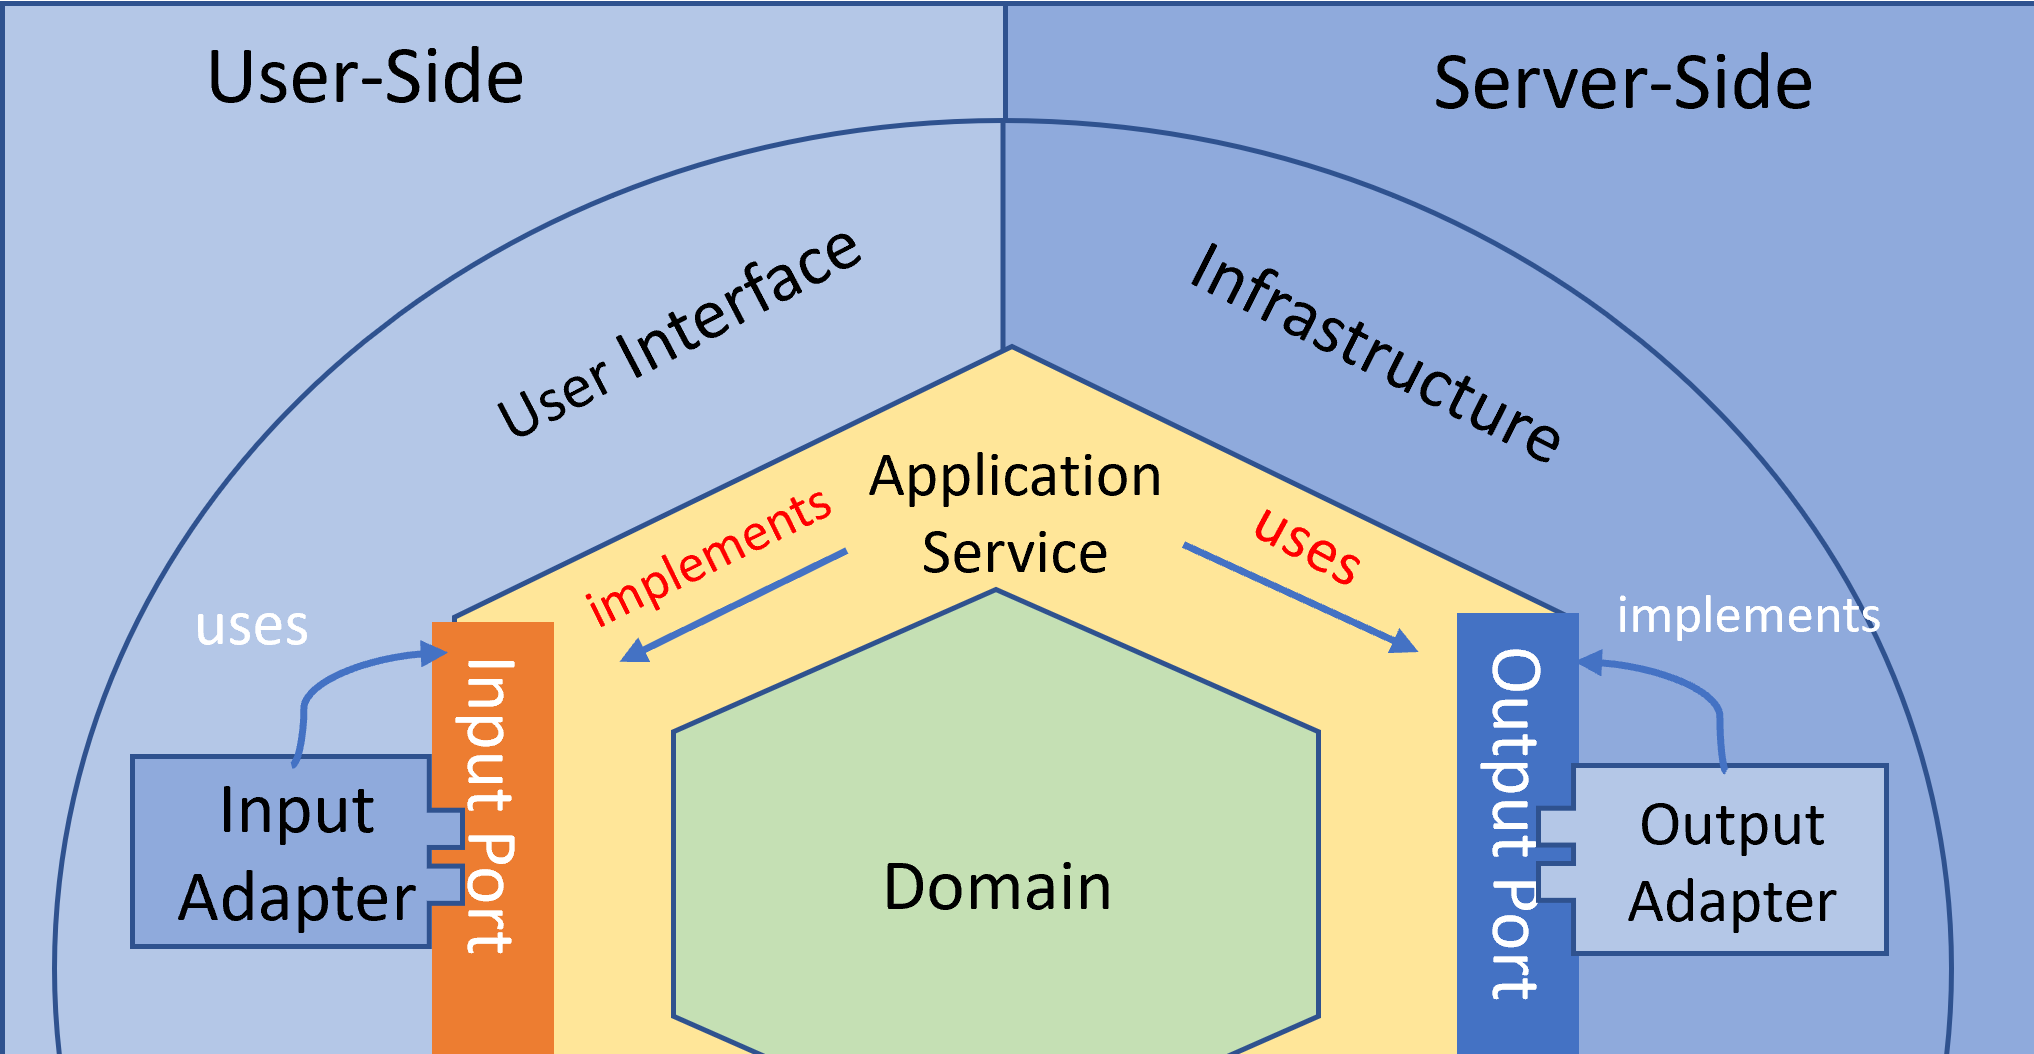
To get a solid grasp of the concept and its benefits, let's start with a foundational article.
How to Implement Dependency Injection in Go
This article from freeCodeCamp, 'How to Implement Dependency Injection in Go', clearly contrasts a tightly coupled approach with a DI approach and explains the immediate benefits.
Please find the introductory section titled 'What is Dependency Injection?'. Read the DI introduction down through the paragraph starting with 'The principle of dependency injection...'. Focus on the transition from the tightly coupled Handler to the one that accepts a UserService interface.
Constructor Injection: The Go Way
While other languages often rely on complex frameworks for DI, Go's philosophy favors explicitness and simplicity. The most idiomatic way to perform DI in Go is through Constructor Injection.
This involves:
- Defining a struct that holds its dependencies as fields, typically using interface types.
- Creating a "constructor" function (by convention, named
New...) that accepts these dependencies as arguments and returns an initialized instance of the struct.
This approach makes a component's dependencies explicit in its constructor signature. There is no "magic" involved; it's just plain Go functions and types.
This video provides an excellent analogy and a clear code demonstration of this pattern.
In 'Master Golang with Interfaces' from Kantan Coding, the presenter uses a physical audio interface as an analogy for software interfaces, which is a great mental model. Then, they demonstrate constructor injection.
First, watch the conceptual explanation. This will reinforce the 'why'. Then, watch the implementation of the newApplication constructor function. Notice how this function accepts the DBContract interface as a parameter, injecting the dependency.
Hands-On: Wiring up the simple-bank API Server
Now, let's apply this to our project. We'll create a basic APIServer struct that will eventually handle our REST API. This server will need to perform data operations, so it will depend on our Storage interface.
Step 1: Create the APIServer Struct and Constructor
First, let's create a new home for our API-related code.
- Create a new directory:
internal/api. - Inside
internal/api, create a new file namedserver.go.
Now, add the following code to internal/api/server.go. This defines our server and its constructor, which uses dependency injection.
package api

import (
	"log"
	"simple-bank/internal/storage"
)

// APIServer handles HTTP requests for our banking service.
type APIServer struct {
	listenAddr string
	store      storage.Storage
}

// NewAPIServer creates a new APIServer instance with its dependencies.
func NewAPIServer(listenAddr string, store storage.Storage) *APIServer {
	return &APIServer{
		listenAddr: listenAddr,
		store:      store,
	}
}

// NOTE: We will add a Run() method and actual handlers in a future lesson.
// For now, we'll add a simple placeholder to confirm it's wired correctly.
func (s *APIServer) Start() {
	log.Printf("API server starting on %s", s.listenAddr)
	// HTTP server setup will go here later
}
Notice that NewAPIServer doesn't know or care what kind of storage it receives. It only cares that the provided store satisfies the storage.Storage interface contract.
Step 2: Wire the Dependencies in main.go
The main function is the composition root of our application. This is where we create our concrete dependencies and inject them into the components that need them.
Update your cmd/main.go file to look like this:
package main

import (
	"simple-bank/internal/api"
	"simple-bank/internal/storage"
)

func main() {
	// 1. Create the concrete dependency (the storage adapter)
	store := storage.NewMemoryStorage()

	// 2. Inject the dependency into the component that needs it (the API server)
	server := api.NewAPIServer(":8080", store)

	// 3. Start the application
	server.Start()
}
Let's break down this wiring process:
- We call
storage.NewMemoryStorage()to create a concrete instance of our in-memory repository. - We then pass this
storeinstance toapi.NewAPIServer. Since*MemoryStorageimplements thestorage.Storageinterface, the Go compiler allows this assignment. - Finally, we call the
Startmethod on the configured server.
Run the application from your terminal:
go run cmd/main.go
You should see the output: API server starting on :8080. This confirms that you have successfully created your dependencies and wired them together!
Compile-Time Compliance Checks: The Safety Net
In the previous lesson, we added the line var _ Storage = (*MemoryStorage)(nil). Now its importance becomes even clearer in the context of DI. This "interface guard" acts as a safety net. It guarantees at compile time that the object you intend to inject (*MemoryStorage) is actually compatible with the interface "slot" it's supposed to fit into (Storage).
This is a common and powerful pattern in Go. If you were to refactor your Storage interface and forget to update MemoryStorage, this check would cause a compile error right in storage/memory.go, pointing you directly to the problem, long before you even try to run main.go.
Let's see this pattern used in the context of creating a mock for testing, which is another prime use case for DI.
Interfaces in Go - Discovering Behavior
In this clip from 'Interfaces in Go' by Matthew Sanabria, he demonstrates how to use this compile-time assertion to guarantee that a mock object correctly implements the interface it's supposed to be mocking.
Starting around the 16-minute mark, watch the compile-time assertion. Pay close attention to the line var _ Notifier = (*mockNotifier)(nil) and how the compiler reacts when a method is removed from the mockNotifier, breaking the interface contract.
This simple line of code is your first line of defense in maintaining a correctly wired, interface-driven application. For a deeper dive, the article "Interface guards in Go" on Redowan's Reflections provides more context on this specific pattern.
The Payoff: Flexibility and Testability
Why go through all this trouble? The two primary benefits are flexibility and testability.
1. Flexibility: Because our APIServer depends on the Storage interface, not a concrete type, we can swap out the implementation with a single line change in main.go. When we build our PostgreSQL repository, changing our application to use it will be as simple as:
// In main.go...
// store := storage.NewMemoryStorage() // Old line
store := storage.NewPostgresStorage(connectionString) // New line!

server := api.NewAPIServer(":8080", store) // This line doesn't change
This is the ultimate payoff for your goal of having easily switchable databases. This video clip perfectly illustrates this "swap".
Let's revisit the Kantan Coding video to see the 'swap' in action. This demonstrates the power of the abstraction we've just built.
About 20 minutes into the video, watch the database swap. See how effortlessly the data source is switched from MySQL to PostgreSQL in the main function without any other code changes.
2. Testability: DI is the key to effective unit testing. When testing our APIServer's logic, we don't want to depend on a real database. Instead, we can inject a mock or our existing MemoryStorage to run tests quickly and in isolation.

We will explore this in depth in Module 4 when we write unit and integration tests.
Conclusion
In this lesson, you've mastered a foundational pattern for building robust Go applications. You have taken the separate components from our previous work—the interface and its implementation—and wired them together cleanly and explicitly.
Key Takeaways:
- Dependency Injection (DI) is a pattern for providing a component with its dependencies from an external source.
- Constructor Injection is the idiomatic Go approach, using
New...functions that accept interfaces as arguments. - The
mainfunction serves as the composition root, where all application components are created and wired together. - DI is the key that unlocks flexibility (swapping implementations like
MemoryStorageforPostgresStorage) and testability (injecting mocks in tests). - Compile-time interface guards (
var _ Interface = (*ConcreteType)(nil)) act as a crucial safety net to ensure your implementations always satisfy their contracts.
Next Up
We now have a solid, flexible foundation for our data layer. We've defined the contract, built an in-memory implementation, and wired it into our application. The next logical step is to create a persistent, production-ready storage backend.
In the next lesson, we will begin working with PostgreSQL. You will learn how to set up and configure a PostgreSQL connection pool using pgx/pgxpool, preparing the ground for our second implementation of the Storage interface.