Hello and welcome back!
In our last module, we dove deep into the performance of our message broker. You learned to benchmark, profile, and apply data-driven optimizations, hardening the core engine of our system. This is a critical skill for any systems programmer, and you now have a solid, performant foundation to build upon.
Now, we shift our focus from the broker's internal machinery to its external interface. In this final module, Building the CLI and Deploying the System, we'll create the tools to interact with and operate our broker.
Today's lesson addresses the first step: Set up a CLI application structure using a library like Cobra and implement a topic management command. We will build a professional-grade command-line interface (CLI) from scratch, a task that directly aligns with your goal of mastering project setup and creating robust, usable software.
1. Why a CLI? Why Cobra?
For a server-side system like our message broker, a CLI is the natural administrative tool. It allows operators (and developers) to manage topics, send test messages, and inspect system state directly from the terminal.
While you could parse command-line arguments using Go's built-in flag package, this becomes cumbersome as complexity grows. We need a more powerful framework. Enter Cobra, the de-facto standard for building modern CLIs in Go. It powers many tools you might already use, like kubectl, hugo, and docker.
Cobra provides:
- Easy creation of nested subcommands (e.g.,
app topic create). - Automatic generation of help text and usage messages.
- Powerful flag parsing, including short (
-p) and long (--partitions) versions. - Suggestions for misspelled commands.
Given your experience in system design, you'll see how Cobra helps create a clean, discoverable, and extensible interface for our application.
2. Structuring a CLI Project
Before writing code, let's establish a standard project structure. For a standalone executable like a CLI, the Go community has converged on a clear pattern.
Go Project Structure: Practices & Patterns
To understand the standard layout for Go applications, including CLIs, please review this short article on project structure.
Read the sections 'The cmd/ Directory' and 'Small CLI Tool'. Pay attention to the rationale for placing application entry points inside cmd/ and the suggested layout for a CLI tool using a command/ (or cmd/) directory.
As the article suggests, we'll create a dedicated directory for our new CLI application and organize the command logic within a cmd subdirectory. This separates the CLI code from our broker code, keeping both projects clean.
Let's start building. First, create a new directory for the CLI outside of your broker project directory. We'll call it minikafka-cli.
mkdir minikafka-cli
cd minikafka-cli
go mod init minikafka-cli
Note: If you plan to host this on GitHub, it's best practice to use the full path, like go mod init github.com/<your-username>/minikafka-cli.
3. Initializing with the Cobra Generator
Cobra includes a code generator that bootstraps the project structure for us. This is a massive time-saver and ensures we start with the correct layout.
This video provides an excellent walkthrough of installing the generator and initializing a project. We will follow these steps to set up our CLI.
How to write beautiful Golang CLI
Watch this segment to see how to install the Cobra generator and use it to create the initial project files.
Follow the instructions from 01:48 to 05:32. Specifically, focus on: Installing the cobra-cli generator tool (go install github.com/spf13/cobra-cli@latest). Running cobra-cli init to generate the project skeleton. Understanding the main.go and cmd/root.go files that are created.
After following the video, your project should look like this:
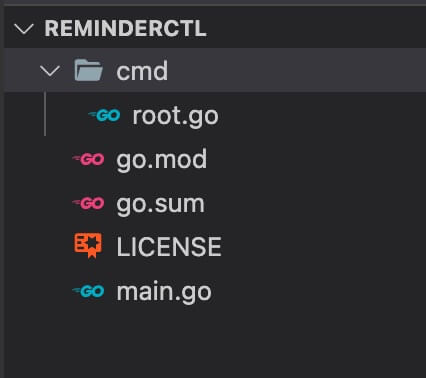
Your main.go simply calls cmd.Execute(), which in turn runs the rootCmd from cmd/root.go. The rootCmd is the base of your entire command hierarchy.
You can test your new CLI already:
go run main.go
This should print the default help message defined in cmd/root.go.
4. Designing a Nested Command Structure
A flat command structure is fine for simple tools, but for our broker, we want to group related actions. A "palette"-based design, where commands are nested, is much cleaner:
minikafka-cli topic create ...minikafka-cli topic delete ...minikafka-cli produce ...
Here, topic is not a command itself but a "sub-palette" that holds the create and delete commands. This is a powerful pattern for organizing complex CLIs.
The following video segment demonstrates exactly how to achieve this.
How to write beautiful Golang CLI
This part of the video is crucial. It shows how to move beyond Cobra's default flat structure to create organized, nested subcommands.
Watch carefully from 06:50 to 13:14. The key idea is to create a parent command (like net in the video) that doesn't have a Run function but instead serves as an attachment point for its children (like ping). You'll apply this same pattern to create a topic command that will hold our management subcommands.
5. Implementing the Topic Management Command
Now, let's apply this pattern to our broker. We will create a topic command with a create subcommand.
Step 1: Create the topic command file
In your cmd/ directory, create a new file named topic.go.
Step 2: Define the parent topic command
In cmd/topic.go, define the parent command. It won't do anything on its own, so we'll make its Run function print the help message.
// cmd/topic.go
package cmd

import (
	"github.com/spf13/cobra"
)

// topicCmd represents the topic command
var topicCmd = &cobra.Command{
	Use:   "topic",
	Short: "Manage topics",
	Long:  `Use this command to create, delete, and inspect topics.`,
	Run: func(cmd *cobra.Command, args []string) {
		// When the user runs 'minikafka-cli topic' without a subcommand,
		// show the help message.
		cmd.Help()
	},
}

func init() {
	// Add the topicCmd to the rootCmd.
	rootCmd.AddCommand(topicCmd)
}
Step 3: Define and attach the create subcommand
Now, let's define the create command in the same file and attach it to topicCmd. The create command will require exactly one argument: the topic's name.
// cmd/topic.go (continued)
package cmd

import (
    "fmt"
	"github.com/spf13/cobra"
)

// ... (topicCmd definition from above)

var partitions int

// createCmd represents the create command
var createCmd = &cobra.Command{
	Use:   "create [topic-name]",
	Short: "Create a new topic",
	Long:  `Creates a new topic with the specified name and optional configuration.`,
	Args:  cobra.ExactArgs(1), // We require exactly one argument
	RunE: func(cmd *cobra.Command, args []string) error {
		topicName := args[0]

		// For now, we just print what we would do.
		// In a future lesson, this will make a network call to the broker.
		fmt.Printf("Attempting to create topic '%s' with %d partitions...\n", topicName, partitions)

		// Here you would add the logic to connect to your broker
		// and send a "create topic" request.

		fmt.Println("Topic creation request sent.")
		return nil
	},
}

func init() {
	rootCmd.AddCommand(topicCmd)

	// Attach createCmd as a subcommand of topicCmd
	topicCmd.AddCommand(createCmd)

	// Add a flag for specifying the number of partitions.
	// We use IntVarP for an integer flag with a short version.
	createCmd.Flags().IntVarP(&partitions, "partitions", "p", 1, "Number of partitions for the new topic")
}
Note the use of RunE. It's best practice to use functions that return an error, as Cobra will then handle printing the error message uniformly.

Let's break down the init() function:
rootCmd.AddCommand(topicCmd): Attaches our newtopiccommand palette to the application's root.topicCmd.AddCommand(createCmd): Attaches ourcreatecommand to thetopicpalette, creating thetopic createstructure.createCmd.Flags().IntVarP(...): This is how you add a flag.&partitions: A pointer to the variable where the flag's value will be stored."partitions": The long name of the flag (--partitions)."p": The short name (-p).1: The default value if the flag is not provided."...": The help text for the flag.
Step 4: Test Your New Command
Now you can build and run your full command.
go run main.go topic create my-first-topic --partitions 4
You should see the output:
Attempting to create topic 'my-first-topic' with 4 partitions...
Topic creation request sent.
Also, test the auto-generated help messages:
go run main.go --help
go run main.go topic --help
go run main.go topic create --help
Notice how Cobra provides tailored, useful information at each level.
Conclusion
Excellent work. You have just built the foundation for a professional, extensible CLI tool for our message broker. This is a significant step beyond simple scripting and is a fundamental skill for creating developer-friendly systems.
Key Takeaways:
- Cobra for Structure: Cobra is the go-to library for building CLIs in Go, providing subcommands, flags, and help generation out of the box.
- Use the Generator: The
cobra-cligenerator quickly bootstraps your project with the correct structure. - Nested Commands are Key: Organizing commands into "palettes" (e.g.,
topic create) creates a clean and scalable user interface. - Define, then Attach: The common pattern is to define command variables globally and then attach them to their parents inside
init()functions. - Flags for Configuration: Flags are the standard way to pass options and configuration to CLI commands.
Next Up
You've created the CLI structure and a command to manage topics. In the next lesson, we will implement the produce command. This will be more involved, as it will require the CLI to establish a TCP connection to our broker, serialize a message according to our custom protocol, and send it over the wire. This will be the first time we connect our two major project components: the CLI and the broker server.