Hello again! In our last lesson, we took the essential first step of initializing our simple-bank project as a Go module. You now have a go.mod file that declares your project's identity and Go version.
Today, we'll bring that file to life by adding external libraries. Managing these dependencies is a core skill for any project that goes beyond the standard library, and mastering it is crucial for building the complex systems you're aiming for.
Today's Learning Outcome: Manage direct and indirect dependencies using 'go get' and 'go mod tidy'.
We will cover how to add dependencies to your project, what happens when those dependencies have dependencies of their own, and how to keep your project's dependency list clean and accurate.
Adding Your First Dependency with go get
Our simple-bank project will eventually be a REST API. To handle HTTP requests, we'll need a router. While Go's standard library has a basic HTTP multiplexer, using a dedicated routing library offers more power and flexibility. We'll use chi, a popular and lightweight choice.
Adding an external library like chi makes it a direct dependency—a module that your own code explicitly imports and uses.
The primary command for adding or updating dependencies is go get. Let's use it to add chi to our project.
In your terminal, from the root of your simple-bank directory, run the following command:
go get github.com/go-chi/chi/v5
You'll see some output as Go downloads the module. After it finishes, two important files will have been modified:
go.mod: Arequiredirective forchihas been added. This line tells the Go toolchain that your module requireschiat a specific version (or a minimum version).go.sum: This file has been created or updated. It contains cryptographic hashes of your dependencies. We will explore this file in detail in our next lesson, but for now, know that it's Go's "lock file" for ensuring dependency integrity.
This video provides a clear, practical demonstration of the go get command in action.
Go Modules Explained | Mastering Dependency Management in Go
Watch this segment from 'Go Modules Explained' by Code & Learn. It shows exactly what happens when you run go get to add a new module and how you can then use it in your code.
About three minutes and twenty seconds into the video, watch the demonstration on adding direct dependencies. Pay attention to how the command updates the go.mod file and how you can specify a particular version of a dependency.
As the video mentions, you can also request a specific version of a module using the @ symbol. This is vital for maintaining stable builds. For example:
go get github.com/go-chi/chi/v5@v5.0.10: Gets a specific tagged version.go get github.com/go-chi/chi/v5@latest: Gets the latest tagged version.
Direct vs. Indirect Dependencies and Version Selection
When you add a dependency like chi, you aren't just adding that one module. That module might have its own dependencies, which are known as indirect or transitive dependencies. Your project needs them to function, but you don't import them directly in your code.
Given your background, this is analogous to how package managers like Maven or npm handle transitive dependencies. However, Go's approach to resolving version conflicts is unique and powerful.
This short clip explains the concept of direct vs. indirect dependencies clearly.
Golang Modules, Versions, Dependency Management - Woohoo! 😃🌴🔆
This video from Learn To Code uses a simple 'puppy' and 'dog' example to illustrate the difference between a direct dependency (puppy) and an indirect one (dog).
About 30 seconds in, watch the dependency overview to solidify your understanding of this concept.
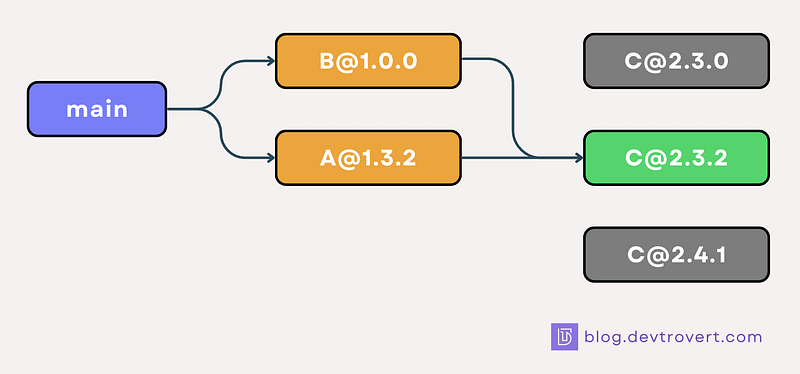
So, what happens if two of your dependencies require different versions of the same indirect dependency? For example, module A requires C v1.1.0 and module B requires C v1.2.0.
Go uses a simple and deterministic algorithm called Minimal Version Selection (MVS). Instead of trying to find the newest possible version of everything, Go selects the oldest compatible version of a dependency that satisfies the requirements of all other modules. In the example above, Go would select v1.2.0 because it's the minimum version that satisfies both A's and B's requirements.
This approach makes builds highly reproducible and avoids the "dependency hell" common in other ecosystems where installing a new package can unexpectedly upgrade dozens of others.
The article below and the accompanying diagram provide an excellent explanation of MVS.
GO EP11: Go Commands - go get, go mod tidy,... - Devtrovert
This blog post from Devtrovert, 'GO EP11: Go Commands', has a great section on how Go resolves dependencies. It explains Minimal Version Selection with a clear, practical example.
Find the subsection titled 'How Go Resolves Dependencies'. Read the MVS explanation—it's a concise and accurate explanation of this core Go concept.
Synchronizing Dependencies with go mod tidy
While go get is perfect for explicitly adding a dependency, there's another, more common workflow. Often, you'll first write the code, adding an import statement for a package you need. At this point, your go.mod file is out of sync with your code.
This is where go mod tidy comes in. It's a crucial command that acts as a "janitor" for your dependency files. It:
- Adds any missing modules that are required by
importstatements in your code. - Removes any modules listed in
go.modthat are no longer used by any of your code.
This ensures your go.mod file is a precise and minimal representation of your project's actual dependencies.
This next video segment demonstrates go mod tidy in both scenarios: adding a missing dependency and removing an unused one.
Go Modules Explained | Mastering Dependency Management in Go
Returning to 'Go Modules Explained', this section clearly demonstrates the power of go mod tidy to keep your dependencies synchronized with your code.
Starting about seven and a half minutes in, watch go mod tidy. Notice how the command automatically finds and adds a module after it's imported in the code, and later removes it when the import is deleted.
Hands-On Practice with go mod tidy
Let's try this with our simple-bank project.
-
Add an import: Open
main.goand modify it to use theuuidpackage for generating unique IDs. Don't worry aboutgo get.package main import ( "fmt" "github.com/google/uuid" ) func main() { id := uuid.New() fmt.Println("Starting the simple bank API...") fmt.Printf("Generated a new UUID: %s\n", id) }Your editor might flag the
uuidimport as an error because the module hasn't been downloaded yet. -
Run
tidy: In your terminal, run:go mod tidyYou'll see it "finding" and "downloading" the
github.com/google/uuidmodule. Now, check yourgo.modfile. Arequiredirective foruuidhas been added automatically. -
Remove the import: Now, revert
main.goto its original state, removing theuuidimport and usage.package main import "fmt" func main() { fmt.Println("Starting the simple bank API...") } -
Run
tidyagain:go mod tidyCheck your
go.modfile one more time. Therequiredirective forgithub.com/google/uuidis now gone.
This cycle—code, tidy, commit—is a standard workflow in Go development. For a definitive written reference on these commands, the official Go documentation is invaluable.
The official Go documentation on 'Managing dependencies' provides the canonical explanation for these commands.
Briefly review the sections 'Adding a dependency' (where you can read about adding dependencies via go get) and 'Synchronizing your code’s dependencies' (which explains synchronizing dependencies via go mod tidy). This will reinforce what we've just practiced.
Conclusion
You've now mastered the essential commands for managing your project's dependencies. You can confidently add new libraries, understand how Go resolves version conflicts, and ensure your go.mod file stays clean and accurate.
Here are the key takeaways:
- Use
go get <module-path>to explicitly add a new dependency or update an existing one to a specific version. - An indirect dependency is a module required by one of your direct dependencies.
- Go uses Minimal Version Selection (MVS) to deterministically and reproducibly select the oldest compatible versions of dependencies.
go mod tidyis your primary tool for synchronizing thego.modfile with theimportstatements in your source code.
Next Up
In this lesson, you saw that go get and go mod tidy both create and modify a file named go.sum. In our next lesson, we will focus entirely on this file. You will learn what it contains, why it's critical for security, and how it enables Go to create reproducible builds that you can trust.