Hello! Welcome to your fourth lesson.
In our last session, we meticulously built the digital blueprint for a PLC system. You configured a virtual rack in TIA Portal's Device View, added I/O modules, set a network IP address, and logically organized the I/O addresses. That offline project is the complete specification for a controller.
Today, we bridge the gap between that digital blueprint and the physical world. The learning outcome for this lesson is to download programs to a PLC and establish online connections. This is the critical process of transferring your engineered solution to the hardware and then "looking inside" the PLC's brain to see it execute in real-time. This is a fundamental skill you will use daily as a controls or robotics engineer, whether commissioning a new machine or troubleshooting an existing one.
The Path to Going Live: Connection and Download
Before you can download your project, your programming computer and the PLC need to establish a connection. This requires a few key things: a physical connection (usually an Ethernet cable), compatible network settings, and a clear "address" for the PLC so your PC can find it on the network.
Once a connection is established, the download process transfers your compiled project—including the hardware configuration you created last lesson and any program logic—to the PLC's memory.
Let's break down how this works.
Step 1: Discovering the PLC on the Network
First, you need to make TIA Portal aware of what PLCs are physically connected to your computer's network port. TIA Portal has a powerful discovery function that scans the network for compatible devices.
This process uses a protocol called PROFINET Discovery and Configuration Protocol (DCP), which operates at Layer 2 of the network stack. This means it can find devices by their unique hardware MAC address, even if they don't have an IP address assigned yet. This is extremely useful for commissioning new or factory-reset hardware.
The following video provides an excellent, practical guide to finding your PLC.
First contact with an S7-1200 - How to go online in TIA Portal, even if Target could not be reached
This video from AutomationStation demonstrates how to use the 'Online access' feature in TIA Portal to find PLCs on your network. Pay close attention to how a brand new PLC appears differently from one that has already been configured.
Watch from 01:37 to 05:26. The presenter will show you how to: Identify the correct network adapter on your computer. Use the 'Update accessible devices' function to scan for PLCs. Interpret the results: notice the difference between a device with only a MAC address ('accessible device') and a device that also has an IP address and a PROFINET name.
As you saw, a new PLC only reports its MAC address. A previously configured PLC will also show its assigned IP address and device name. Being able to find a device even without a configured IP address is a key feature of PROFINET.
Step 2: The Download Process
With your project open and the hardware configured, you can now initiate the download. TIA Portal will guide you through a process to select the target device and load the program.
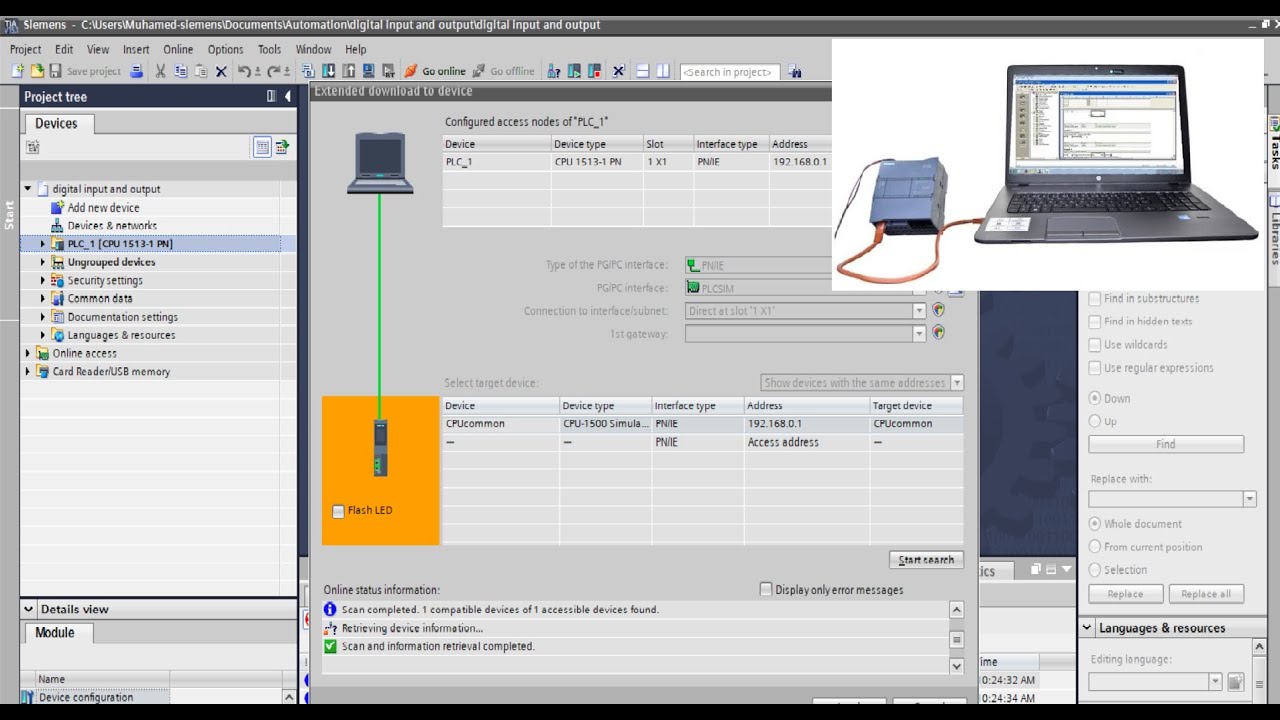
The core steps are:
- Compile the Project: Before downloading, it's good practice to compile your project. This checks for errors and converts your configuration and logic into a format the PLC can understand. You can do this by right-clicking the PLC in the Project Tree and selecting Compile > Hardware and software (Rebuild all).
- Initiate Download: Select the PLC in the Project Tree and click the "Download to device" icon (an arrow pointing down to a box) in the toolbar.
- Configure Connection: In the "Download to device" window, you'll select your PC's network card (the PG/PC interface) and click "Start search". TIA Portal will scan the network and list compatible devices it finds.
- Select Target and Load: Choose your target PLC from the list and click "Load".
TIA Portal will then present a "Load preview" screen. This screen is important because it tells you what actions it's about to perform. For an initial download, it will show that it's loading the hardware configuration and all software blocks. It also gives you options, such as starting or stopping the CPU after the download completes. For the first download, you typically accept the defaults and proceed.
This short guide provides a good textual summary of detecting a device and downloading a project.
Intro to Siemens S7-1200 PLC and TIA Portal Programming
This article from Control.com provides a concise walkthrough of the connection and download process. It reinforces what we've discussed so far.
Read the sections 'Connecting to the Siemens S7 PLC' and 'Downloading a Project to a SIMATIC S7-1200'. These sections clearly summarize how to use 'Online access' to find a device and then initiate the download, setting the target IP address in the process.
Step 3: Going Online and Monitoring
After a successful download, your project exists on the PLC, which is now running (or stopped, depending on your selection). The next step is to establish a live connection to monitor its status. This is called "Going Online".

When you click the "Go online" button (a computer screen icon), TIA Portal connects to the PLC and compares the project on your PC with the one running on the device.
- Green Checkmarks: Indicate that the online and offline projects are identical.
- Orange/Blue Icons: Indicate that there are differences between the online and offline projects.
- "Monitoring on/off" Button: Once online, you can click the "glasses" icon to monitor the live status of your program logic. In a ladder diagram, this will show power flow through the rungs in real-time.
Troubleshooting: "Target Could Not Be Reached"
One of the most common and frustrating experiences for beginners is when the download fails with a message like "Target could not be reached," even though you can see the PLC in the "Accessible devices" list.
This often happens because, for full communication (like downloading a project), the PLC needs both a valid IP address and a PROFINET Device Name. The initial discovery can work with just the MAC address (Layer 2), but the download requires Layer 3 communication and a properly named device.
The video we watched earlier has an excellent segment dedicated to solving this exact problem.
First contact with an S7-1200 - How to go online in TIA Portal, even if Target could not be reached
Let's return to the AutomationStation video to see a masterclass in troubleshooting this common connection issue. This is one of the most valuable parts of the lesson.
Watch from 11:45 to 23:16. This extended clip covers a full troubleshooting workflow: (11:45) Using 'Online & diagnostics' to check details like firmware version if a hardware mismatch occurs. (14:15) Showing where the IP address and PROFINET name are set in the offline project (which you learned last lesson). (17:28) The key part: Demonstrating the 'Target could not be reached' error and then solving it by going into 'Online & diagnostics' to manually assign both an IP address and a PROFINET name to the PLC directly on the network. This forces the PLC into a state where it can accept a full download.
This troubleshooting process is a vital skill. To recap the solution from the video:
- Find the device under "Online access".
- Right-click and select "Online & diagnostics".
- Go to Functions > Assign IP address to set the IP and subnet mask.
- Go to Functions > Assign PROFINET device name to set the name.
- Once the PLC has both, it should be fully reachable for a download.
Conclusion
You have now learned the complete workflow for taking an offline project and bringing it to life on a physical PLC. This cycle of downloading and going online to monitor is the fundamental rhythm of PLC programming and commissioning.
Key Takeaways:
- Discovery: Use "Online access > Update accessible devices" to find PLCs on the network, even if they don't have an IP address.
- Download Process: The "Download to device" function guides you through selecting the target PLC and loading your compiled hardware and software configuration.
- Going Online: Establishes a live connection to monitor the PLC's status and see your code execute in real-time via the "Monitoring" (glasses) function.
- Critical Troubleshooting: If you can discover a PLC but can't download to it, the most likely cause is a missing IP address or PROFINET device name. Use "Online & diagnostics" to assign them directly to the device.
Preview of the Next Lesson:
Having a physical PLC for every learning exercise isn't always practical. What if you want to test your logic without any hardware at all? In our next lesson, we will explore the powerful TIA Portal simulation tool, PLCSIM. You will learn how to download the exact same project to a virtual PLC running entirely on your computer, allowing you to test and debug your programs anywhere.