Welcome to the next stage of your Flutter journey! In our last lesson, we mastered Dart's asynchronous programming, giving you the power to handle operations like network requests. That was a crucial step in preparing to build dynamic, data-driven applications. Now, it's time to connect that logic to what the user actually sees and interacts with.
This lesson marks our official entry into the world of Flutter's UI. We'll explore the fundamental philosophy behind how Flutter builds interfaces. Your background in React will be a significant asset today, as Flutter's UI model was heavily inspired by it. You'll find many concepts feel familiar, allowing us to focus on the unique aspects and terminology of the Flutter ecosystem.
We will cover three core concepts:
- Flutter's declarative UI model: How you describe what your UI should look like, rather than giving step-by-step instructions to build it.
- The Widget Tree: The central idea that in Flutter, "everything is a widget," and how you compose these widgets into a tree to create your UI.
StatelessWidgetvs.StatefulWidget: The two fundamental types of widgets and the crucial difference between them, which revolves around managing state.
By the end of this lesson, you'll understand the "big picture" of Flutter's architecture, setting a solid foundation for building your first screens.
The Declarative UI Paradigm
The most important concept to grasp about Flutter is that it uses a declarative approach to building UIs. This means you, the developer, declare what the UI should look like for any given state. You don't manually manipulate UI elements (e.g., "find this button and change its color"). Instead, you describe the UI's appearance based on your application's current state variables. When the state changes, the framework automatically rebuilds the UI to reflect that new state.
This is in direct contrast to the imperative style you might have seen with libraries like jQuery or direct DOM manipulation in vanilla JavaScript, where you issue specific commands to change the UI.
Since you're experienced with React, this concept should be second nature. Flutter's approach is remarkably similar.
Is Flutter similar to React? · Sean Connolly
This article by Sean Connolly provides an excellent comparison for developers coming from a React background.
Read the first part of the article, up to the heading "Flutter widgets are React components". Focus on the sections that define declarative vs. imperative UI and look at the side-by-side code examples for a React update and a Flutter update. Notice the parallel: you declare the UI's appearance based on a state variable (color or _color) and then update that variable to trigger a change.
The official Flutter documentation echoes this idea, explicitly stating its inspiration from React. The framework's job is to efficiently translate your declarative code into a high-performance user interface. When a widget's state changes, it rebuilds its description. The framework then compares this new description to the old one and calculates the minimal set of changes needed to update the screen.
The Widget Tree: UI as Composition
In Flutter, the guiding principle is "everything is a widget." This isn't an exaggeration. Your entire UI, from a button or a piece of text to layout elements like rows and columns, padding, and even the root of your application itself, is a widget.
You build your UI by composing these widgets together in a nested, hierarchical structure called the widget tree. A widget can have a child (a single nested widget) or children (a list of nested widgets), forming a parent-child relationship that defines your entire layout.
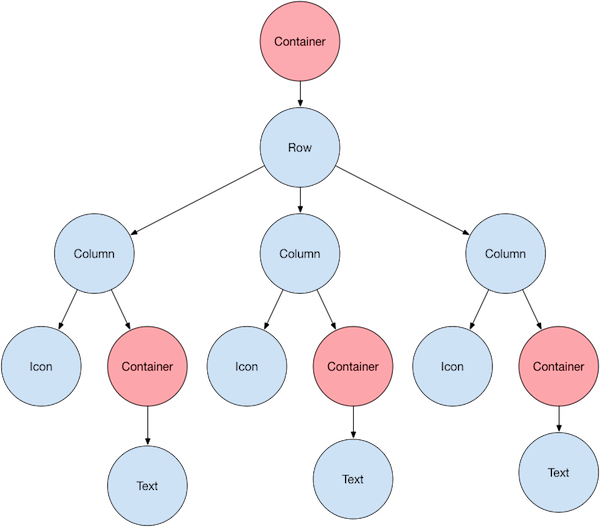
This composition model is powerful because it allows you to create complex UIs by combining small, single-purpose widgets. The following video demonstrates this concept of composition practically.
How to Create Stateless Widgets - Flutter Widgets 101 Ep. 1
This video from the Google for Developers channel provides a great introduction to the idea of widgets as building blocks.
Watch the segment from the beginning, where the presenter demonstrates how a UI is built by wrapping a Text widget with a DecoratedBox for color, then a Padding widget for spacing, and finally arranging multiple items in a Column. This is a perfect visual of the composition principle in action.
Behind the Scenes: The Widget and Element Trees
You might wonder how Flutter can be efficient if it's constantly rebuilding parts of this widget tree. The secret lies in the fact that the widget tree is not the whole story. It's more like a lightweight "blueprint" or configuration.
Flutter actually maintains three trees, but for now, we only need to understand two:
- The Widget Tree: The tree of immutable
Widgetobjects that you create in your code. They are cheap to create and disposable. - The Element Tree: A tree of
Elementobjects. An element is created for each widget in the tree and represents an "inflated" instance of the widget. These elements are longer-lived and hold references to the widgets and the state.
When you trigger a rebuild, Flutter creates a new widget subtree. The framework then walks the element tree, comparing the old widget at each position with the new one. If they are the same type, the element is simply updated with the new widget's configuration. This is much faster than tearing down and rebuilding the entire UI from scratch. The BuildContext object that you'll see passed into every build method is, in fact, a reference to the widget's corresponding element in this tree.
How Flutter Works: The Three Trees #DecodingFlutter (2/6)
This video from the official Flutter channel provides a deeper dive into how Flutter's UI rendering works.
First, watch the brief introduction to widgets from the start, which emphasizes their immutable and disposable nature. Then, skip ahead and watch the section explaining the Element Tree. This will clarify the relationship between widgets and elements and explain the role of the BuildContext.
StatelessWidget vs. StatefulWidget
Now that we understand the UI is a tree of widgets, we need to learn about the two fundamental types of widgets you'll create: StatelessWidget and StatefulWidget. The choice between them depends entirely on whether the widget needs to manage its own internal state that can change over its lifetime.
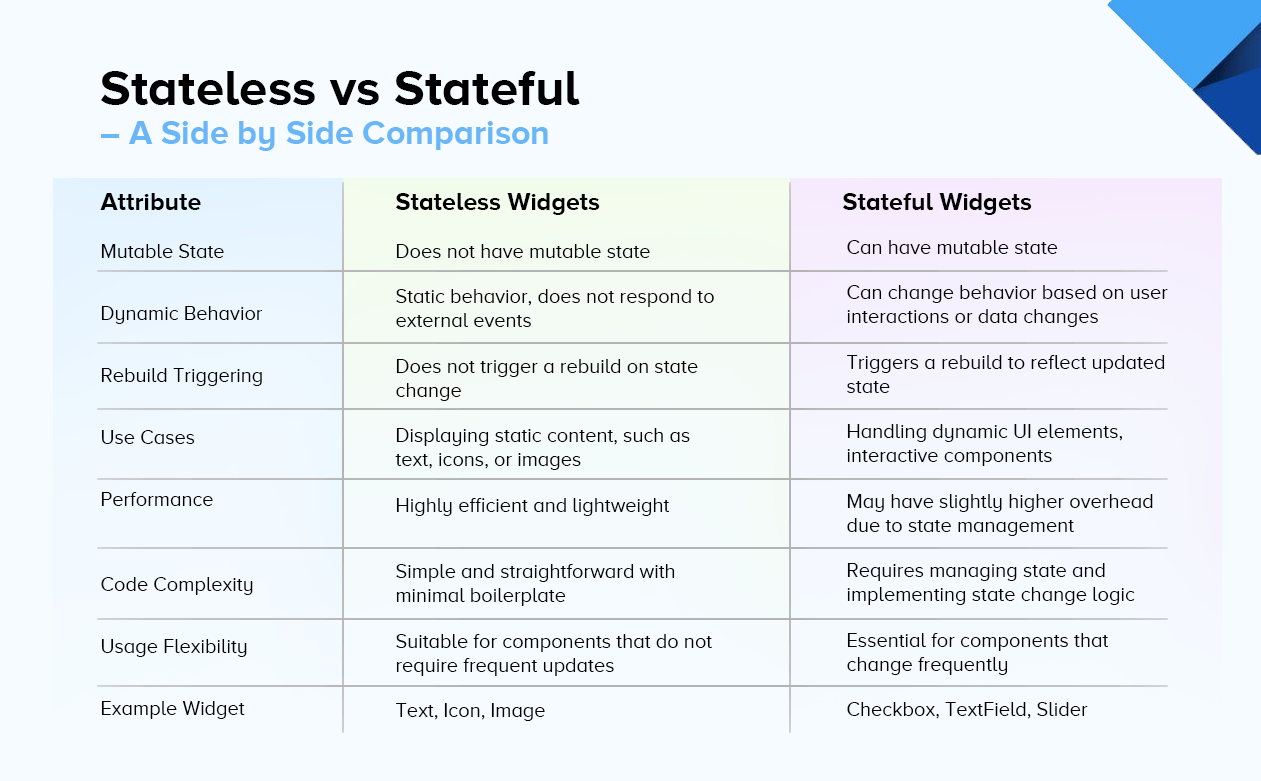
StatelessWidget
A StatelessWidget is a widget that describes a part of the user interface which depends only on the configuration information in the object itself (passed in via its constructor) and the BuildContext in which the widget is inflated.
Key characteristics:
- Immutable: Once created, its properties cannot change. All member variables should be
final. - No Internal State: It cannot track any values that change over time.
- Data Flows Down: It receives data from its parent widget and uses that data in its
buildmethod. - Analogy: This is very similar to a React functional component that only uses props and contains no
useStateor other hooks.
You use a StatelessWidget for any part of the UI that doesn't need to change dynamically on its own—for example, an icon, a label with static text, or a button whose appearance is determined entirely by its parent.
How to Create Stateless Widgets - Flutter Widgets 101 Ep. 1
Let's return to the "Stateless Widgets 101" video to see a practical example.
Watch the section from this timestamp. Here, the presenter refactors repetitive UI code into a reusable DogName stateless widget. This perfectly demonstrates the primary purpose of a stateless widget: to encapsulate a piece of UI and reuse it with different configurations (in this case, different names).
StatefulWidget
A StatefulWidget is a widget that has mutable state. This is the widget you use when a part of your UI needs to change dynamically in response to user interaction or other data changes.
A StatefulWidget is unique because it's implemented as two classes:
- A subclass of
StatefulWidget: This class is, like aStatelessWidget, immutable. It holds the configuration for the widget, passed down from its parent. - A subclass of
State: This class is the persistent, mutable part. It holds the internal state for the widget and contains thebuildmethod. TheStateobject is associated with an element in the tree and lives across multiple rebuilds of its correspondingStatefulWidget.
To change the UI, you call the setState() method from within the State object. This tells the Flutter framework that the widget's internal state has changed and that its build method needs to be run again to update the screen.
- Analogy: This is analogous to a React functional component that uses the
useStatehook. The state variables are held by the framework, and calling the setter function (likesetCount) triggers a re-render. CallingsetState()in Flutter serves the exact same purpose.
Let's dive into the official documentation, which provides the canonical explanation and example.
Building user interfaces with Flutter
The official Flutter documentation provides the most thorough explanation of stateful widgets, including the reasoning behind their design.
Start by reading the section "Changing widgets". Pay close attention to the explanation of why StatefulWidget and State are separate objects with different lifecycles. This is a crucial concept. Carefully study the Counter example code that follows. It's the "Hello, world!" of stateful widgets. Identify the immutable Counter widget, the mutable _CounterState, the _counter state variable, and the _increment method that calls setState(). Continue reading the rest of the page, including the ShoppingList example. This more advanced example beautifully illustrates how state flows down from a stateful parent (ShoppingList) to stateless children (ShoppingListItem), and how events (callbacks like onCartChanged) flow up to notify the parent to change its state. This "state flows down, events flow up" pattern is fundamental in both Flutter and React.
Conclusion
In this lesson, we've laid the conceptual groundwork for all UI development in Flutter. You've seen that Flutter's approach is likely very familiar to you from your experience with React, which will give you a significant head start.
Here are the key takeaways:
- Declarative UI: You describe what the UI should look like for a given state, and Flutter handles the updates. This is just like React.
- Widget Tree: The entire UI is a tree of composed widgets. Everything from layout to styling and interactive elements is a widget.
StatelessWidget: Use this for immutable parts of your UI that are configured by their parent. They are like React components that only use props.StatefulWidget: Use this when a widget needs to manage its own internal, mutable state. It consists of an immutableWidgetpart and a persistentStatepart. CallingsetState()triggers a rebuild, similar to state-setting functions in React'suseStatehook.
You now understand the "why" and "how" of Flutter's UI philosophy. In our next lesson, we'll put this theory into practice. You'll learn how to compose a basic UI using core widgets like Text, Image, Icon, and Container, and handle user input with buttons.