Welcome to the first lesson of your course on developing a film sound workshop. As a professional in the sound world, you possess a wealth of knowledge and experience. The goal of this course is to help you translate that expertise into a structured, engaging, and effective learning experience for film students.
This first module focuses on the foundational principles of workshop design. Today, we'll start with the single most important concept in instructional design: backward design. This principle will be the bedrock of your entire planning process. Instead of starting with the question, "What do I want to talk about?", you will learn to start by asking, "What do I want my students to be able to do by the end of this workshop?" This shift in perspective is crucial for creating a workshop that is focused, practical, and truly serves your students' needs.
By the end of this lesson, you will be able to apply the backward design principle to begin planning your own workshop, starting with the end goals in mind.
The Problem with "Content-First" Design
Many new instructors, especially experts in their field, begin planning by listing all the topics they want to cover. They might open a presentation tool, create a slide titled "Introduction to Film Sound," and start filling it with everything they know. This is often called a "content-first" or "activity-first" approach.
While it seems logical, this method has significant drawbacks. It can lead to:
- Unfocused sessions: Trying to cover too much ground without a clear purpose.
- Superficial learning: Students are exposed to many facts but don't develop usable skills.
- Mismatched activities: Hands-on exercises might be interesting but don't directly contribute to the most important learning goals.
The resource below from Ohio State University illustrates this common pitfall with a character, "Professor Buckeye," who plans his course based on his own comfort and pre-existing materials rather than student outcomes.
Using Backward Design to Plan Your Course | Teaching and Learning Resource Center
This reading introduces the common "content-first" approach to course design and contrasts it with backward design. It sets the stage for why a different method is more effective.
Please read the first part of this article, from the beginning down to the table. Focus on the initial scenario with "Professor Buckeye" and the subsequent explanation of the traditional design process. Notice how this approach prioritizes the instructor's content and activities over the learner's actual development.
Starting with the End in Mind: Backward Design
Backward design, as the name implies, reverses this process. It is a simple but powerful framework that ensures your workshop has a clear purpose and that every element—every topic, demonstration, and exercise—is deliberately chosen to serve that purpose.
For a quick and clear overview of this concept, please watch the beginning of the following video.
Backward Design Overview with Examples
This video provides a concise introduction to the backward design model, contrasting it with the traditional approach and outlining its three core steps.
Watch the first part of the video, from the beginning to the overview of the three steps. This will give you a solid mental model of the process we'll be exploring.
As the video explained, backward design consists of three distinct stages, which we will now explore in the context of your film sound workshop.
The Three Stages of Backward Design
The entire backward design process can be visualized as a simple, three-stage sequence.
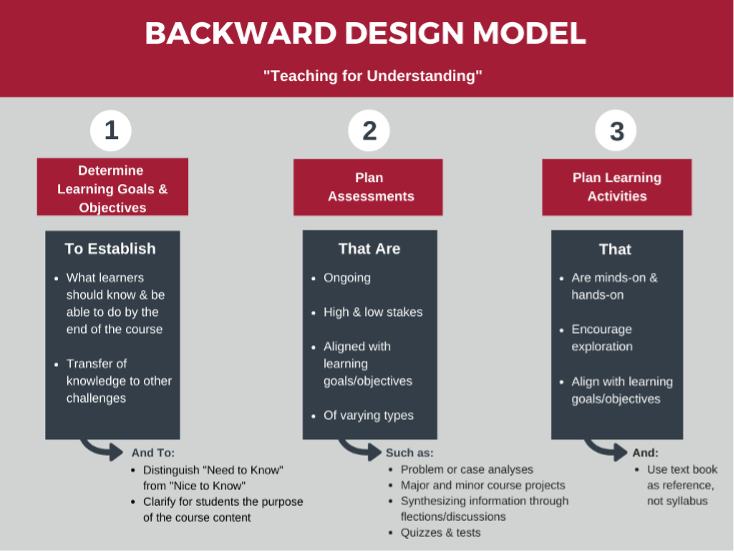
Let's break down each stage.
Stage 1: Identify Desired Results
This is your starting point. Before you think about equipment lists or film clips, you must define what you want your students to know, understand, and be able to do by the end of your 10-hour workshop. These are your learning goals.
A goal like "Students will learn about sound" is too vague. A good learning goal is specific and focuses on application. The article "How to Elevate Your Training with Backward Design" provides excellent examples of this.
How to Elevate Your Training with Backward Design
This article gives clear, practical examples of what makes a good or bad learning goal. This will help you formulate your own goals effectively.
In the article, focus on the section "The 3 key stages of backwards design." Pay close attention to the "Good Practice" vs. "Bad Practice" examples for defining results. This contrast is key to understanding how to write effective goals.
For your workshop, a desired result might be: "By the end of the workshop, students will be able to perform a basic script breakdown to identify key sound needs for a scene." This is a concrete skill they can walk away with.
Stage 2: Determine Acceptable Evidence
Once you have your goals, the next question is: How will you know if the students have achieved them? This is the assessment stage.
In a hands-on workshop, "assessment" doesn't mean a final exam. It means creating opportunities for students to demonstrate their learning. These are the practical exercises and activities where you can observe their skills in action.
- If your goal is for them to record clean dialogue, the evidence is an exercise where they attempt to do so, and you can listen to the result.
- If your goal is for them to understand mic placement, the evidence is an activity where they have to choose and place a microphone for a specific scenario.
This stage forces you to think about what success looks like in practice. The video below gives some practical thoughts on how to think about this measurement step.
What is Backward Design? | Kathleen Jasper
This video discusses the assessment stage in practical terms, emphasizing that it doesn't have to be a formal test. This is highly relevant for a hands-on workshop format.
Watch the segment on the second step of backward design, from "how will I know". The speaker gives simple, activity-based examples of how to measure learning.
Stage 3: Plan Learning Experiences and Instruction
Only now do you plan your content and activities. With your goals and evidence of learning defined, you can make strategic decisions about what to teach and how to teach it.
Ask yourself:
- What information do my students need to succeed in the assessment I just planned?
- What is the most effective way to deliver that information? (A short lecture? A live demonstration? A video clip?)
- What practice activities will help them build the skills needed for the assessment?
This ensures that every part of your workshop is purposeful. You're not just "covering" pre-production sound; you are teaching specific concepts and demonstrating techniques that directly enable students to perform the script breakdown exercise (your assessment), which in turn proves they have met your learning goal.
The article from The L&D Academy provides a clean, real-world example that ties all three stages together.
How to Elevate Your Training with Backward Design
This section provides a clear, concise example that connects all three stages of backward design.
Read the short section titled "A real-world example". Notice how the desired result (delivering feedback) directly dictates the assessment (a role-play) and the learning activities (video, practice, cheat sheet).
Your First Step: Defining Your Workshop's "Big Ideas"
Let's put this into practice. Your workshop is 10 hours long, which is a very short amount of time. You cannot teach everything. Backward design helps you prioritize.
Think about your film student audience. After your five sessions are over, what is the most important, enduring understanding you want them to leave with? What skills are absolutely essential, versus what is just "good to know"?

Using this model, let's start a rough draft of your top-level goals for the entire 10-hour workshop.
Exercise:
Take 10 minutes to think about this. Don't worry about wording things perfectly yet. The goal is to get your initial thoughts down.
- Enduring Understanding: What is the one big idea or skill at the very core of what you want to teach? (e.g., "Sound is a narrative tool, not just a technical requirement.")
- Important to Know and Do: List 2-3 broad goals that support this. What should students be able to do to demonstrate this understanding? These should be stated from the student's perspective.
- Example Goal 1: Students will be able to analyze how sound design shapes the emotional tone of a film scene.
- Example Goal 2: Students will be able to plan for and capture clean, usable dialogue during a simple production scenario.
Jot your ideas down. This is the first, critical step in building your workshop, and it will be the foundation for everything we do in the upcoming lessons.
Conclusion
In this lesson, we've introduced the principle of backward design. You've learned that effective instructional planning starts not with content, but with clear goals for your learners. The three-stage process—1. Identify Desired Results, 2. Determine Acceptable Evidence, 3. Plan Learning Experiences—provides a reliable roadmap for transforming your professional expertise into a purposeful and impactful workshop.
Key Takeaways:
- Always start with the end in mind: What should your students be able to do?
- Your learning goals dictate your assessments (the evidence of learning).
- Your goals and assessments, together, dictate the content and activities you need to plan.
In our next lesson, we will build directly on the goals you started drafting today. We will focus on how to refine those broad goals into specific, measurable, achievable, relevant, and time-bound (SMART) learning objectives. This will give you the precision needed to design each of your five workshop sessions effectively.