Welcome back. In our last lesson, you developed a system for curating your extensive professional knowledge, distinguishing the "must-know" content from the merely "nice-to-know." You now have the essential building blocks for your workshop. This lesson moves from what to teach to how to sequence that content within a single 2-hour session.
A well-structured session is like a good film scene: it has a clear beginning, middle, and end. It establishes the context, develops the action, and resolves in a way that sets up what's next. Simply presenting a list of topics can feel disjointed and overwhelming for students. By contrast, a session with a logical flow guides participants, manages their energy, and makes the learning stick.
By the end of this lesson, you will be able to structure any of your 2-hour workshop sessions into four logical segments: introduction, instruction, practice, and debrief, creating an engaging and effective experience for your students.
The Rhythm of a Workshop Session
Just as a film score uses rhythm and structure to build and release tension, a workshop session uses a structured flow to maintain engagement and facilitate learning. There isn't one single, rigid formula, but most effective teaching models follow a similar pattern. Let's explore a classic, comprehensive framework to understand the components.
The Madeline Hunter lesson plan model is a well-respected framework in education that breaks a session down into several key elements. It provides a detailed blueprint for a complete learning cycle.
[PDF] Madeline Hunter's Lesson Plan - ACTE
This document outlines the classic seven-step lesson plan model. It provides a robust structure that covers everything from grabbing the students' attention to ensuring they have consolidated their learning.
Please read the descriptions for the following elements: Anticipatory Set: This is the "hook" to engage your students. Objective: Purpose: This is where you state the learning goals for the session. Teaching: Input and Modeling: This is where you present information and, crucially, demonstrate the skill. Checking for Understanding: A vital step to ensure students are ready for practice. Guided Practice: The "I do, we do, you do" phase where students try the skill with your support. Closure: The process of wrapping up and reinforcing the key takeaways.
A Blueprint for Your 2-Hour Session
The Hunter model is thorough, but we can synthesize its parts—and those of other similar models—into the four core segments mentioned in our learning outcome: Introduction, Instruction, Practice, and Debrief. This four-part structure provides a flexible yet reliable blueprint for your 2-hour sessions.
Let's break down each part and assign some approximate timings for a 120-minute session.
1. Introduction: Setting the Stage (Approx. 15 minutes)
The start of your session is crucial for establishing focus and motivation. It answers the students' implicit question: "Why is this important for me right now?"
- Hook (Anticipatory Set): Start with something that grabs attention. Don't just say, "Today we're learning about microphones." Instead, play a short film clip with terrible dialogue audio and ask, "What went wrong here?" Or, hold up two different types of microphones and ask, "When would you choose this one over this one, and why could the wrong choice ruin your film?"
- State the Purpose (Objectives): Clearly state what they will be able to do by the end of the session. "By the end of the next two hours, you will be able to choose the right microphone for a dialogue scene, set it up correctly, and record clean audio."
- Agenda and Logistics: Briefly outline the plan for the session. "First, we'll quickly cover the main types of mics used in film. Then, I'll demonstrate how to set up a boom mic. After that, you'll get into pairs and practice recording a short conversation. We'll wrap up by listening to a few examples."
The opening of the live Design Thinking Workshop video is a great example of a simple, effective introduction that sets the agenda and expectations.
How To Run a Design Thinking Workshop (2-hour Live Training)
Watch how the facilitator kicks off the workshop.
Notice how she quickly introduces the team, goes through the agenda, and sets expectations. This creates a clear and professional start. An icebreaker follows, which is also part of a good introduction to build rapport.
2. Instruction: The "What" and "How" (Approx. 35 minutes)
This is the phase where you, the expert, deliver the core knowledge and demonstrate the skills. For your practical workshop, this segment is as much about showing as it is about telling.
- Input (Presentation): Explain the necessary concepts. Keep it concise and focused on the "must-know" content you identified. Use visuals—slides with pictures of gear, diagrams of mic pickup patterns, etc.
- Modeling (Demonstration): This is your moment to shine as a professional. Demonstrate the physical skill. If you're teaching boom operation, show them how to hold the pole, how to stand, how to move. Talk through your actions and reasoning. "Notice I'm creating a small loop in the cable here. This is a strain relief, so if the cable gets snagged, it won't pull the microphone and create noise."
- Check for Understanding: Before you turn them loose to practice, ask a few quick questions to make sure the key points have landed. "Can someone remind me why we monitor audio with headphones and not just rely on the camera's meters?" This prevents students from practicing mistakes.
In the Design Thinking workshop, the facilitators provide clear instructions and rationale before every activity.
How To Run a Design Thinking Workshop (2-hour Live Training)
Observe how the facilitators explain an exercise before the participants begin.
Watch the detailed explanation of the prototyping phase, where they explain the "why" and "what." Then, see how they give very specific instructions for the "Crazy Eights" sketching exercise, including how to fold the paper. This level of clarity is key for a successful activity.
3. Practice: The "You Do" (Approx. 55 minutes)
This should be the longest part of your 2-hour session. This is where the learning is solidified as students move from passive listening to active doing.
- Guided Practice: Have students attempt the skill for the first time with your direct supervision. For example: "In your pairs, one person will be the boom operator, the other will be the subject. Just practice following the subject's head movements with the mic. I'll come around and check your form." Provide immediate, corrective feedback.
- Independent Practice: Give them a slightly more complex task that integrates the skill. "Okay, now record a 30-second monologue. Your goal is to get the cleanest possible audio, free of rustle or background noise. You'll have 10 minutes."
The Design Thinking workshop is built around hands-on practice. The prototyping segment is a perfect example of learning by doing.
How To Run a Design Thinking Workshop (2-hour Live Training)
See how participants are given time and materials to apply what they've learned.
Watch the segment from "start building our tool" where the teams get hands-on with prototyping. Then, observe the testing phase, where they add a constraint (the oven mitts) to simulate a real-world challenge. This is an excellent model for your own hands-on exercises.
4. Debrief: Consolidating the Learning (Approx. 15 minutes)
The end of a session is as important as the beginning. A strong debrief helps students make sense of what they just did and connect it to the bigger picture. Don't let it fizzle out with a simple "Any questions? No? Okay, bye."
- Share and Reflect: Have a few students share their results or experiences. Play back a piece of audio they recorded. Ask reflective questions: "What was the most challenging part of that exercise? What's one thing you discovered that made it easier?"
- Summarize Key Takeaways: Briefly restate the 2-3 most important points of the session. "So, remember: always monitor with headphones, watch your mic placement to avoid rustling, and get the mic as close as possible without being in the shot."
- Preview and Transition: Bridge to the next session to create continuity and anticipation. "Today we focused on getting clean dialogue in a controlled indoor setting. Next week, we'll take on the much harder challenge of recording outdoors."
The end of the Design Thinking workshop includes a structured reflection where participants share their key learnings.
How To Run a Design Thinking Workshop (2-hour Live Training)
Watch the final segment of the workshop for a model of an effective debrief.
Pay attention to how the facilitators guide a group discussion starting at "as a group to as a way to wrap up". They ask participants to share key highlights and takeaways, which helps solidify the learning for everyone.
Visualizing Your Plan
To make this structure concrete, it's helpful to use a template. The "Agenda Design Canvas" is a simple but powerful tool for mapping out your session.
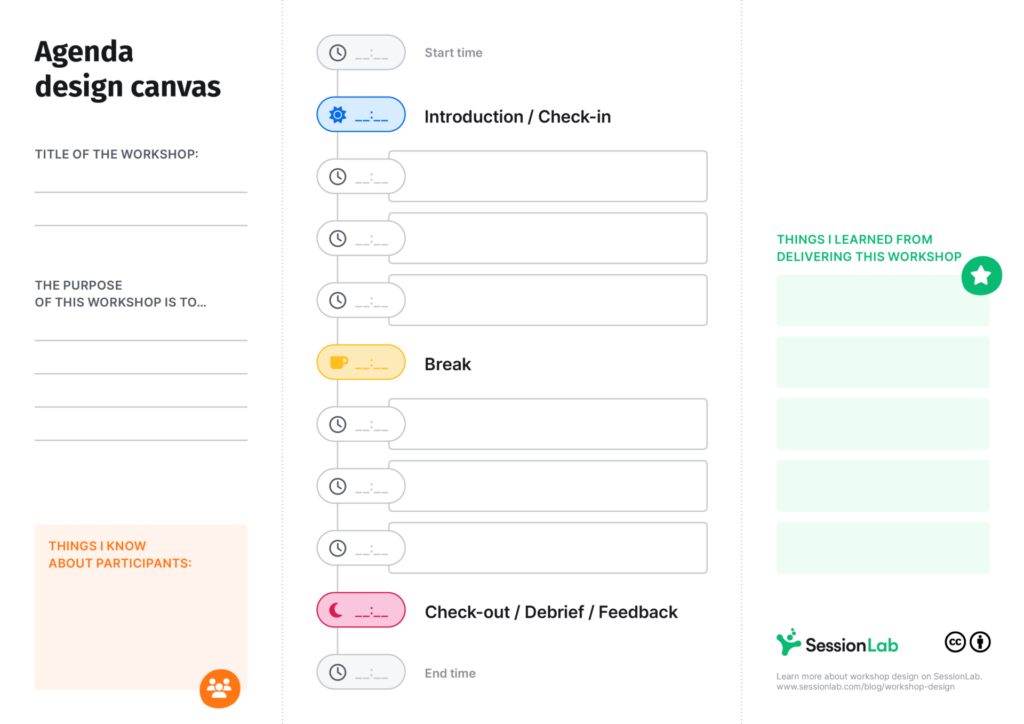
This canvas prompts you to think about the purpose, what you know about the participants (in your case, film students with some basic knowledge), and then lay out the session in a timed, logical sequence.
Your Turn: Outline a Session
Now it's time to apply this four-part structure to one of your own sessions.
Exercise (15 minutes):
- Choose one of the five sessions from your workshop plan (e.g., Session 2: Pre-Production, or Session 3: Production Sound Fundamentals).
- Using the four-part structure (Introduction, Instruction, Practice, Debrief), create a high-level outline for that 2-hour session.
- Assign an approximate time for each of the four main segments (e.g., Intro: 15 min, Instruction: 35 min, etc.).
- Within each segment, list 1-2 specific activities you would do.
Example Outline for "Production Sound Fundamentals":
- Introduction (15 min):
- Hook: Play a clip where the dialogue is muffled. Ask students to identify the problem.
- Objectives: State that by the end, they will be able to set up a boom mic and follow a moving actor.
- Instruction (35 min):
- Input: Briefly explain the components of a boom kit (pole, mic, shock mount, cable).
- Demonstration: Show proper holding technique, how to check for shadows, and the "boom from above" principle.
- Practice (55 min):
- Guided: In pairs, students practice holding the pole and aiming the mic without recording.
- Independent: Students record a partner walking and talking, trying to maintain consistent audio levels.
- Debrief (15 min):
- Share: Play back one team's recording and have the class give feedback.
- Summary: Recap the three most important aspects of good boom technique.
- Preview: Mention that next session will add a lavalier microphone into the mix.
Conclusion
You now possess a versatile and powerful blueprint for structuring your 2-hour workshop sessions. This four-part model—Introduction, Instruction, Practice, and Debrief—provides a rhythm that builds engagement, delivers knowledge effectively, allows for hands-on application, and ensures the learning is consolidated. While the exact timings can be adjusted, the logical flow from "why" to "what/how" to "you do" to "so what" is a cornerstone of effective teaching.
Key Takeaways:
- A well-structured session has a narrative arc that guides the learner.
- The four key segments are Introduction (the hook and purpose), Instruction (the explanation and demonstration), Practice (the hands-on application), and Debrief (the reflection and summary).
- The Practice segment should occupy the largest portion of your time in a hands-on workshop.
- Use tools like the Agenda Design Canvas to visually plan your session flow and timings.
With a model for structuring individual sessions, you're now ready to think about the bigger picture. In our next lesson, we will explore how to balance the different types of activities—theory, demonstration, and practice—not just within one session, but across the entire five-session arc of your workshop.