Welcome to the first lesson of Module 2. It's time to bring our Rust engine and the Unity frontend together.
In the previous lesson, we successfully compiled our Rust code into a dynamic library (game_engine_core.dll on Windows, libgame_engine_core.dylib on macOS, or libgame_engine_core.so on Linux) and exposed functions using a C-compatible Foreign Function Interface (FFI). We now have a self-contained piece of native code ready to be integrated.
Today's learning outcome is to import that compiled Rust native plugin into a Unity 2022.3 project. This lesson is the crucial link between the two main components of our game. We'll set up a new Unity project, learn about the special Plugins folder, and correctly configure our Rust library so that Unity can recognize it.
1. What Are Native Plugins in Unity?
Before we begin, let's quickly clarify what a native plugin is in the context of Unity.
How to make NATIVE PLUGINS in Unity using RUST
The video 'How to make NATIVE PLUGINS in Unity using RUST' by Ryan Hedgecock starts with a great explanation of what we're about to do.
Watch from 01:10 to 01:42 to get a clear definition of a native plugin and how Rust fits into this picture.
As the video explains, Unity can load libraries of native code compiled from languages like C++ or, in our case, Rust. The key requirement is that the library must expose a C-style interface, which is precisely what we achieved in the last lesson with extern "C" and #[no_mangle].
2. Setting Up Your Unity Project
First, you'll need a Unity project to host our game. Since you have experience with Unity, this should be straightforward.
- Open the Unity Hub.
- Create a new project using Unity 2022.3.6f1 (or a compatible 2022.3 version).
- Select the 3D (URP) template for a modern rendering pipeline, which will be useful for visuals later.
- Name your project something like
LifeSimGameand choose a location for it.
Once the project is created and opened, you can proceed to the next step.
3. Importing the Rust Library
Unity has a special folder for native plugins. For Unity to automatically find and load our Rust library, we must place it inside a folder named Plugins located in the Assets directory.
Step 1: Create the Plugins Folder
In your Unity project window, navigate to the Assets folder. Right-click and select Create > Folder, then name it Plugins. Your project structure should now look like this: Assets/Plugins.
Step 2: Copy the Library File
Now, locate the dynamic library file you compiled in the last lesson. You'll find it in your Rust project's target/debug/ directory.
- On Windows:
game_engine_core.dll - On macOS:
libgame_engine_core.dylib - On Linux:
libgame_engine_core.so
Copy the appropriate file from that directory and paste it into the Assets/Plugins folder you just created in Unity.
Tutorial: Use Rust to generate meshes in Unity
The following video demonstrates this exact process. It also introduces a very useful technique: automating the copy step with a simple build script, which aligns well with our hands-on approach.
Watch the segment from 04:24 to 05:25. It shows how to create the Plugins folder and copy the compiled library into it. Pay close attention to the build script examples provided; creating one for your operating system now will save you a lot of time in the long run.
An Important Note for macOS Users:
As mentioned in the "Getting started with FFI: Rust & Unity" guide, Unity on macOS expects native library files to have a .bundle extension. After copying libgame_engine_core.dylib into your Plugins folder, you should rename it to game_engine_core.bundle. Unity will handle the rest. This step is not necessary for Windows or Linux.
4. Configuring the Plugin in the Inspector
After you copy the library file into the Plugins folder, Unity will import it. Click on the library file inside the Unity Editor to open its Import Settings in the Inspector window. This is where you tell Unity how and on which platforms to use your plugin.
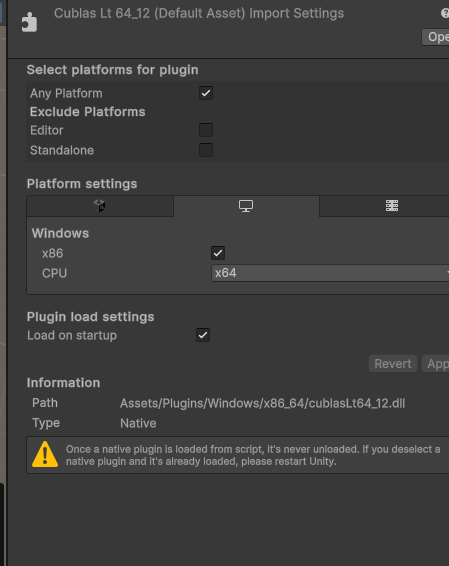
Here are the key settings to configure:
-
Select platforms for plugin:
- Uncheck "Any Platform". If you're building on and for a 64-bit Windows machine, you should only check "Editor" and "Standalone".
- Under the platform settings (e.g., the Windows logo tab), ensure the CPU is set to
x86_64(for 64-bit). The debug build you created is likely for your current machine's architecture.
-
Platform-specific settings:
- Click on the tab corresponding to your operating system (e.g., the Windows icon, the Apple icon).
- Make sure the "Editor" and "Standalone" platforms are checked, and the CPU architecture matches your build (
x86_64).
-
Load on startup:
- Ensure this option is checked. This tells Unity to load your Rust library into memory as soon as the game starts.
-
The "Restart Required" Warning:
- You will see a warning that native plugins are not unloaded until the editor is restarted. This is extremely important. If you make changes to your Rust code and recompile the library, you must close and reopen the Unity Editor for the changes to take effect. Forgetting this step is a very common source of confusion.
After configuring the settings, click the Apply button at the bottom of the Inspector.
Conclusion
That's it! You have successfully imported your Rust-based game engine as a native plugin into your Unity project. Unity is now aware of your library and will load it on startup.
Key Takeaways:
- Unity loads native libraries from the
Assets/Pluginsfolder. - You must copy your compiled
.dll,.so, or.dylibfile into this folder. On macOS, you should rename.dylibfiles to.bundle. - The Import Settings in the Inspector are used to specify target platforms (e.g., Windows x64) and load behavior for the plugin.
- Crucially, any changes to the Rust library require a full restart of the Unity Editor to be loaded.
While the plugin is loaded, our C# scripts don't yet know how to communicate with it. In our next lesson, "Call Rust functions from C# scripts in Unity using P/Invoke," we will bridge this final gap. We'll create a C# script and use the DllImport attribute to call the create_game_state, level_up, and get_level functions we defined in Rust, seeing the two halves of our application communicate for the very first time.