Hello! Welcome to the next stage of our life simulation game. In the last lesson, we built a robust UI system to display the immediate outcomes of social interactions—mood and relationship changes. This feedback loop is essential for players to understand the game's mechanics.
Today, we're taking a major leap toward creating truly dynamic and unpredictable characters. We will set up the core technology that will power their conversations: a local Large Language Model (LLM). Your goal for this lesson is to install and configure a local LLM API (e.g., Ollama) and verify its operation. By the end, you'll have a private, powerful AI engine running on your own machine, ready to be integrated into our Rust backend to generate unique dialogue.
1. What is Ollama and Why Are We Using It?
Before we dive in, let's briefly cover what Ollama is and why it's a great fit for our project.
Ollama is an open-source tool that makes it incredibly simple to download, set up, and run powerful open-source LLMs on your local computer. For our game, this approach has several key advantages:
- Privacy and Offline Use: All data processing happens on your machine. This means our game won't need an internet connection for its core dialogue feature, and player data remains completely private.
- No API Costs: Unlike cloud-based AI services (like OpenAI's GPT series) that charge per use, running models locally with Ollama is free. This is ideal for development and for the final game.
- Customization: Ollama gives us access to a vast library of different models. We can choose models that are small and fast, or larger and more creative, depending on our needs.
The main takeaway is that Ollama provides a self-contained, cost-effective, and private "brain" that we can plug into our game to bring characters to life.
2. Installation and Initial Setup
Let's get Ollama installed. The process is straightforward and well-documented. We'll use a video guide to walk through the steps.
Before you start, a quick note on hardware: LLMs can be memory-intensive. For a smooth experience, it's recommended to have at least 8GB of RAM, with 16GB being ideal for running more capable models. We will start with a very small model that should run well on most systems.
Learn Ollama in 15 Minutes - Run LLM Models Locally for FREE
This video from the Tech With Tim channel provides a concise walkthrough of the entire Ollama setup process. We'll use it to get you up and running quickly.
Watch the first part of this video from 00:29 to 01:43. It covers downloading the Ollama application for your operating system (Windows, macOS, or Linux) and verifying the installation by running the ollama command in your terminal or command prompt.
After following the video's instructions, you should have Ollama installed. To confirm this, open a new terminal (or Command Prompt/PowerShell on Windows) and run the following command:
ollama
If the installation was successful, you should see a list of available commands.

3. Downloading and Running Your First Model
With Ollama installed, the next step is to download an LLM. Ollama provides a library of models with different sizes and capabilities. We'll start with phi3:mini, a small but surprisingly capable model from Microsoft that is perfect for testing our setup.
The ollama run command will automatically download the model if you don't have it, and then start an interactive chat session.
Learn Ollama in 15 Minutes - Run LLM Models Locally for FREE
Now that Ollama is installed, let's download and run our first model. This next segment of the video will walk you through the process.
Watch from 01:36 to 04:07. This section explains how to find models and, most importantly, how to download and run one using the ollama run <model_name> command. You'll see how it pulls the model from the internet and then starts a chat session right in your terminal. When you're ready, run the following command in your terminal:
ollama run phi3:mini
You will see a download progress bar. Once it's finished, you'll be presented with a >>> prompt. You are now chatting directly with the AI! Try asking it a question, for example: Why is the sky blue?
You can see that it responds directly in your terminal. This confirms that the model is running correctly. To exit the chat, type /bye and press Enter.
You can also list all the models you have downloaded locally at any time with the ollama list command.
4. Verifying the API Server
The most important part for our game is not the terminal chat, but the REST API that Ollama automatically starts in the background. This is how our Rust backend will communicate with the LLM.
The API server runs by default at http://localhost:11434.
Step 1: Check the Server Status
First, ensure the Ollama application is running. On Windows, you should see its icon in the system tray; on macOS, it will be in the menu bar. If it's running, open a web browser and navigate to:
http://localhost:11434/
You should see a simple message: Ollama is running.
Step 2: Test the API with curl
Now, let's send a request to the API to prove it can generate responses over HTTP. We'll use curl, a standard command-line tool for making web requests. Since you are a CS undergraduate, you should be familiar with it.
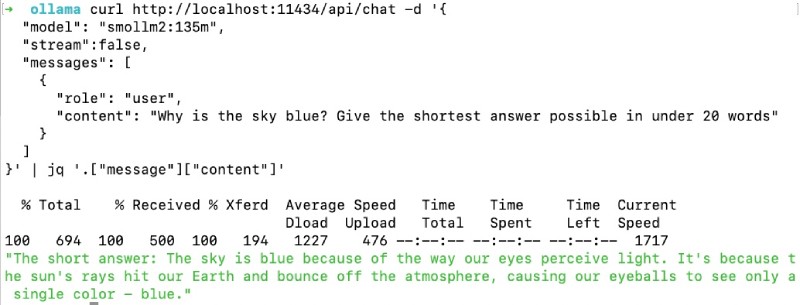
Open your terminal and execute the following command. This command sends a JSON payload to the /api/chat endpoint, asking the phi3:mini model a question.
curl http://localhost:11434/api/chat -d '{
  "model": "phi3:mini",
  "messages": [
    {
      "role": "user",
      "content": "Why is the sky blue? Give a one-sentence answer."
    }
  ],
  "stream": false
}'
Let's break down this command:
curl http://localhost:11434/api/chat: We are targeting the chat endpoint of our local Ollama server.-d '{...}': We are sending data in the request body. The data is a JSON object."model": "phi3:mini": Specifies which installed model to use."messages": [...]: Provides the conversation history. Here, just a single message from a "user"."stream": false: Tells the API to wait until the entire response is generated before sending it back.
If successful, the API will respond with a JSON object containing the model's answer.
Troubleshooting: If you get a "Connection refused" error, it most likely means the Ollama server isn't running. Make sure you have started the Ollama desktop application or, on Linux, run ollama serve in a separate terminal window.
Conclusion
Excellent work! You have successfully set up a complete, local AI development environment on your machine. This is a foundational piece of our game's most innovative feature.
Key Takeaways:
- You have installed and configured Ollama, a powerful tool for running local LLMs.
- You have downloaded and tested a model (
phi3:mini) using the interactive terminal chat. - Most importantly, you have verified that the Ollama REST API is operational by successfully sending a request and receiving a generated response using
curl.
You are now perfectly positioned for the next step. In our upcoming lesson, we will call the local LLM API from Rust using an HTTP client to send a prompt and receive a response. We will leave the world of command-line tools behind and bring this powerful AI capability directly into our game's engine.