Hello! Welcome back to the course.
In our last lesson, you successfully set up Ollama, ran a local Language Model, and confirmed that its API was working using curl. This was a crucial first step in creating the "brain" for our game's characters.
Today, we will connect that brain to our Rust backend. The goal is to call the local LLM API from Rust using an HTTP client to send a prompt and receive a response. We'll be replacing the manual curl command with automated Rust code, establishing the fundamental communication channel that will power all our game's dynamic dialogue.
1. The Architecture of our AI Call
Before writing code, let's visualize what we're building. In the previous lesson, you acted as the "client" by typing a curl command. Now, our Rust application will take on that role.
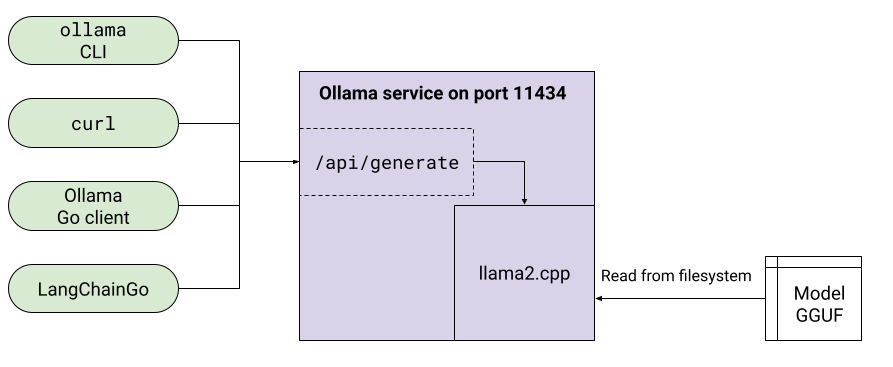
Our Rust code will send an HTTP POST request containing a JSON payload to the Ollama server. The server will process the request, generate text with the model, and stream the response back to our application.
2. Setting Up Your Rust Project
To make HTTP requests and handle JSON data in Rust, we need to add a few essential crates to our project. These are the "power tools" for web communication in the Rust ecosystem.
tokio: An asynchronous runtime for Rust. Since network requests can take time, we need anasyncenvironment so our program doesn't freeze while waiting for the LLM to respond.reqwest: The de facto standard HTTP client for Rust. We'll use it to construct and send our request to the Ollama API. We'll enable itsjsonfeature to make working with JSON data seamless.serdeandserde_json: These crates are the gold standard for serializing (Rust struct to JSON) and deserializing (JSON to Rust struct) data.
Open your project's Cargo.toml file and add the following lines under the [dependencies] section:
[dependencies]
tokio = { version = "1", features = ["full"] }
reqwest = { version = "0.12", features = ["json"] }
serde = { version = "1.0", features = ["derive"] }
serde_json = "1.0"
Alternatively, you can run these commands in your terminal from your project's root directory:
cargo add tokio -F full
cargo add reqwest -F json
cargo add serde -F derive
cargo add serde_json
3. Implementing the API Call
Now for the core of the lesson: writing the Rust code to communicate with Ollama. We will build an asynchronous function that takes a prompt as input and returns the LLM's generated response as a string.
We'll be referencing an excellent article that demonstrates this exact process. Your task is to study its approach, and then we'll integrate it into our project.
Categorizing Data with Large Language Models in Rust
This article from Ardan Labs provides a clear, self-contained example of calling the Ollama API's /api/generate endpoint using reqwest. We will use its llm_completion function as the blueprint for our implementation.
Please read the section titled 'Talking to the LLM'. Focus on the code provided for the LLM_API constant, the Response struct, and especially the llm_completion async function. The key is to understand how it constructs the JSON request, sends it, and then handles the streaming response.
Breaking Down the Code
Let's dissect the key components from the article and adapt them for our main.rs file.
Step 1: The Main Function and Tokio Runtime
First, we need to set up our main function to run in an async context provided by tokio. We'll also use a generic Result for cleaner error handling.
use serde::Deserialize;
use serde_json::json;

// Define a generic Result type for our main function
type Result<T> = std::result::Result<T, Box<dyn std::error::Error>>;


#[tokio::main]
async fn main() -> Result<()> {
    println!("->> Sending prompt to LLM...");

    let prompt = "Why is the sky blue? Explain it like I'm five years old.";

    let response = llm_completion(prompt).await?;

    println!("\n->> LLM Response:\n{}", response);

    Ok(())
}
Step 2: Defining the Data Structures
Ollama's API streams back a series of JSON objects. We need a Rust struct that serde can use to deserialize each piece of the response. Based on the article and Ollama's API docs, the generate endpoint returns objects with a response field containing a fragment of the text.
// This struct will be used to deserialize each chunk of the streaming response


#[derive(Deserialize)]
struct OllamaResponse {
    response: String,
}
Step 3: The API Call Function
This is the function that does all the heavy lifting. It's adapted directly from the article you just read. It builds the request, sends it, and pieces together the streaming response.
Notice that we're using the /api/generate endpoint and specifying the model we downloaded in the last lesson, phi3:mini.
async fn llm_completion(prompt: &str) -> Result<String> {
    const LLM_API_URL: &str = "http://localhost:11434/api/generate";

    // Create a reqwest client
    let client = reqwest::Client::new();

    // Use serde_json::json! macro to create the request payload
    let request_payload = json!({
        "model": "phi3:mini",
        "prompt": prompt,
        "stream": false // For this first example, we'll get the full response at once.
    });

    // Send the POST request
    let res = client.post(LLM_API_URL)
        .json(&request_payload)
        .send()
        .await?;

    // Check if the request was successful
    if !res.status().is_success() {
        // We are creating a custom error here to provide more context.
        let status = res.status();
        let text = res.text().await?;
        return Err(format!("LLM API request failed with status {}: {}", status, text).into());
    }

    // Deserialize the JSON response into our struct
    let ollama_response = res.json::<OllamaResponse>().await?;

    // Return the response field
    Ok(ollama_response.response)
}
Note on Streaming: In the code above, I've set "stream": false. This simplifies our first attempt by making the API send the entire response in one go, rather than in small chunks. The article you read shows how to handle stream: true, which is better for interactive applications. We will revisit streaming in a later lesson when we display dialogue in the UI word-by-word.
4. Putting It All Together and Testing
Combine all the pieces into your main.rs file. The complete file should look like this:
use serde::Deserialize;
use serde_json::json;

// Define a generic Result type for our main function
type Result<T> = std::result::Result<T, Box<dyn std::error::Error>>;

// This struct will be used to deserialize the JSON response


#[derive(Deserialize, Debug)]
struct OllamaResponse {
    response: String,
}


#[tokio::main]
async fn main() -> Result<()> {
    // Ensure the Ollama server is running before executing this
    println!("->> Sending prompt to LLM...");

    let prompt = "Why is the sky blue? Explain it like I'm five years old.";

    let response = llm_completion(prompt).await?;

    println!("\n->> LLM Response:\n{}", response);

    Ok(())
}

async fn llm_completion(prompt: &str) -> Result<String> {
    const LLM_API_URL: &str = "http://localhost:11434/api/generate";

    let client = reqwest::Client::new();

    let request_payload = json!({
        "model": "phi3:mini",
        "prompt": prompt,
        "stream": false
    });

    let res = client.post(LLM_API_URL)
        .json(&request_payload)
        .send()
        .await?;

    if !res.status().is_success() {
        let status = res.status();
        let text = res.text().await?;
        return Err(format!("LLM API request failed with status {}: {}", status, text).into());
    }

    let ollama_response = res.json::<OllamaResponse>().await?;

    Ok(ollama_response.response)
}
Now, make sure your Ollama application is running in the background. Then, run your Rust program from the terminal:
cargo run
If everything is configured correctly, you will see your prompt being sent, followed by the complete answer generated by the phi3:mini model printed to your console.
Conclusion
Fantastic work! You have successfully bridged the gap between your Rust backend and a local AI model. You now have a reusable, asynchronous function capable of sending any prompt to your LLM and retrieving its response.
Key Takeaways:
- You've configured your Rust project with
reqwest,serde, andtokiofor asynchronous web communication. - You implemented a function that sends a JSON payload to the Ollama
/api/generateendpoint using an HTTP POST request. - You learned how to deserialize the JSON response from the API back into a native Rust struct to access the generated text.
This function is a powerful new tool in our game development arsenal. In the next lesson, we will move beyond simple questions and learn how to construct dynamic LLM prompts that include character personality, mood, and relationship context, making the generated dialogue truly feel like it's coming from the unique characters in your game world.