Hello! Welcome back to Module 6.
In our previous lesson, you successfully built a click-to-select system. Your game can now distinguish between clicks meant for movement and clicks meant for selecting an interactable object. We ended by storing the selected object in a variable, _currentSelection. Now, it's time to give the player a way to interact with that selection.
This lesson directly addresses the learning outcome: Build a dynamic radial menu UI that appears on selection and displays available interactions. A radial menu is an excellent choice for simulation games because it's fast, contextual, and doesn't obscure the player's view of the game world.
By the end of this 60-minute lesson, you will have a functional, animated radial menu that appears when an object is selected.
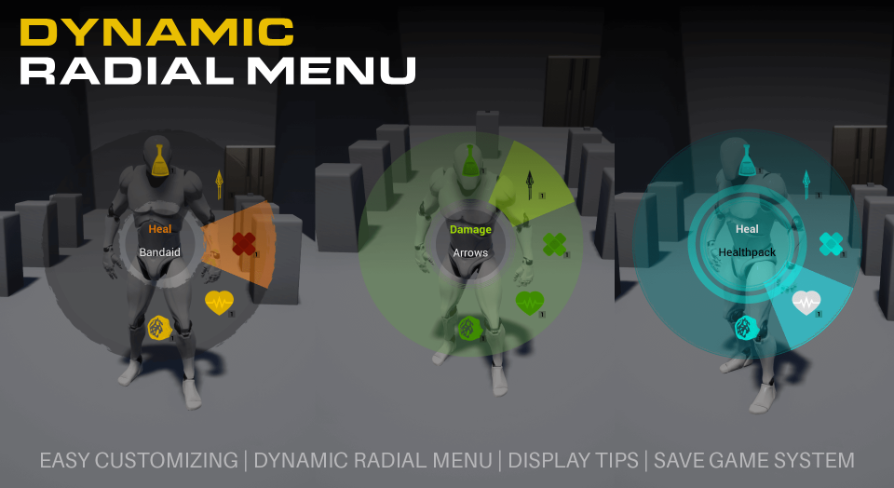
1. The Anatomy of a Radial Menu
A dynamic radial menu isn't a single UI component, but a collection of elements working together. We will break down its construction into three main parts:
- The Entry: A single button in the menu, containing an icon and a label. We'll create this as a reusable prefab.
- The Controller: A script that spawns the entries, arranges them in a circle, and manages the menu's state (open/closed).
- The Interaction: Logic to handle clicks on an entry and trigger a specific action.

2. Building the Menu Components in Unity
We will be following a comprehensive video tutorial to guide the hands-on implementation. Your experience with the Unity Editor will be very helpful here.
First, let's create the visual template for a single button in our menu. This will be a prefab that we can instantiate for every available interaction.
Radial Menu Tutorial for Unity
This first segment of the 'Radial Menu Tutorial for Unity' by PabloMakes will guide you through creating a prefab for a single menu entry. This involves setting up a backer image, an icon, and a text label.
Watch from 00:36 to 02:10. Follow the steps to create a RadialMenuEntry GameObject with its child components (Backer, Icon, Label) and save it as a prefab. You can use placeholder images and text for now.
With the entry prefab ready, our next task is to write a controller script that can spawn these entries and, crucially, arrange them in a circle. This involves a little trigonometry to calculate the position of each entry.
The position of a point on a circle can be found using the formulas:
Where is the radius of the circle and is the angle. By iterating through our menu entries and increasing the angle for each one, we can place them evenly around a central point.
The next video segment demonstrates exactly how to implement this.
Radial Menu Tutorial for Unity
This part of the tutorial covers creating the main RadialMenu script. It shows you how to instantiate your entry prefabs and dynamically calculate their positions using sine and cosine to form a circle.
Watch from 02:10 to 06:30. Pay close attention to the Rearrange function and how Mathf.Sin and Mathf.Cos are used with an angle offset to position each UI element. You will also hook up the script to a button to test the Open function.
At this point, you should have a basic but functional radial menu that appears when you trigger the Open method. The entries are all identical, but they are arranged correctly.
3. Adding Polish and Interactivity
A static menu is functional, but polish is what makes a UI feel good to use. We will now add unique icons, animations, and click functionality.
First, let's give each entry its own icon.
Radial Menu Tutorial for Unity
Let's continue with the same video to learn how to assign unique icons to each of our menu entries.
Watch from 06:30 to 08:14. This section demonstrates how to pass a Texture to each entry to customize its icon. You can use any small images you have available as placeholders.
Next, let's add animations for hovering over an entry and for the open/close sequence. The video uses a popular, free Unity library called DOTween, which simplifies UI animation. You can get it from the Unity Asset Store.
Radial Menu Tutorial for Unity
This segment covers adding juicy animations. You'll implement hover effects (scaling the icon) and a staggered animation for when the menu opens, making it pop into view.
Watch from 08:14 to 13:20. Follow the steps to add the IPointerEnterHandler and IPointerExitHandler interfaces to your RadialMenuEntry script and use DOTween to animate the scale.
Finally, and most importantly, we need to make the buttons do something when clicked. The best way to do this is with delegates and callbacks. A delegate is essentially a type that references a method. We can give each menu entry a delegate variable, and when the entry is clicked, it can call the method that the delegate is pointing to. This allows us to assign a different action to each button.
Radial Menu Tutorial for Unity
This final segment from the video explains how to use delegates to create callbacks. This is the key to assigning unique functionality to each button in our menu.
Watch from 14:46 to 18:01. Focus on how a delegate type is declared and how an instance of it is used as a Callback in the RadialMenuEntry script. This allows the RadialMenu controller to decide what happens when an entry is clicked.
4. Integrating the Radial Menu with Selection
You now have a self-contained, beautiful radial menu. The final step is to link it to the SelectionManager from the previous lesson. The menu should appear when an object is selected and disappear when it's deselected.
- Create an instance of the menu. Drag your
RadialMenuprefab into your scene's Canvas. Make sure it's initially disabled so it's not visible on game start. - Modify
SelectionManager.cs. We need to get a reference to theRadialMenuand call its public methods.
Update your SelectionManager.cs script with the following changes:
using UnityEngine;

public class SelectionManager : MonoBehaviour
{
    public LayerMask interactableLayer;
    public LayerMask walkableLayer;

    private Transform _currentSelection;
    private PlayerMovementController _playerMovement;

    // Add a reference to the RadialMenu
    private RadialMenu _radialMenu;

    void Start()
    {
        _playerMovement = FindObjectOfType<PlayerMovementController>();
        // Find the RadialMenu in the scene
        _radialMenu = FindObjectOfType<RadialMenu>(true); // 'true' to find inactive objects
    }

    void Update()
    {
        // Deselect if we right-click
        if (Input.GetMouseButtonDown(1))
        {
            if (_currentSelection != null)
            {
                _currentSelection = null;
                _radialMenu.Close(); // Close the menu on deselect
                Debug.Log("Deselected.");
            }
        }

        if (Input.GetMouseButtonDown(0))
        {
            // First, check if the mouse is over a UI element. If so, do nothing.
            if (UnityEngine.EventSystems.EventSystem.current.IsPointerOverGameObject())
            {
                return;
            }

            Ray ray = Camera.main.ScreenPointToRay(Input.mousePosition);
            RaycastHit hit;

            // 1. Check for Interactable objects first
            if (Physics.Raycast(ray, out hit, 100f, interactableLayer))
            {
                _currentSelection = hit.transform;
                Debug.Log("Selected: " + _currentSelection.name);

                // Open the menu at the mouse position
                _radialMenu.Open(Input.mousePosition);
            }
            // 2. If no interactable was hit, check for Walkable ground
            else if (Physics.Raycast(ray, out hit, 100f, walkableLayer))
            {
                // A movement click should also close the menu
                _playerMovement.MoveTo(hit.point);
                _currentSelection = null;
                _radialMenu.Close();
                Debug.Log("Movement click at: " + hit.point);
            }
        }
    }
}
- Modify
RadialMenu.cs. You'll need to adapt theOpenandClosemethods to be public and to handle positioning. TheTogglelogic from the video can be split into publicOpenandClosemethods.
// In your RadialMenu.cs script

public void Open(Vector2 screenPosition)
{
    // If already open, do nothing or reposition
    if (transform.childCount > 0) return;

    // Set the menu's position to the mouse position
    // Note: This requires the menu's parent Canvas to be in "Screen Space - Overlay" mode.
    transform.position = screenPosition;

    // --- The logic from the video to instantiate and arrange entries goes here ---
    // For example:
    // for (int i = 0; i < numEntries; i++)
    // {
    //     AddEntry(...);
    // }
    // Rearrange();
}

public void Close()
{
    // --- The logic from the video to destroy entries goes here ---
    // For example, iterating through children and animating them out before destroying.
}
After these changes, run your scene. Clicking an interactable object should now pop open your radial menu right at the cursor! Right-clicking or clicking the ground to move should make it disappear.
Conclusion
Fantastic work! You have successfully designed, built, and integrated a dynamic and visually appealing radial menu. This is a huge step forward for your game's user experience.
Key Takeaways:
- Prefab-based UI: Building UI components as prefabs is a powerful and scalable approach in Unity.
- Procedural Layout: You can use trigonometry (
sin,cos) to create complex UI layouts like circles programmatically. - Delegates for Callbacks: Delegates are a clean, type-safe way to make UI elements trigger specific, assignable C# functions, decoupling the UI from the game logic.
- Input Management: A central
SelectionManagerthat routes input (selecting, moving, UI interaction) is critical for avoiding conflicts and creating predictable player controls.
In this lesson, the menu options were still hard-coded for demonstration purposes. In our next lesson, Define interactions as data-driven entries in JSON, specifying their type and associated need changes, we will remove this hard-coded logic. You will learn to define interactions in external JSON files and dynamically load them into the radial menu based on which object you select.