Hello! Welcome to the final lesson of our course on building a 3D life simulation game.
In our last session, you built a fully functional settings menu, complete with an autonomy toggle that communicates with the Rust backend and a master volume slider that controls the game's overall sound level using Unity's Audio Mixer.
Today, we will bring your game world to life by fulfilling this lesson's learning outcome: to integrate basic background music and UI sound effects. We'll expand on the audio system you've already started, creating separate channels for music and effects, and hooking them up to our settings menu. This lesson will add a crucial layer of polish and atmosphere to your project.
1. Upgrading the Audio Mixer for Granular Control
In the previous lesson, we created an AudioMixer with a single "Master" volume control. A more robust setup involves creating separate channels, or "Groups," for different types of audio. This allows the player to adjust the volume for music and sound effects independently.
Let's modify the MasterMixer you created.
How To Add Sound Effects the RIGHT Way | Unity Tutorial
This video provides a clear, step-by-step guide to creating and configuring groups within an Audio Mixer. We will follow this process to set up dedicated groups for our music and sound effects.
Watch the section from 08:36 to 10:15. Follow the instructions to: Open your MasterMixer. Create two new groups under 'Master' and name them Music and SFX. For both the Music and SFX groups, right-click their 'Volume' parameter in the Inspector and select 'Expose to script'. In the 'Exposed Parameters' list in the Audio Mixer window, rename the new parameters to MusicVolume and SFXVolume respectively.
By the end of this step, your AudioMixer will have a hierarchy: Master at the top, with Music and SFX as its children. This structure allows the master volume to control everything, while the individual group volumes provide fine-grained control.
2. Creating a Centralized Audio Manager
To avoid placing audio playback logic in scripts all over your project, we'll create a centralized AudioManager. This class will be responsible for playing all music and sound effects. We will use the Singleton pattern, which ensures that only one instance of the AudioManager ever exists and that it persists even when we change scenes.
First, let's create the script and set up the AudioSource components.
Your Tasks:
- In your Unity project, create a new C# script named
AudioManager.cs. - Create a new empty GameObject in your scene, name it
_AudioManager. - Add the
AudioManager.csscript to this GameObject. - On the
_AudioManagerGameObject, add twoAudioSourcecomponents. We'll configure them next.
Now, open AudioManager.cs and replace its content with the code below.
// AudioManager.cs
using UnityEngine;

public class AudioManager : MonoBehaviour
{
    public static AudioManager instance;

    // --- Audio Sources ---
    // Assign these in the Inspector
    public AudioSource musicSource;
    public AudioSource sfxSource;

    void Awake()
    {
        // Singleton pattern implementation
        if (instance == null)
        {
            instance = this;
            DontDestroyOnLoad(gameObject);
        }
        else
        {
            Destroy(gameObject);
        }
    }

    public void PlaySoundEffect(AudioClip clip)
    {
        // Use PlayOneShot for sound effects to allow overlapping sounds
        sfxSource.PlayOneShot(clip);
    }
}
This script establishes the singleton and provides a public method to play sound effects. The DontDestroyOnLoad function is key to making our background music persistent.
To learn more about the distinction between Play() and PlayOneShot(), which is crucial for correct audio implementation, please review the following guide.
Sound Effects and Background Music in Unity - Complete Guide
The article 'Sound Effects and Background Music in Unity - Complete Guide' offers a clear breakdown of Unity's audio components. We'll use it to understand why different methods are used for music versus sound effects.
Read the section titled 'Making Sound Effects That Feel Responsive and Alive'. Focus on the comparison table that explains the difference between AudioSource.Play() and AudioSource.PlayOneShot().
3. Implementing Background Music
With our AudioManager in place, let's configure the AudioSource for music.
- Find a Music Track: Download a free, loopable music track. You can find many options on sites like OpenGameArt.org or Kenney.nl. Import it into your Unity project.
- Configure the Music Source:
- On your
_AudioManagerGameObject, select the firstAudioSourcecomponent. - Drag your music clip into the
AudioClipfield. - Check the boxes for
Play On AwakeandLoop. - Crucially, find the
Outputfield and assign it to theMusicgroup of yourMasterMixer.
- On your
- Assign in Script: In the Inspector for
_AudioManager, drag this configuredAudioSourcecomponent into theMusic Sourcefield of yourAudioManagerscript.
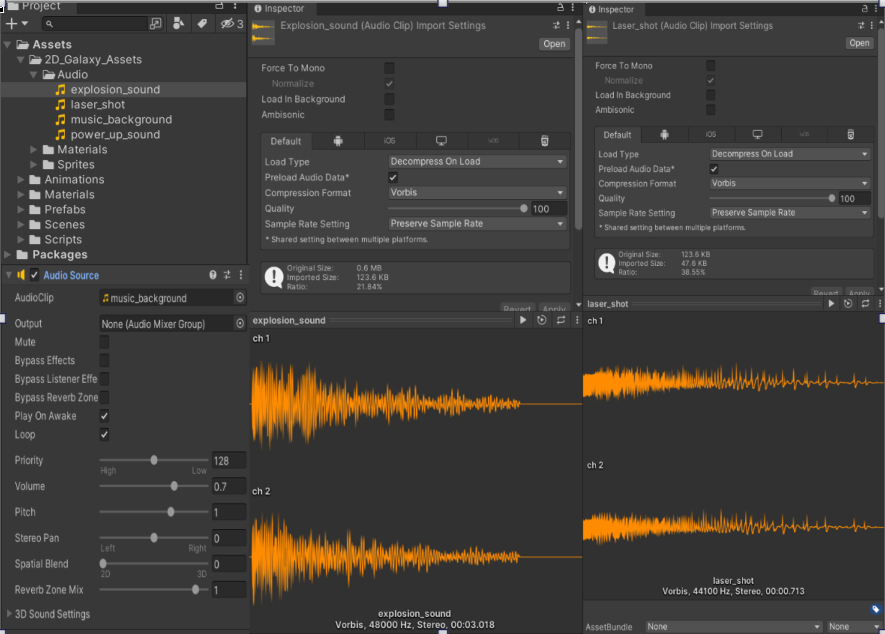
Now, if you run your game, the background music should start playing automatically, loop indefinitely, and be routed through the correct audio channel.
4. Adding UI Sound Effects
Next, let's add satisfying click sounds to our UI buttons.
- Find a Sound Effect: Find a short, simple "click" sound effect and import it into Unity.
- Configure the SFX Source:
- On the
_AudioManagerGameObject, select the secondAudioSourcecomponent. - Do not assign an
AudioClip. We will pass clips to it via code. - Ensure
Play On Awakeis unchecked. - Set the
Outputto theSFXgroup of yourMasterMixer.
- On the
- Assign in Script: Drag this
AudioSourcecomponent into theSfx Sourcefield of yourAudioManagerscript.
Now, we'll modify the SettingsController.cs from the previous lesson to play a sound when buttons are clicked.
// In SettingsController.cs

// Add this at the top of the class
public AudioClip uiClickSound; // Assign this in the Inspector

// ...

// Inside the Start() method, modify your button callbacks:
settingsButton.clicked += () =>
{
    settingsPanel.style.display = DisplayStyle.Flex;
    AudioManager.instance.PlaySoundEffect(uiClickSound);
};
closeSettingsButton.clicked += () =>
{
    settingsPanel.style.display = DisplayStyle.None;
    AudioManager.instance.PlaySoundEffect(uiClickSound);
};
After making these changes, select the GameObject with your SettingsController and drag your click sound effect into the Ui Click Sound field in the Inspector. Now your buttons will have audio feedback!
5. Updating the Settings Menu
Finally, let's update our settings menu to control the new Music and SFX channels.
1. Update the UI:
- Open your UI Document in the UI Builder.
- Rename your existing
volume-slidertomusic-volume-slider. - Duplicate this slider and name the new one
sfx-volume-slider. Adjust the labels accordingly.
2. Update SettingsController.cs:
You need to add logic for the new SFX slider, mirroring what you already did for the master volume.
// In SettingsController.cs, update the variables
private Slider musicVolumeSlider;
private Slider sfxVolumeSlider; // New slider

// In the Start() method, update your queries and add new callbacks
musicVolumeSlider = root.Q<Slider>("music-volume-slider");
sfxVolumeSlider = root.Q<Slider>("sfx-volume-slider"); // New

musicVolumeSlider.RegisterValueChangedCallback(OnMusicVolumeChanged);
sfxVolumeSlider.RegisterValueChangedCallback(OnSfxVolumeChanged); // New

// ...

// Rename OnVolumeChanged to OnMusicVolumeChanged
private void OnMusicVolumeChanged(ChangeEvent<float> evt)
{
    float volumeValue = evt.newValue;
    masterMixer.SetFloat("MusicVolume", Mathf.Log10(volumeValue) * 20);
    PlayerPrefs.SetFloat("MusicVolume", volumeValue);
}

// Add the new callback for SFX
private void OnSfxVolumeChanged(ChangeEvent<float> evt)
{
    float volumeValue = evt.newValue;
    masterMixer.SetFloat("SFXVolume", Mathf.Log10(volumeValue) * 20);
    PlayerPrefs.SetFloat("SFXVolume", volumeValue);

    // Play a sound so the user can hear the change
    if (evt.previousValue != evt.newValue) // Avoid playing sound on initial load
    {
        AudioManager.instance.PlaySoundEffect(uiClickSound);
    }
}

// Update the LoadSettings() method
private void LoadSettings()
{
    // Load Music Volume
    float savedMusicVolume = PlayerPrefs.GetFloat("MusicVolume", 1.0f);
    musicVolumeSlider.SetValueWithoutNotify(savedMusicVolume);
    masterMixer.SetFloat("MusicVolume", Mathf.Log10(savedMusicVolume) * 20);

    // Load SFX Volume (New)
    float savedSfxVolume = PlayerPrefs.GetFloat("SFXVolume", 1.0f);
    sfxVolumeSlider.SetValueWithoutNotify(savedSfxVolume);
    masterMixer.SetFloat("SFXVolume", Mathf.Log10(savedSfxVolume) * 20);

    // ... rest of the method for autonomy ...
}
This video reinforces the process of connecting UI sliders to mixer parameters and saving the values, which you are now doing for two separate channels.
Unity AUDIO Volume Settings Menu Tutorial
This tutorial shows the complete process of creating volume sliders for both music and SFX, including saving the settings with PlayerPrefs. It's a great review of the concepts you've just applied.
Watch from 05:28 to 09:14. This covers using PlayerPrefs to save and load settings (which you've just implemented) and duplicating the music slider setup for SFX, confirming the approach we've taken.

Conclusion
Congratulations on completing the final lesson! You have successfully integrated a foundational audio system into your game. This adds an essential layer of feedback and immersion that makes the world feel more dynamic and responsive.
Key Takeaways:
- The AudioManager Singleton is an effective pattern for managing game-wide audio from a single, persistent point of access.
- AudioMixer Groups are essential for separating audio into controllable channels like Music and SFX.
- Using
Play On AwakeandLoopon anAudioSourceis ideal for background music, whilePlayOneShot()is perfect for non-interrupting sound effects. - Connecting UI elements like sliders and buttons to the audio system provides critical player feedback and control.
You have now built the core foundation of a complex life simulation game, from the Rust backend and its communication with the Unity frontend, to character systems, AI, UI, and now audio. You have a powerful, extensible base from which to continue building your unique vision. Well done