Welcome to the second module of our course! You've built a strong foundation in Java's procedural elements like loops, methods, and arrays. Now, we're taking a significant and exciting leap into Object-Oriented Programming (OOP). This is the paradigm that powers most modern, large-scale software, including the Spring Boot applications you aim to build.
In this first lesson on OOP, we will focus on its most fundamental building block: the class. You will learn how to define your own custom data types with state (fields) and behavior (methods), and how to properly initialize them using constructors. This moves you from simply using data types like int and String to creating your own, a crucial skill for any software engineer.
1. From Blueprints to Objects: The Core Idea of OOP
So far, we've worked with data and functions separately. You might have an array of strings for student names and a separate method to print them. OOP brings data and the functions that operate on that data together into a single, cohesive unit called an object.
The blueprint for creating these objects is called a class.
Think of a class as an architect's blueprint for a house. The blueprint itself isn't a house; it defines the properties (e.g., number of bedrooms, color of the walls) and functionalities (e.g., open door, turn on lights) a house will have. An object is an actual house built from that blueprint. You can build many houses (objects) from the same blueprint (class), each with its own specific properties (a red house, a blue house, etc.).
The video from CS Dojo provides an excellent conceptual introduction using a robot analogy.
Introduction to Classes and Objects - Part 1 (Data Structures & Algorithms #3)
This video explains the fundamental difference between classes and objects and why they are so useful for organizing code.
Watch the segment from the beginning until the overview. Focus on understanding the distinction between a class as a blueprint and an object as a specific instance with its own state.
2. The Anatomy of a Java Class
In Java, we define these blueprints using the class keyword. A class encapsulates three main types of members:
- Fields: Variables that define the state or attributes of an object (e.g., a
Carobject'scolororspeed). - Methods: Functions that define the behavior or actions an object can perform (e.g., a
Carobject'sstartEngine()oraccelerate()method). - Constructors: Special methods used to create and initialize new objects from the class.
This diagram shows how these components are structured within a class definition.
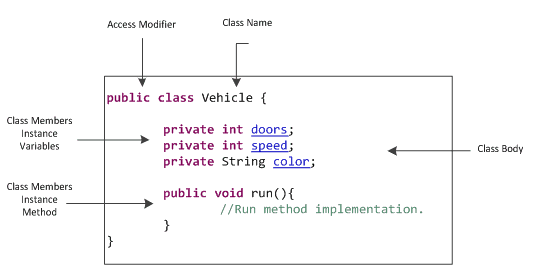
The infographic below provides a great high-level summary of the key concepts we'll be covering in detail.

3. Defining a Class: Fields, Methods, and Constructors
Let's dive into the syntax for defining each part of a class. The article "Classes and objects in Java" from InfoWorld offers a thorough, well-structured explanation of these concepts.
This article will be our main textual guide for understanding the syntax and purpose of fields, methods, and constructors.
Please read the following sections: First, read "How to declare a class" for the basic syntax. Next, focus on "Using fields to describe attributes" to understand how to define the state of your objects. Then, read "Using methods to describe behaviors" to learn how to define object actions. Finally, study "Using constructors to initialize objects". Pay close attention to the role of the this keyword and constructor overloading.
Let's recap the key points from that reading.
Fields: The State of an Object
Fields, also known as instance variables, hold the data for an object. Each object gets its own copy of these variables.
class Student {
    String name;  // A field for the student's name
    int studentId; // A field for the student's ID
    String major; // A field for the student's major
}
Methods: The Behavior of an Object
Methods define what an object can do. They operate on the object's fields to perform actions or calculations.
class Student {
    String name;
    int studentId;
    String major;

    // A method to display student information
    void displayInfo() {
        System.out.println("Student ID: " + studentId + ", Name: " + name + ", Major: " + major);
    }
}
Constructors: Initializing an Object
Manually setting each field after creating an object is clumsy. A constructor is a special method that runs automatically when you create a new object, allowing you to initialize its fields right away.
- It must have the exact same name as the class.
- It has no return type, not even
void.
If you don't provide a constructor, Java gives you a default, no-argument constructor that does nothing. However, it's best practice to define your own.
class Student {
    String name;
    int studentId;
    String major;

    // This is a constructor
    Student(String studentName, int id, String studentMajor) {
        // The 'this' keyword refers to the current object's fields
        this.name = studentName;
        this.studentId = id;
        this.major = studentMajor;
    }

    void displayInfo() {
        System.out.println("Student ID: " + studentId + ", Name: " + name + ", Major: " + major);
    }
}
The this keyword is crucial here. It disambiguates between the class field (e.g., this.name) and the constructor parameter (e.g., studentName). It's common to name the parameters the same as the fields, making this essential: this.name = name;.
4. Bringing Objects to Life
Now that we have our Student blueprint (the class), let's see how to create and use actual Student objects (instances). This process is called instantiation.
The following video from the "Keep On Coding" channel provides a fun, practical walkthrough of defining a class, creating objects, and using constructors.
This video demonstrates the full workflow from class definition to object instantiation in an IDE.
First, watch how a simple Pokemon class with fields and a method is created: class definition. Next, see how objects are created (new) and how their fields and methods are accessed (.): creating and using objects. Then, observe how constructors are added to initialize objects more efficiently: adding constructors. Finally, pay close attention to the explanation of the this keyword to resolve naming conflicts: the 'this' keyword.
5. A Complete Example
Let's put everything together. Imagine we have two files.
Student.java - This file contains our class definition (the blueprint).
public class Student {
    // Fields
    String name;
    int studentId;

    // Constructor
    public Student(String name, int studentId) {
        // Use 'this' to assign constructor parameters to fields
        this.name = name;
        this.studentId = studentId;
        System.out.println("New student created: " + this.name);
    }

    // Method
    public void study() {
        System.out.println(this.name + " (ID: " + this.studentId + ") is studying.");
    }
}
University.java - This file contains our main method, where we create and use objects of our Student class.
public class University {
    public static void main(String[] args) {
        // Create a new Student object using the 'new' keyword and the constructor
        Student student1 = new Student("Aisha", 101);

        // Create another Student object
        Student student2 = new Student("Ben", 102);

        // Call the study() method on the first object
        student1.study();

        // Call the study() method on the second object
        student2.study();

        // You can access fields directly (though we'll soon learn a better way)
        System.out.println(student1.name + " and " + student2.name + " are classmates.");
    }
}
When you run University.java, the output will be:
New student created: Aisha
New student created: Ben
Aisha (ID: 101) is studying.
Ben (ID: 102) is studying.
Aisha and Ben are classmates.
Notice how student1 and student2 are separate instances, each with its own name and studentId.
Conclusion
This lesson marked your entry into the world of Object-Oriented Programming. You've learned how to move beyond primitive data types and create your own complex types by defining classes.
Here are the key takeaways:
- A class is a blueprint that defines the structure and behavior of objects.
- An object is a specific instance of a class, with its own state.
- Fields (instance variables) store the state of an object.
- Methods define the behaviors an object can perform.
- Constructors are special methods used to initialize a new object's state upon creation.
- The
newkeyword is used to instantiate an object, and the.operator is used to access its fields and methods. - The
thiskeyword is used inside a class to refer to the current object instance, which is essential for distinguishing between fields and parameters in a constructor.
In our previous lesson, you saw how arrays are stored in a part of memory called the Heap. Objects are also stored on the Heap. In the next lesson, we will explore this in more detail, examining the difference between stack and heap memory and understanding exactly what happens when you write a line like Student student1 = new Student();. This knowledge is crucial for understanding how Java manages memory and avoids common programming errors.