Welcome to our next lesson. In our previous discussion on strings, we saw how Java's design choices, like immutability, contribute to creating robust and efficient code. Today, we'll explore another critical aspect of building resilient software: handling errors. No matter how carefully we code, things can go wrong—a file might be missing, a network connection could drop, or a user might enter invalid data. A professional developer anticipates these issues and ensures the program responds gracefully instead of crashing.
This lesson will equip you with the tools to do just that. We will cover how to handle exceptions in Java using the fundamental try-catch-finally structure. Then, we will look at the modern and more elegant try-with-resources statement, which simplifies a common and critical use case for exception handling. By the end, you'll be able to write code that is not only functional but also stable and reliable in the face of unexpected events.
1. What Are Exceptions and How Do We Handle Them?
An exception is an event that occurs during the execution of a program that disrupts its normal flow. If your code doesn't handle the exception, the program terminates abruptly. You've likely encountered this in Python with its try...except blocks; Java has a very similar and powerful mechanism.
Let's consider a simple scenario. What happens if we try to parse a non-numeric string into an integer?
public class ExceptionExample {
    public static void main(String[] args) {
        String userInput = "hello";
        int number = Integer.parseInt(userInput); // This will fail!
        System.out.println("The number is: " + number); // This line is never reached.
    }
}
Running this code will cause the Java Virtual Machine (JVM) to throw a NumberFormatException and stop execution. To prevent this crash, we can wrap the "risky" code in a try block and provide a handler for the exception in a catch block.
The "Coding with John" channel provides an excellent introduction to this concept.
Exception Handling in Java Tutorial
This video clearly explains what an exception is and walks through the basic syntax and logic of a try-catch block.
Watch the segment from the beginning up to the discussion on the exception hierarchy, specifically from the introduction. Pay attention to how the try-catch block prevents the program from terminating and allows you to execute alternative logic.
The general flow of control is visualized well in this diagram, showing what happens both when an exception occurs and when it doesn't.
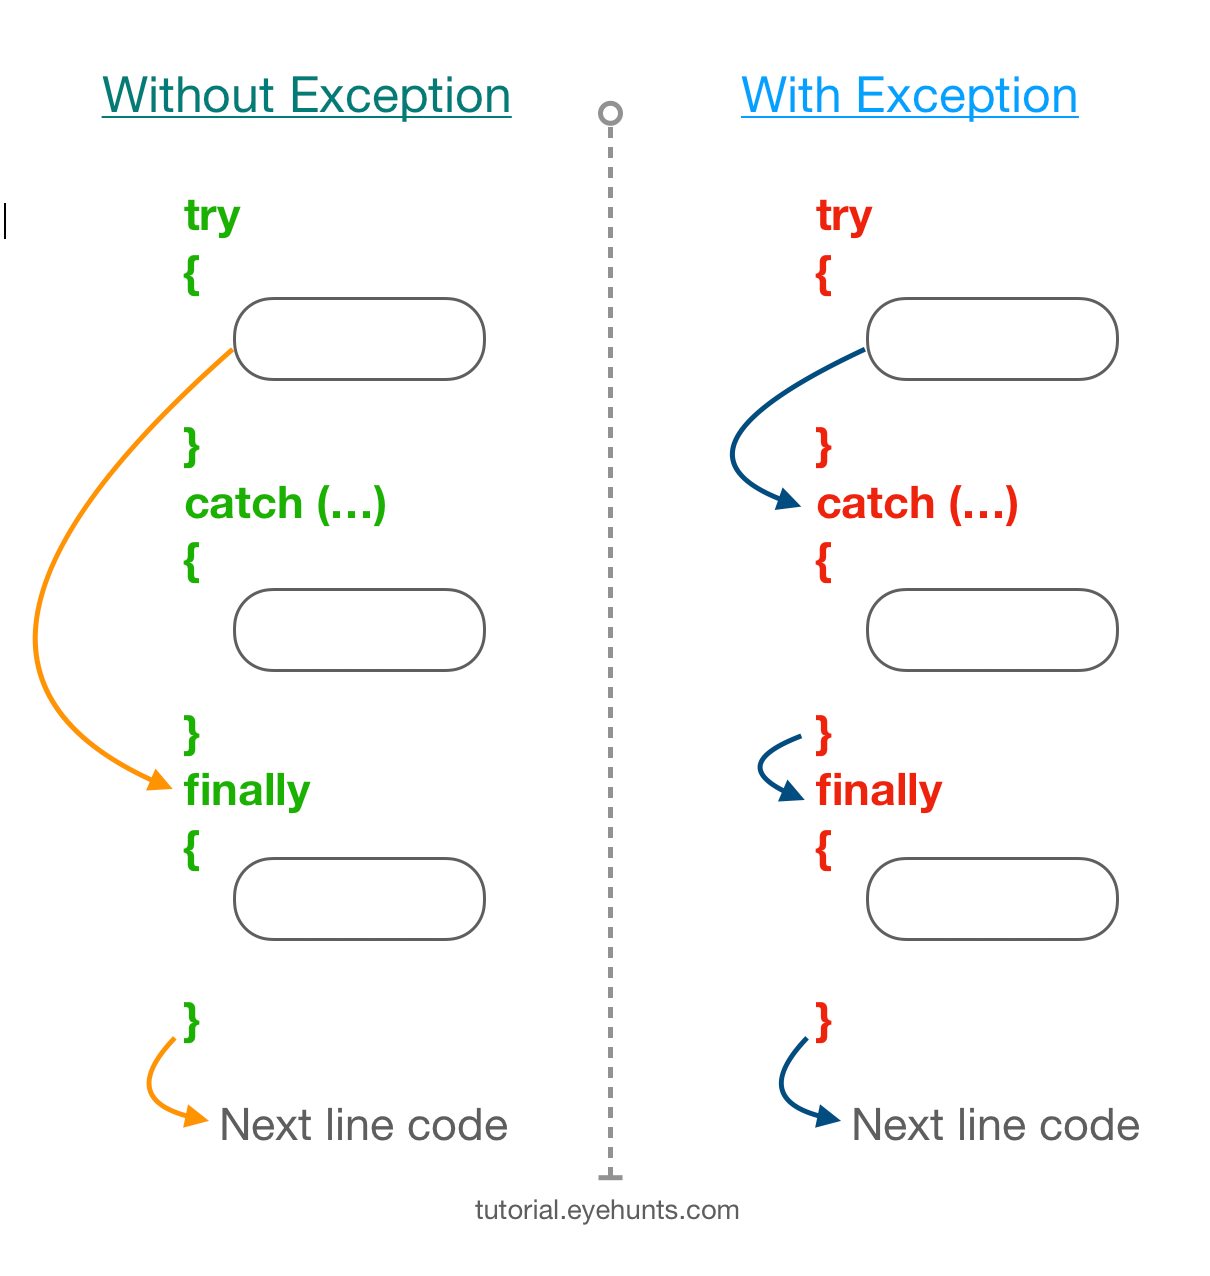
As you can see, the catch block is only executed if an exception of the specified type (or a subtype of it) is thrown within the try block.
2. Handling Multiple Exception Types
A single try block might contain code that can fail in multiple ways. For instance, you could have code that performs a calculation and then accesses an array. This could lead to an ArithmeticException (e.g., division by zero) or an ArrayIndexOutOfBoundsException.
To handle these different scenarios appropriately, you can chain multiple catch blocks after a single try block. Java will execute the first catch block that matches the type of the exception thrown.
try {
    // Code that might throw different exceptions
    int[] numbers = {1, 2, 3};
    int result = numbers[1] / 0; // Throws ArithmeticException first
    System.out.println(numbers[5]); // Could throw ArrayIndexOutOfBoundsException
} catch (ArithmeticException e) {
    System.out.println("Error: A mathematical error occurred. " + e.getMessage());
} catch (ArrayIndexOutOfBoundsException e) {
    System.out.println("Error: Invalid array index. " + e.getMessage());
}
System.out.println("Program continues...");
In the code above, because the ArithmeticException occurs first, its corresponding catch block is executed, and the ArrayIndexOutOfBoundsException is never even thrown.
The article "Beginner's Guide To Try And Catch In Java" provides a clear walkthrough of this concept.
Beginner's Guide To Try And Catch In Java
This section of the article explains why you might want to handle different errors differently and demonstrates the syntax for using multiple catch blocks.
Please read the section titled How to use multiple catch blocks. The examples clearly show how changing the code can trigger different catch blocks.
Since Java 7, you can also use a "multi-catch" block if you want to handle several different exception types with the same logic, avoiding code duplication. The syntax uses a pipe character (|).
try {
    // ...
} catch (ArithmeticException | ArrayIndexOutOfBoundsException e) {
    System.out.println("An error occurred: " + e.getMessage());
}
3. Guaranteed Cleanup with the finally Block
Sometimes, you need to execute a piece of code regardless of what happens in the try block—whether it completes successfully, throws an exception that is caught, or throws an exception that is not caught. This is typically used for resource cleanup, such as closing a file or a network connection.
The finally block is the mechanism for this. It is placed after the try and any catch blocks, and its code is guaranteed to run (with very few exceptions, like a system exit or JVM crash).
The "Coding with John" video has a fantastic segment on finally, including its interaction with return statements—a classic topic for technical interviews.
Exception Handling in Java Tutorial
This part of the video explains the purpose of the finally block and demonstrates its guaranteed execution, even when return statements are present.
Watch the segment on the finally block starting from this timestamp. Pay close attention to the example where return statements are in the try, catch, and finally blocks (around here). Understanding this behavior demonstrates a deep grasp of Java's execution flow.
The key takeaway is that finally provides a robust way to ensure cleanup logic is never skipped.
4. A Better Way: The try-with-resources Statement
While finally is powerful, using it for resource management can become verbose and clunky. You often have to declare the resource variable outside the try block, check if it's null inside the finally block before closing it, and even wrap the close() call in another try-catch block because close() itself can throw an exception.
The following video from the "Deege" channel brilliantly illustrates this problem and presents the modern solution.
This video builds a strong case for try-with-resources by first showing the complexities and pitfalls of using a finally block for closing file resources.
Watch the first part, which sets up the problem of resource leaks. Next, see how the finally block is used to solve this, and how it quickly becomes complex with null checks and nested try-catches. Finally, watch the introduction of the try-with-resources statement, which elegantly handles everything automatically.
Introduced in Java 7, the try-with-resources statement automates the closing of resources. Any object that implements the java.lang.AutoCloseable interface can be used. You declare and initialize the resource in parentheses after the try keyword, and Java ensures its close() method is called automatically at the end of the block.
import java.io.BufferedReader;
import java.io.FileReader;
import java.io.IOException;

public class TryWithResourcesExample {
    public static void main(String[] args) {
        try (BufferedReader br = new BufferedReader(new FileReader("data.txt"))) {
            System.out.println(br.readLine());
        } catch (IOException e) {
            System.err.println("Error reading file: " + e.getMessage());
        }
        // No finally block needed! The BufferedReader is automatically closed.
    }
}
This syntax is cleaner, safer, and less error-prone. For a more formal and detailed explanation, the official Java documentation is the best source.
The try-with-resources Statement (The Java™ Tutorials > Essential ...
This Oracle tutorial is the definitive guide to the try-with-resources statement. It formalizes the concepts shown in the video.
Read the introduction to understand what a "resource" is in this context. Study the first example, which contrasts a try-with-resources implementation with a finally block, highlighting potential resource leaks in the latter. Review the section that discusses how multiple resources are handled and how exceptions are suppressed. You can find this starting from this paragraph and continuing through the writeToFileZipFileContents example.
For any code involving resources like files, streams, or database connections, try-with-resources should be your default choice.
5. Best Practices for Exception Handling
Knowing the syntax is only half the battle. Using these tools effectively is what marks a skilled developer. Here are some critical best practices to follow, which are often the focus of code reviews and interviews. The "Beginner's Guide" article has an excellent summary of common mistakes.
Beginner's Guide To Try And Catch In Java
This final part of the article covers crucial anti-patterns and best practices that will help you write professional, maintainable code.
Please read the entire section Common mistakes in exception handling. Focus on understanding the "why" behind each piece of advice: Why catching a generic Exception is bad. Why empty catch blocks are dangerous. Why you shouldn't use exceptions for program flow control (e.g., input validation). Why it's better to prevent unchecked exceptions (like NullPointerException) than to catch them. Finally, it reinforces the use of try-with-resources as the best practice for resource management.
Conclusion
In this lesson, you've learned the fundamentals of handling errors in Java, a skill that is non-negotiable for building any serious application.
Here are the key takeaways:
try-catch: The basic mechanism to handle exceptions and prevent your program from crashing. You can use multiplecatchblocks for different exception types.finally: A block that guarantees execution of cleanup code, whether an exception occurred or not.try-with-resources: The modern, preferred standard for automatically managing resources like files and database connections. It is cleaner and safer than using afinallyblock for this purpose.- Best Practices: Always handle exceptions specifically, never ignore them, and don't use them for standard application logic.
You now know how to handle exceptions. In our next lesson, we will explore the different types of exceptions in Java: checked and unchecked exceptions. Understanding this distinction is crucial because it dictates when the Java compiler forces you to handle an exception, a feature that makes Java code notably robust.