Welcome to the next stage of building our Spring Boot application! In our previous lessons, we've focused on the "front door" of our API—the Controller layer. You've mastered handling incoming client requests using @PathVariable, @RequestParam, and @RequestBody. Now, the question is: what do we do with that data? A robust application needs to store data permanently, and that means interacting with a database.
This lesson bridges the gap between your Java code and a relational database. We will explore a powerful concept called Object-Relational Mapping (ORM) that frees you from writing tedious SQL code. Your main goal today is to learn how to map your Java objects directly to database tables using a standard set of annotations from the Java Persistence API (JPA), specifically @Entity, @Id, and @GeneratedValue. This is the foundational step in making our application's data persistent.
The Challenge: Objects vs. Tables
In the world of Java, we think in terms of objects—instances of classes with fields, methods, and relationships. In the world of databases, we think in terms of tables—structures with rows and columns, governed by foreign keys. Trying to manually translate between these two paradigms is often complex and error-prone. This fundamental difference is known as the Object-Relational Impedance Mismatch.
How do we efficiently get data from a users table into a User object, and vice-versa?
Hibernate & JPA Tutorial - Crash Course
To understand this core problem, watch the introduction of this "Hibernate & JPA Tutorial" from Marco Codes. It clearly frames the challenge that ORM is designed to solve.
Watch the segment from the beginning, where the presenter illustrates the disconnect between a database table and a Java class: What problem does hibernate solve.
The Solution: ORM, JPA, and Hibernate
The solution to this mismatch is Object-Relational Mapping (ORM). An ORM framework acts as a translator, automatically mapping your Java objects to database tables. You work with your Java objects, and the ORM framework generates and executes the necessary SQL behind the scenes.

In the Java ecosystem, the standard for ORM is the Java Persistence API (JPA). It's important to understand that JPA is a specification—a set of interfaces and rules that define how ORM should work. It's like a blueprint.
Hibernate is the most popular implementation of the JPA specification. It's the engine that reads the blueprint and does the actual work. When you use Spring Data JPA, you are using the JPA specification, and by default, Spring Boot brings in Hibernate as the underlying implementation. This distinction between a standard API (JPA) and its concrete implementation (Hibernate) is a common pattern in software engineering.
Hibernate & JPA Tutorial - Crash Course
The same video provides an excellent explanation of this relationship between the JPA specification and the Hibernate implementation.
Watch this segment to clarify the roles of JPA and Hibernate and see how code can be written against the JPA standard: JPA vs. Hibernate.
Mapping Your First Entity
Now for the practical part. How do we tell JPA/Hibernate how to map a Java class to a database table? We use annotations to add metadata to our class. Let's transform our Employee class into a database entity.
There are three essential annotations you need to know:
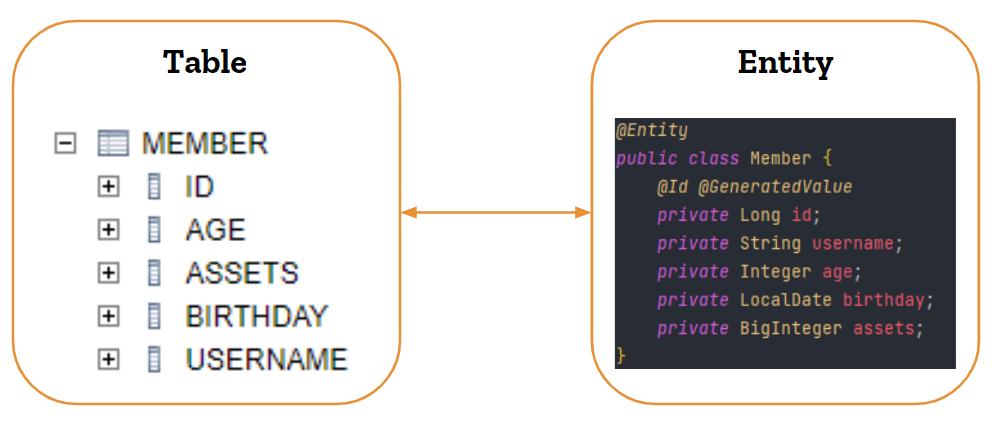
@Entity: This annotation is placed on the class and marks it as a JPA entity. It tells Spring, "This class corresponds to a table in the database." By default, the table name is assumed to be the same as the class name (e.g.,Employeeclass maps toEmployeetable).@Id: This annotation is placed on a field to mark it as the primary key for that table. Every entity must have a primary key.@GeneratedValue: This annotation is placed on the primary key field to configure how its value is generated. It's often used to tell the database to auto-increment the ID for each new record.
Here is a visual representation of this mapping:
The official Spring guide for accessing data with JPA provides a clear, canonical example of this.
Getting Started | Accessing Data with JPA - Spring
This guide from spring.io is the definitive source for this topic. We'll focus on the section that defines the entity.
In the article, find the section titled Define a Simple Entity. Read through this section carefully. It shows a Customer class and explains the role of the @Entity, @Id, and @GeneratedValue annotations, just as we discussed. Notice the protected no-argument constructor; JPA requires this to create object instances when fetching data from the database.
Automating Schema Creation
One of the most powerful features of using an ORM during development is its ability to manage the database schema for you. Instead of manually writing CREATE TABLE SQL scripts, you can configure Hibernate to do it automatically based on your entity definitions.
This is controlled by a property in your application.properties file:spring.jpa.hibernate.ddl-auto
This property can have several values, but for development, update is very common.
update: Hibernate checks the database schema against your entity model and automatically adds new tables, columns, or constraints as needed, without deleting existing data.create: Drops the existing schema and recreates it every time the application starts. Useful for testing, but destructive.create-drop: Same ascreate, but also drops the schema when the application shuts down cleanly.validate: Checks if the schema matches the entities and throws an error if it doesn't.none: Disables automatic schema management. This is the recommended setting for production environments.
The following resource provides another example of creating an entity and shows where the ddl-auto configuration fits in.
This GeeksforGeeks article walks through a complete example, including the crucial database configuration step.
First, look at "Step 3: Configure Database Connection" to see how ddl-auto = update is set in the application.properties file. Next, read Step 4: Create the Entity Class. This provides another clear, annotated example of an Employee class and briefly explains the function of @Entity, @Id, and @GeneratedValue.
Customizing the Mapping
The default conventions are great for getting started, but in the real world, you often need more control. What if your database table is named app_employees but your class is Employee? What if a column is named first_name but your field is firstName?
JPA provides more specific annotations for these cases:
@Table(name = "custom_table_name"): Use this on the class to specify a table name that differs from the class name.@Column(name = "custom_column_name"): Use this on a field to map it to a column with a different name. You can also specify constraints likenullable = falseorlength = 100.
Watching these customizations in action is the best way to learn them.
Spring Data JPA Tutorial - #8 - JPA Annotations @Table, @Column, @GeneratedValue, @UniqueConstraint
This video from Java Guides is a deep dive into various JPA annotations. We'll focus on the ones for customizing table and column names, as well as the primary key generation strategy.
Watch the following segments: Custom Table Name: This part demonstrates how to use the @Table annotation to give your table a custom name and assign it to a specific schema. Custom Column Mapping: Here, you'll see how @Column is used to change a column's name and set a NOT NULL constraint (nullable = false). Primary Key Strategy: This segment shows how to be more explicit with @GeneratedValue by specifying a strategy, such as GenerationType.IDENTITY, which is common for MySQL's auto-increment feature.
By using these annotations, you create a clear, declarative mapping between your object model and your database schema, all within your Java code.
Conclusion
In this lesson, you've taken a crucial step towards building a full-stack application. You've learned how to bridge the gap between your object-oriented Java code and a relational database using the powerful concepts of ORM and JPA.
Key Takeaways:
- Object-Relational Mapping (ORM) is a technique that automates the transfer of data between Java objects and database tables.
- JPA is the Java standard (specification) for ORM, while Hibernate is the most popular implementation that Spring Boot uses by default.
- The
@Entityannotation marks a Java class as a database entity. - The
@Idand@GeneratedValueannotations work together to define the primary key and its generation strategy. - The
spring.jpa.hibernate.ddl-auto = updateproperty allows Hibernate to automatically manage your database schema during development. - You can use
@Tableand@Columnannotations to customize the mapping when default naming conventions are not sufficient.
You now know how to define what your data looks like and how it maps to the database. In our next lesson, we will focus on how to interact with that data. We will introduce Spring Data JPA's repository interfaces, which allow you to perform Create, Read, Update, and Delete (CRUD) operations with almost no boilerplate code.