In our last lesson, we explored the foundational principles of the Spring Framework: Inversion of Control (IoC) and Dependency Injection (DI). You learned how Spring takes over the responsibility of creating and wiring objects (beans), allowing you to focus on business logic rather than boilerplate code. Today, we put that theory into practice.
This lesson marks your first step in building a real Spring Boot application. We will use the Spring Initializr, a powerful web-based tool that bootstraps your project, to create a complete, runnable application skeleton. By the end of this session, you'll be able to configure and generate a new Spring Boot project with all the necessary dependencies, import it into your IDE, and understand the core components that Spring Boot automatically provides.
Getting Ready: The Spring Initializr
Before we can write any Spring code, we need a project structure. In the past, setting up a Java project with all its libraries and configurations was a tedious and error-prone manual process. Spring Boot simplifies this dramatically with the Spring Initializr. It's a web application, found at start.spring.io, that generates a project template for you based on your specifications.
The "CodeSnippet" YouTube channel provides an excellent, step-by-step walkthrough of this entire process. We will follow along with it, and I will provide additional context for each choice you make.
Spring Boot Project Setup from Scratch | Complete Guide
This video guides you through the Spring Initializr web UI, explaining each option from project type to metadata and packaging. It's a perfect visual guide for our first practical task.
Please start by watching the first two major sections of the video: Watch the introduction to the UI from the beginning. This covers selecting the build tool, language, and Spring Boot version. Continue with the section on project metadata and packaging from this timestamp. Pay close attention to the explanation of JAR vs. WAR, as this is a fundamental concept in Java web development.
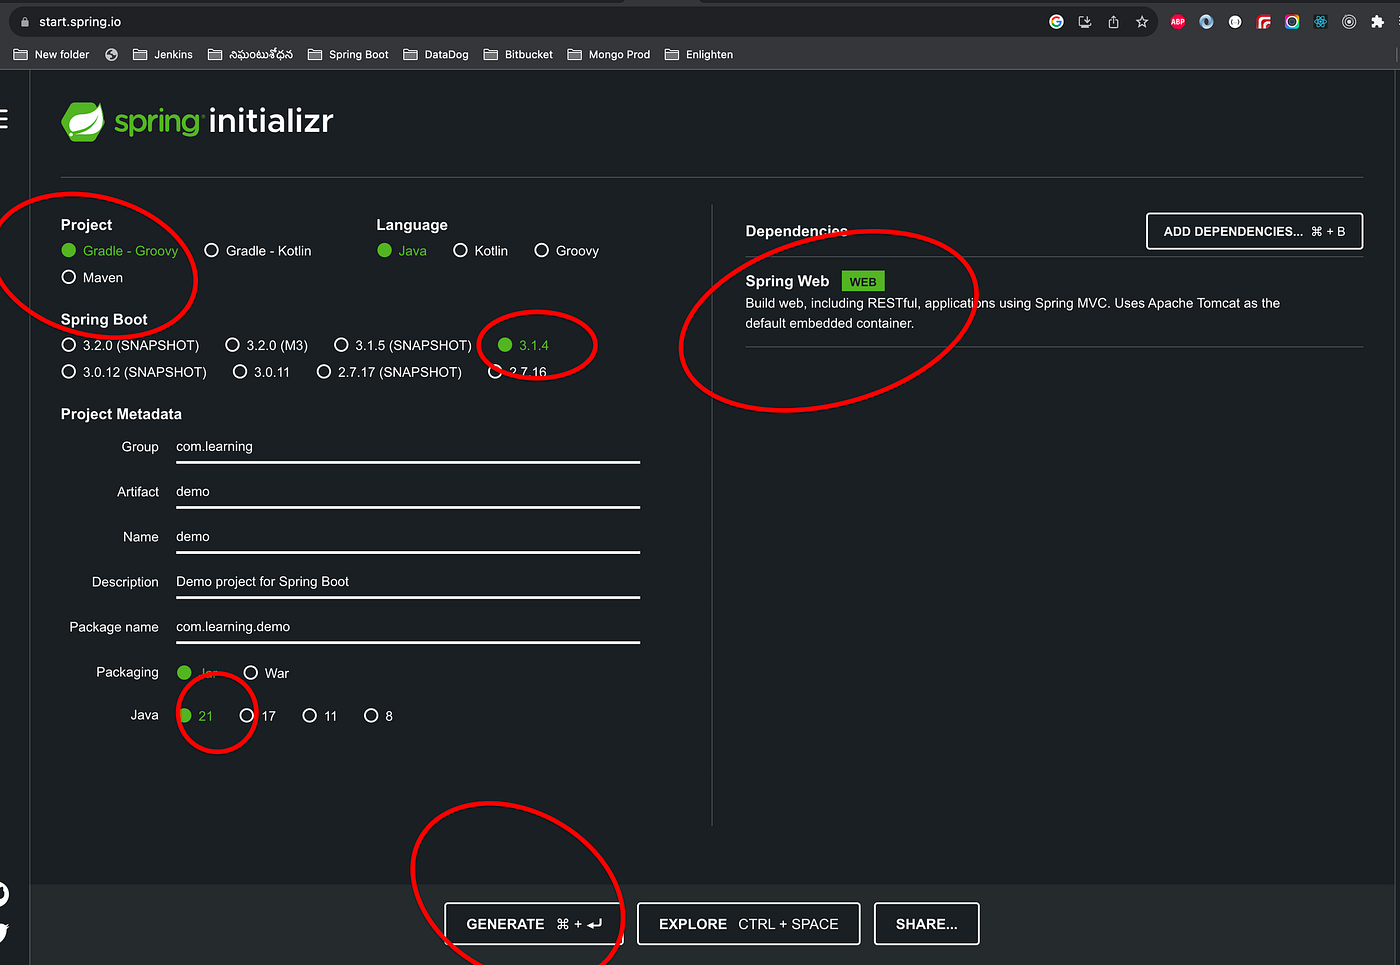
Let's break down the key configuration options you just saw in the video.
-
Project: This lets you choose your build automation tool. Both Maven and Gradle are popular. We will use Maven as it's extremely common in the enterprise Java world and its
pom.xmlfile is straightforward to understand. A build tool's job is to compile your code, manage dependencies (the libraries your project needs), and package your application for deployment. -
Language: We will, of course, be using Java.
-
Spring Boot Version: You'll see several versions listed. Always choose the latest stable version that does not have
(SNAPSHOT)or(M)in its name.SNAPSHOTversions are unstable, in-development builds, andMstands for "Milestone," which is a pre-release. -
Project Metadata:
- Group: This is a unique identifier for your organization or project group, typically written in reverse domain name notation (e.g.,
com.mycompany). We'll use something likecom.learning.demo. - Artifact: This is the name of your project itself (e.g.,
my-first-app). - Packaging: The video explained this well. A JAR (Java Archive) packages your application into a single, executable file with an embedded server (like Tomcat), making it a standalone application. A WAR (Web Application Archive) is meant to be deployed on an external web server. For modern microservices and REST APIs, JAR is the standard choice.
- Group: This is a unique identifier for your organization or project group, typically written in reverse domain name notation (e.g.,
-
Java: Select a recent Long-Term Support (LTS) version, such as 17 or 21. We will use Java 17 for this course.
Adding Dependencies with "Starters"
The real power of Spring Boot's setup process comes from its "starters". A Spring Boot Starter is a pre-configured dependency descriptor that brings in a whole set of related libraries needed for a specific capability. Instead of manually adding dozens of individual libraries for web functionality, you just add one starter.
For our first project, we need to build a web application, so we'll add the Spring Web starter.
Spring Boot Project Setup from Scratch | Complete Guide
This part of the video demonstrates how to search for and add dependencies to your project.
Watch the segment from this timestamp where the presenter adds Spring Web, JPA, and H2 Database. For now, the most important one for us is Spring Web. This single dependency includes everything needed to create REST controllers and run an embedded Tomcat server.
The official Spring guide, "Building an Application with Spring Boot," also walks you through this.
Getting Started | Building an Application with Spring Boot
This official guide provides a concise summary of the initialization process.
Please read the section Starting with Spring Initializr. This reinforces the steps you saw in the video and provides direct links to get started.
Generating and Importing Your Project
Now that you've configured your project, it's time to generate it, download the zip file, and open it in your IDE. We'll be using IntelliJ IDEA, but the process is similar for other IDEs like VS Code or Eclipse.
Spring Boot Project Setup from Scratch | Complete Guide
This final segment of the video shows you how to generate the project, extract it, and—most importantly—import it correctly into IntelliJ IDEA. It also gives a quick tour of the resulting project structure.
Watch from this point to the end. The key step is to open the pom.xml file to import it as a Maven project. The video then shows you how to run the main application class.
After importing, your project structure in IntelliJ should look something like this:
pom.xml: The heart of your Maven project. It defines your project's metadata and, crucially, its dependencies.src/main/java/com/learning/demo/DemoApplication.java: The main entry point of your application.src/main/resources/application.properties: A file for your application's configuration properties (e.g., database connection details, server port).src/test/java: A folder for your unit and integration tests.
Under the Hood: What Makes It Work?
You've just created and run a web application with almost no code. Let's demystify the two key pieces of "magic" that make this possible.
1. The @SpringBootApplication Annotation
If you open your main application file (DemoApplication.java), you'll see the @SpringBootApplication annotation above the class definition. This single annotation is incredibly powerful. It's a convenience that combines three other essential annotations:
@Configuration: Tells Spring that this class can contain bean definitions. This is part of the IoC container's setup we discussed in the last lesson.@EnableAutoConfiguration: This is the core of Spring Boot's magic. It tells Spring Boot to automatically configure any beans you might need based on the dependencies (starters) on your classpath. For example, because you includedspring-boot-starter-web, it automatically configures Tomcat and Spring MVC.@ComponentScan: Tells Spring to scan the current package (and its sub-packages) for other components, configurations, and services to register them as beans in the ApplicationContext.
You can read more about this in the official Spring guide.
Getting Started | Building an Application with Spring Boot
This section explains the purpose of the main application class and breaks down the @SpringBootApplication annotation.
Read the text under the heading Create an Application class. Focus on the bullet points that explain what @SpringBootApplication does.
2. The pom.xml and the Bill of Materials (BOM)
Open your pom.xml file. You will notice two key things: a <parent> tag and a <dependencies> section.
<parent>
    <groupId>org.springframework.boot</groupId>
    <artifactId>spring-boot-starter-parent</artifactId>
    <version>3.x.x</version>
    <relativePath/> <!-- lookup parent from repository -->
</parent>

<dependencies>
    <dependency>
        <groupId>org.springframework.boot</groupId>
        <artifactId>spring-boot-starter-web</artifactId>
    </dependency>
</dependencies>
The spring-boot-starter-web dependency doesn't specify a version. So how does Maven know which version to download? The answer lies in the spring-boot-starter-parent. This parent project provides what's known as a Bill of Materials (BOM)—a curated, tested, and compatible list of versions for all the libraries Spring Boot might use.
When you select a version of Spring Boot, you are essentially selecting a BOM. This means you don't have to worry about version conflicts between, say, Spring Core, Spring MVC, and Tomcat. The Spring team has already guaranteed they work together.
The legendary Java Brains channel has a short, clear video explaining this concept.
Spring Boot Quick Start 13 - What's Happening Here: Bill Of Materials
This video masterfully explains how the starter parent acts as a "Bill of Materials" to manage dependency versions, which is why you don't have to specify them for each starter.
Watch the video from the beginning until the end. The demonstration of changing the parent version and seeing all the underlying library versions change automatically is a powerful illustration of this concept.
Conclusion
Congratulations! You've successfully moved from the theory of IoC/DI to the practical reality of building a Spring Boot application. You now have a solid foundation and a working project skeleton ready for development.
Key Takeaways:
- Spring Initializr (
start.spring.io) is the standard tool for bootstrapping Spring Boot projects, saving you from complex manual setup. - Maven is a build tool that manages your project's lifecycle and dependencies via the
pom.xmlfile. - Spring Boot Starters (e.g.,
spring-boot-starter-web) are "one-stop-shop" dependencies that pull in all the necessary libraries for a specific functionality. - The
@SpringBootApplicationannotation enables auto-configuration and component scanning, bringing your application to life with minimal code. - The
spring-boot-starter-parentprovides a Bill of Materials (BOM), which manages dependency versions to ensure compatibility and prevent conflicts.
In our next lesson, we will start building on this foundation. You'll learn how to implement a layered architecture by creating your first @Controller, @Service, and @Repository components—the fundamental building blocks of a professional Spring Boot application.