Hello! Welcome back to our module on classification.
In our previous lessons, we've trained and evaluated several classifiers like Logistic Regression, KNN, and Decision Trees. A subtle but important detail is that the datasets we used were mostly balanced—each class had a similar number of examples. However, in many real-world problems like fraud detection, medical diagnosis, or manufacturing defects, this is not the case. We often deal with imbalanced datasets, where one class is much rarer than others.
Today, we'll address a critical first step in handling such datasets. We will explore what happens when we split imbalanced data for training and testing and why the standard approach can fail. By the end of this lesson, you will be able to apply stratified splitting to ensure your training and test sets are representative of the original data, which is crucial for reliable model evaluation.
1. The Problem with Random Splitting
Imagine a dataset with 100 transactions, where only 2 are fraudulent (the minority class). If you perform a standard 80/20 train_test_split, what could happen?
- Worst Case: Both fraudulent transactions could end up in the test set. Your model would be trained on a dataset with zero examples of fraud and would never learn to detect it. Its performance on the test set would be misleading.
- Another Bad Case: Both fraudulent transactions could end up in the training set. Your test set would have no fraud examples, and you'd get a perfect (but useless) accuracy score of 100% just by predicting "not fraud" every time.
In either scenario, the split is not representative of the overall problem, and our model evaluation becomes unreliable. The solution is to be more deliberate about how we split the data.
2. Understanding Stratified Sampling
The technique we'll use is based on a statistical concept called stratified sampling. The idea is to first divide the entire population into distinct subgroups (called "strata") and then draw samples from each subgroup in proportion to its size in the total population.
In our case, the "strata" are simply the classes of our target variable.
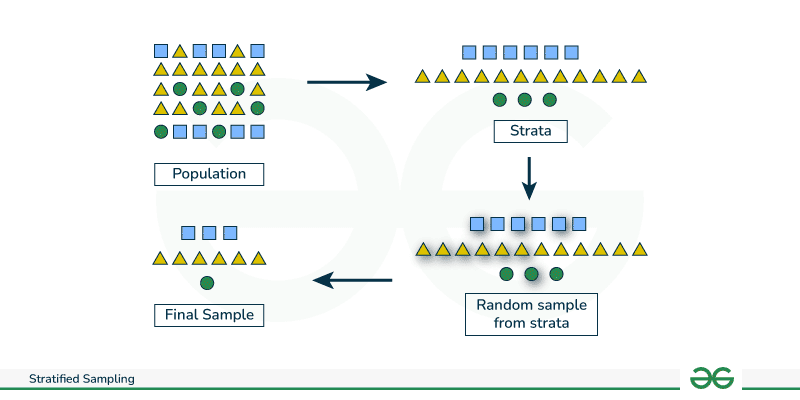
When we apply this to splitting our data, we ensure that the proportion of each class in the training set and the test set is the same as in the original dataset.
3. Applying Stratified Splitting with Scikit-learn
Scikit-learn makes this incredibly easy. Both the train_test_split function and cross-validation objects have mechanisms to handle this.
For train_test_split
The train_test_split function you're already familiar with has a crucial parameter: stratify. By setting stratify=y (where y is your array of labels), you tell scikit-learn to preserve the class proportions found in y.
The following video provides a concise and clear demonstration of why this is so important and how to implement it.
Use stratified sampling with train_test_split
This video from Data School shows a practical example of a non-stratified split going wrong and how stratify=y immediately fixes the problem.
Watch from the beginning to 03:22. Pay close attention to the class distribution in the y_train and y_test sets before and after using the stratify parameter.
To see another clear, code-based example, let's look at an article that creates a highly imbalanced dataset and compares the results.
Train-Test Split for Evaluating Machine Learning Algorithms
This article from Machine Learning Mastery demonstrates stratified splitting with a clear code example. It uses make_classification to create a synthetic dataset with a 94%/6% class imbalance.
Read the section titled 'Stratified Train-Test Splits'. Run the two code blocks and compare the output from Counter. Notice how the unstratified split results in skewed class distributions (45/5 and 49/1), while the stratified split perfectly preserves the proportion (47/3 in both train and test).
4. Hands-on Practice
Now it's your turn to see this in action. This exercise will solidify your understanding of the impact of stratification.
- Create an imbalanced dataset: Use
make_classificationto generate data with a significant imbalance (e.g., 95% class 0, 5% class 1). - Perform a standard split: Use
train_test_splitwithout stratification and print the class counts for the training and test sets. - Perform a stratified split: Use
train_test_splitwithstratify=yand print the class counts again. - Compare: Observe the difference in class proportions.
Here's the code to get you started. Try to predict what you'll see before you run it!
import numpy as np
from sklearn.datasets import make_classification
from sklearn.model_selection import train_test_split
import pandas as pd


# 1. Create an imbalanced dataset
X, y = make_classification(n_samples=1000,
                           n_features=10,
                           n_informative=5,
                           n_redundant=0,
                           n_classes=2,
                           weights=[0.95, 0.05], # 95% for class 0, 5% for class 1
                           flip_y=0,
                           random_state=42)

print("Original dataset class distribution:")
print(pd.Series(y).value_counts(normalize=True))
print("-" * 40)


# 2. Perform a standard (non-stratified) split
X_train, X_test, y_train, y_test = train_test_split(X, y, test_size=0.3, random_state=42)

print("Non-stratified split distribution:")
print("Train set:\n", pd.Series(y_train).value_counts(normalize=True))
print("\nTest set:\n", pd.Series(y_test).value_counts(normalize=True))
print("-" * 40)


# 3. Perform a stratified split
X_train_s, X_test_s, y_train_s, y_test_s = train_test_split(X, y,
                                                            test_size=0.3,
                                                            random_state=42,
                                                            stratify=y) # The key difference!

print("Stratified split distribution:")
print("Train set:\n", pd.Series(y_train_s).value_counts(normalize=True))
print("\nTest set:\n", pd.Series(y_test_s).value_counts(normalize=True))
You should see that the stratified split maintains the ~95%/5% balance in both the training and test sets, while the standard split deviates from it. This ensures your model evaluation is performed on a set that has the same characteristics as the training set and the overall data.
5. Stratification in Cross-Validation
The same logic applies when you use k-fold cross-validation. A standard KFold splitter might create some folds with very few (or even zero) instances of the minority class. The solution is to use StratifiedKFold.
StratifiedKFold is a variation of k-fold that returns stratified folds: each fold contains approximately the same percentage of samples of each target class as the complete set.
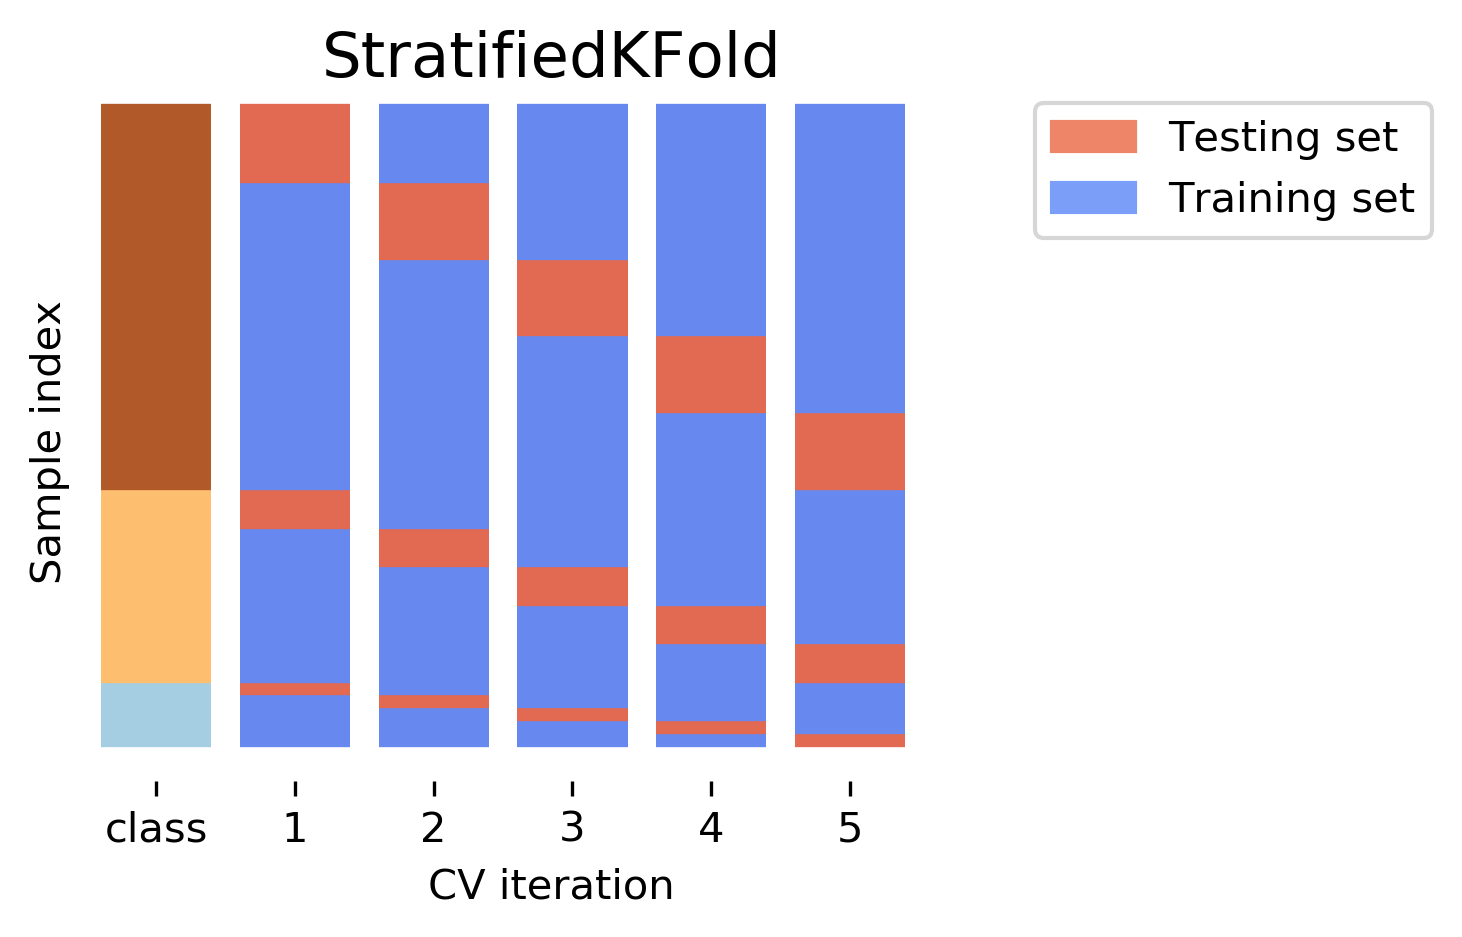
The following video explains this concept clearly.
Complete Guide to Cross Validation
This video by Rob Mulla explains why Stratified K-Fold is essential for imbalanced datasets.
Watch the section from 18:28 to 19:37. The explanation here builds directly on the concept of KFold (which you learned about in Module 4) and highlights why stratification is necessary.
In practice, if you are using a function like cross_val_score with a scikit-learn classifier, you often don't need to specify StratifiedKFold manually. For classification tasks, scikit-learn's default CV strategy is typically already stratified. However, if you build a custom loop, you must use StratifiedKFold explicitly for imbalanced data.
Important Note: As mentioned in the Data School video, stratification is about ensuring a reliable evaluation setup. It does not solve the underlying problem that the model may struggle to learn from the rare class. It simply makes sure your train/test splits are fair and representative.
Conclusion
You've taken a crucial step toward building robust machine learning models today. Dealing with imbalanced data is a common challenge, and ensuring a proper evaluation framework is the foundation for everything that follows.
Key Takeaways:
- Class imbalance can lead to non-representative train/test splits, making model evaluation unreliable.
- Stratified splitting solves this by maintaining the original dataset's class proportions in each subset.
- For a single split, use the
stratify=yparameter intrain_test_split. - For cross-validation, the principle is the same, and the tool to use is
StratifiedKFold. - Stratification is about creating a fair evaluation, not about improving the model's ability to learn from imbalanced data.
Preview of the next lesson:
Now that we know how to split our data correctly, how do we help our model actually learn from it? In the next lesson, we will explore techniques specifically designed to handle class imbalance during model training, such as SMOTE and class weights.