Hello! Welcome back to our module on Ensemble Methods.
In our last lesson, we explored the theoretical foundations of ensemble learning, contrasting the parallel approach of bagging with the sequential method of boosting. You learned that bagging is excellent for reducing variance and that Random Forest is its most famous implementation.
Today, we move from theory to practice. You will train your first Random Forest model and, more importantly, learn how to interpret what the model has learned. This lesson is all about building a powerful model and then asking it: "Which features were most important for making your decisions?" This is a crucial skill for transforming a "black box" model into an insightful, practical tool.
By the end of this lesson, you will be able to train a Random Forest model using scikit-learn and interpret its feature importances to understand the key drivers in a dataset.
1. A Quick Refresher: How Random Forest Works
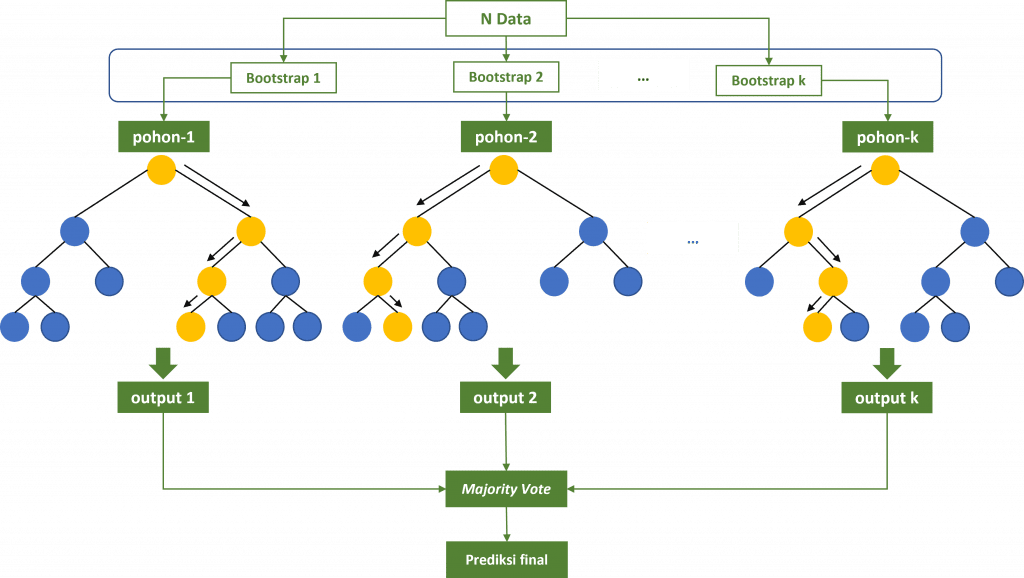
Before we jump into the code, let's quickly recall the mechanics of a Random Forest. It is an ensemble of Decision Trees that uses bagging to improve performance and control overfitting.
The process, as we discussed, involves:
- Bootstrapping: Creating multiple, random subsets of the training data with replacement.
- Independent Training: Training a separate Decision Tree on each data subset. A key detail for Random Forest is that at each split in a tree, only a random subset of features is considered, adding another layer of randomness that decorrelates the trees.
- Aggregation: Combining the predictions of all trees. For a classification task like the one we'll do today, this means taking a majority vote.
This process is visualized in the flowchart below.
Now, let's see how this is done in practice.
2. Training a Random Forest Classifier with Python
Theory is one thing, but implementing it is where the real learning happens. We are going to walk through the entire process, from loading a dataset to training a RandomForestClassifier and evaluating its performance.
The following video provides a clear, step-by-step guide. We'll watch it in segments to focus on each part of the process.
First, let's look at the essential data preparation phase. As you'll often hear, data scientists spend a significant amount of their time on this step.
60 - How to use Random Forest in Python?
This first part of the video from the DigitalSreeni channel demonstrates the initial data preparation steps: loading the data with pandas, inspecting it, and handling non-numeric values. This is a great refresher of the skills you learned in earlier modules.
Please watch from 02:22 to 14:19. Focus on how the raw CSV data is cleaned and transformed into numerical features (X) and a target variable (y) suitable for a machine learning model.
With our data prepared, the next logical step is to split it into training and testing sets. This is fundamental for evaluating our model on unseen data, a concept we covered in the module on model validation.
60 - How to use Random Forest in Python?
Now, let's see how to split the data into training and testing sets using scikit-learn's train_test_split function.
Watch from 14:19 to 18:09. Pay attention to the purpose of the test_size and random_state parameters.
Finally, we've reached the core of our lesson: training the Random Forest model itself. You'll see that thanks to scikit-learn, the implementation is surprisingly straightforward.
60 - How to use Random Forest in Python?
This section shows how to import RandomForestClassifier, create an instance of the model, and train it using the .fit() method on our training data. Notice the n_estimators hyperparameter, which controls the number of trees in the forest.
Watch from 18:09 to 21:43. This is where the model training happens.
After training, we need to see how well our model performs. We'll use the test set we held out earlier to make predictions and calculate the model's accuracy.
60 - How to use Random Forest in Python?
In this final clip for this section, the presenter uses the trained model to make predictions on the test set and evaluates its performance using an accuracy score.
Watch from 21:43 to 26:02. Observe how changing the train-test split size can impact the model's accuracy.
Great! You've now seen the full workflow for training and evaluating a Random Forest model. But a model's accuracy score only tells part of the story. The real power comes from understanding why it makes the predictions it does.
3. Interpreting the Model: Feature Importance
One of the most valuable aspects of tree-based models like Random Forest is their built-in ability to calculate feature importance. This tells us which features the model relied on most heavily to make its predictions.
The default method used by scikit-learn is Mean Decrease in Impurity (MDI), also known as Gini importance. At each node of each decision tree, a feature is used to split the data. This split reduces the "impurity" of the data (i.e., it does a better job of separating the classes). The MDI for a feature is the average reduction in impurity it provides across all the trees in the forest. A higher MDI value means the feature was more important for the model's decisions.
Let's see how to extract and interpret these importance scores in Python.
60 - How to use Random Forest in Python?
This concluding part of the video is crucial. It demonstrates how to access the feature_importances_ attribute of a trained Random Forest model, pair these scores with their corresponding feature names, and interpret the results to see which factors were most predictive.
Watch from 26:02 to 31:48. Focus on how a simple line of code (model.feature_importances_) can yield powerful insights about your data.
As you saw in the video, visualizing feature importances as a bar chart makes them easy to understand at a glance. The most important features will have the longest bars.

A Note on Different Importance Methods
Mean Decrease in Impurity is fast and intuitive, but it has some known limitations. For example, it can be biased towards numerical features or categorical features with many unique values (high cardinality).
An alternative, more robust method is Permutation Importance. This technique works by randomly shuffling the values of a single feature in the test set and measuring how much the model's performance drops. A large drop in performance implies the feature was very important. While more computationally expensive, it is often considered a more reliable measure of feature importance.
The following short reading explains the difference between these two methods.
Understanding Random Forest using Python (scikit-learn)
This excerpt from the article 'Understanding Random Forest using Python' on Towards Data Science provides a concise explanation of both Mean Decrease in Impurity and Permutation Importance.
Please read the section titled 'Calculating Random Forest Feature Importance'. Focus on understanding the conceptual difference between the two methods described.
For now, using the built-in feature_importances_ (MDI) is a fantastic starting point for model interpretation. As you advance, you may want to explore permutation importance for more rigorous analysis.
Conclusion
In this lesson, you successfully bridged the gap between the theory of bagging and the practical application of Random Forests. You have not only trained a sophisticated ensemble model but also learned how to peek inside it to understand its decision-making process.
Key Takeaways:
- A Random Forest model can be trained in
scikit-learnby instantiatingRandomForestClassifierand using the.fit()method. - The
.predict()method is used to generate predictions on new data. - Feature importance helps us understand which features are the most influential in a model's predictions.
- You can access the built-in feature importance scores via the
.feature_importances_attribute on a trained Random Forest model. - Visualizing these scores with a bar chart is an effective way to interpret the model.
Preview of the next lesson:
Now that you have hands-on experience with a powerful bagging algorithm, we will turn our attention to the other major ensemble strategy: boosting. In the next lesson, you will learn to train a Gradient Boosting model using scikit-learn, which builds models sequentially to correct the errors of its predecessors. This will give you another powerful tool for your data science toolkit.