Hello! Welcome to your next lesson on building robust data science workflows.
In our previous session, we explored the art of feature engineering, creating polynomial, interaction, and temporal features to enhance our model's predictive power. We saw a glimpse of how scikit-learn's Pipeline can chain these steps together.
Applying all the preprocessing techniques we've learned—imputation, scaling, encoding, and feature engineering—manually for training, validation, and testing data is not only repetitive but also dangerously prone to errors and data leakage. Today, we'll solve this problem.
Our learning outcome is to build a reusable preprocessing pipeline using scikit-learn's Pipeline and ColumnTransformer. This is a critical step in moving from theoretical knowledge to building professional, production-ready machine learning systems, which aligns perfectly with your goal of developing a strong practical foundation.
1. Why Use Pipelines?
Before we dive into the code, it's essential to understand why pipelines are a cornerstone of modern machine learning development. They offer several powerful advantages over applying transformations step-by-step.
A Comprehensive Guide For scikit-learn Pipelines
Let's start by reading a short section from the 'A Comprehensive Guide For scikit-learn Pipelines' article on the MJ Blog. It clearly outlines the key motivations for using this powerful tool.
Read the section titled 'Why?'. As you read, think about how these points address the challenges of managing multiple preprocessing steps.
To summarize, the main benefits are:
- Organization & Simplicity: They bundle all your preprocessing and modeling steps into a single object, making your code cleaner and more readable.
- Preventing Data Leakage: This is crucial. Pipelines ensure that information from your validation or test data doesn't "leak" into your training process. For example, when using cross-validation (a topic we'll cover soon), the pipeline fits the transformers only on the training fold for each split, which is the correct way to do it.
- Reproducibility & Reusability: A saved pipeline guarantees that the exact same steps, with the exact same learned parameters (like the mean from an imputer or the scale from a scaler), are applied every time you use it.
2. The Core Components: Pipeline and ColumnTransformer
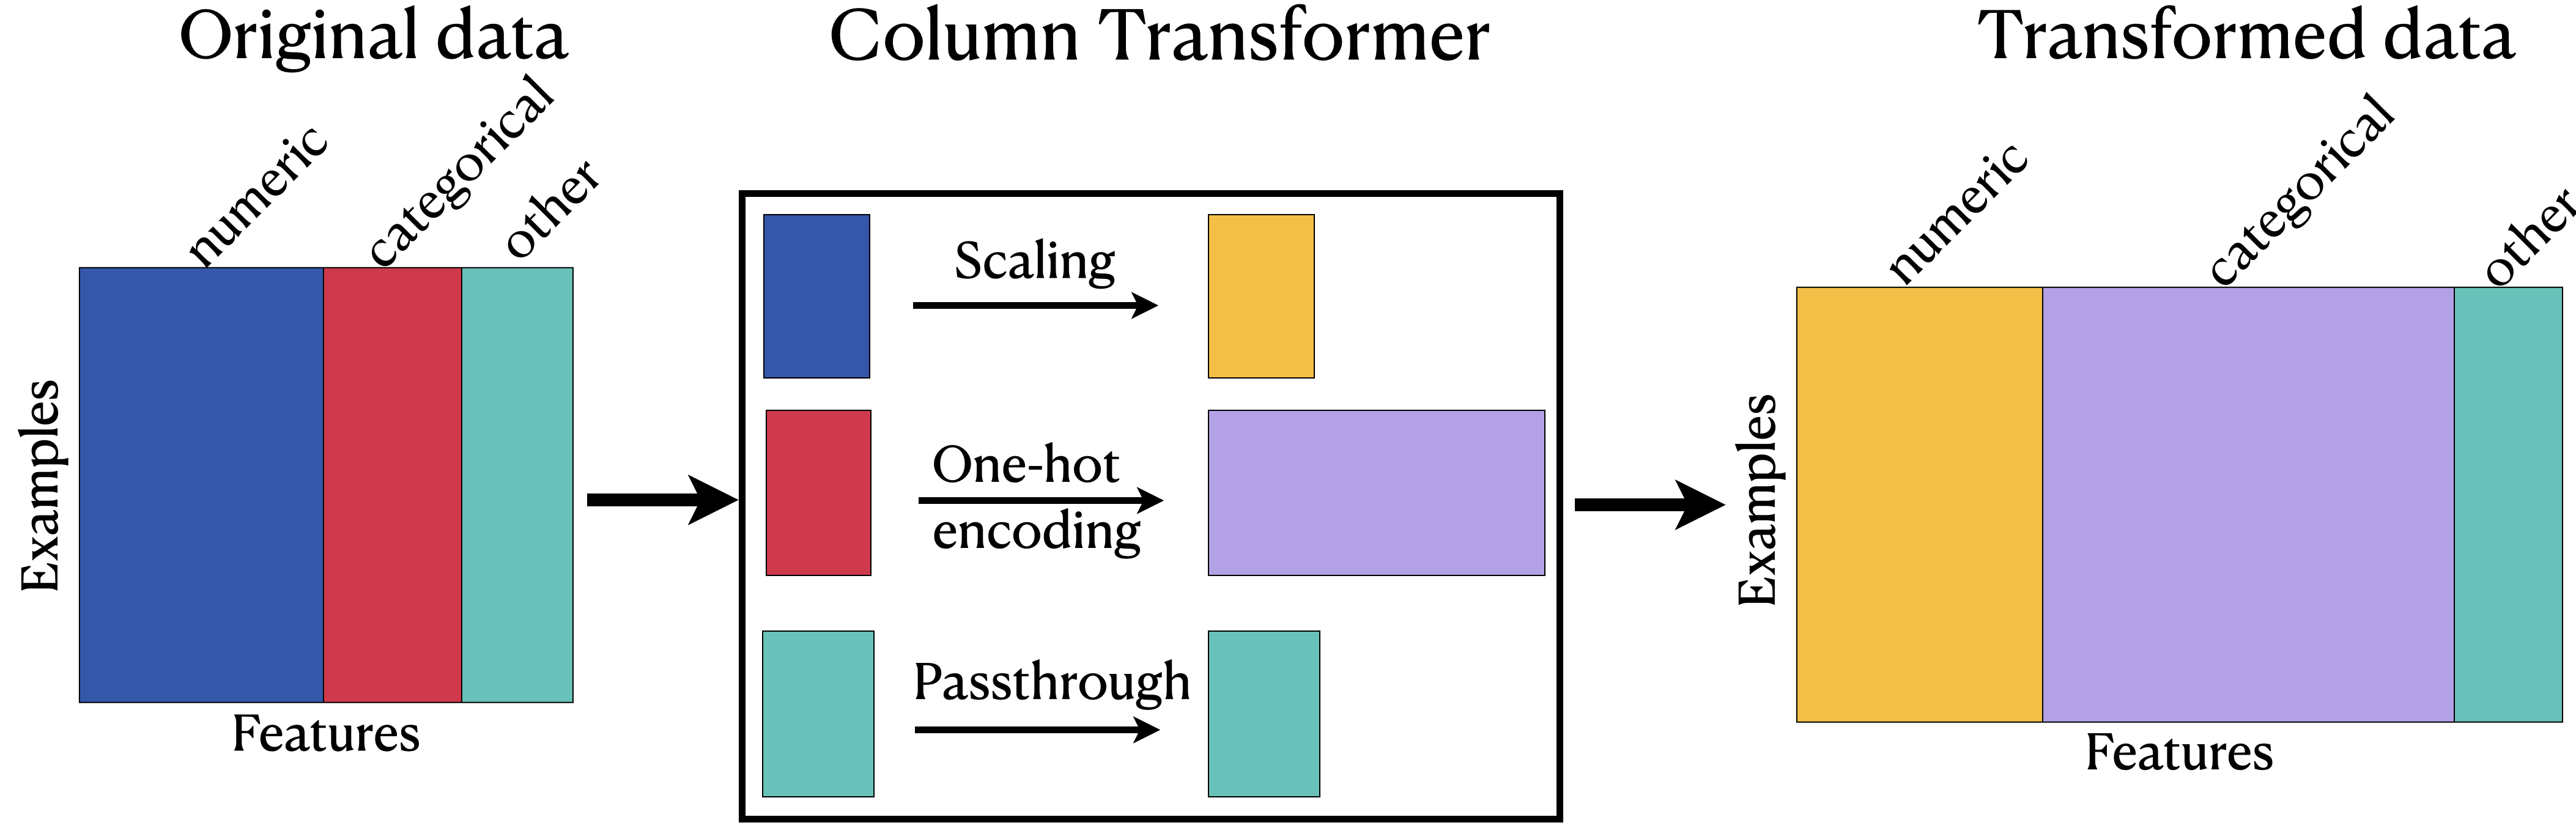
Scikit-learn provides two main tools for this job, and it's important to understand their distinct roles.
Pipeline: Chains multiple transformation steps that are applied sequentially to the same set of columns. For example, for your numerical data, you might first impute missing values, and then scale the data.ColumnTransformer: Applies different transformation pipelines to different subsets of columns. Real-world datasets are heterogeneous—they have numerical, categorical, and other types of columns.ColumnTransformerlets you direct the right columns to the right transformers.

The ColumnTransformer is what allows us to handle complex, real-world data in a clean, organized fashion.
3. Hands-On: Building a Complete Pipeline
Now, let's build a full pipeline step-by-step. We will combine everything we've learned: imputing missing values, scaling numerical features, and one-hot encoding categorical features, all before feeding the data to a model.
The following video provides an excellent, clear walkthrough. We'll watch it in segments to focus on each part of the process.
Step 1: Setup and Feature Separation
First, we need to import the necessary tools and identify which of our columns are numerical and which are categorical. This is the preparatory step before building the pipeline itself.
Machine Learning Pipelines in Python: Step-by-Step Guide with Scikit-Learn
Let's watch the first part of the 'Machine Learning Pipelines in Python' video by Code with Josh. This will cover the setup.
Watch from 03:56 to 05:30 to see all the scikit-learn components we need to import. Then, watch from 09:52 to 12:09 to see how the features are separated into numerical and categorical lists based on their data type.
Step 2: Creating Sub-Pipelines
With our column lists ready, we can now define the sequence of operations for each data type. We'll create a Pipeline for our numerical columns (impute then scale) and another Pipeline for our categorical columns (impute then one-hot encode).
Machine Learning Pipelines in Python: Step-by-Step Guide with Scikit-Learn
Continuing with the video, let's see how these individual pipelines are constructed.
Watch from 11:58 to 14:40. Pay close attention to the syntax for creating a Pipeline: it's a list of tuples, where each tuple contains a name for the step (e.g., 'imputer') and the transformer object itself (e.g., SimpleImputer()).
Step 3: Combining with ColumnTransformer
Now we use ColumnTransformer to bring our two specialized pipelines together into a single "preprocessor" object. This object will know to apply the numerical pipeline to the numerical columns and the categorical pipeline to the categorical columns.
Machine Learning Pipelines in Python: Step-by-Step Guide with Scikit-Learn
The next step is to combine the two sub-pipelines. Let's see how that's done.
Watch from 14:30 to 15:56. Notice how the ColumnTransformer is also a list of tuples. Each tuple now specifies a name, the pipeline object to apply, and the list of columns it should be applied to.
Step 4: The Final Pipeline (Preprocessor + Model)
The final step is to create one last Pipeline that chains our ColumnTransformer (the preprocessor) with a machine learning model (the estimator). This creates a single, end-to-end object that takes in raw data and outputs predictions.
Machine Learning Pipelines in Python: Step-by-Step Guide with Scikit-Learn
Let's complete our pipeline by adding the model.
Watch from 15:41 to 16:47. This is the final assembly, where the preprocessor and the model are linked together.
4. Using and Reusing the Pipeline
You've now built a complete machine learning pipeline! The beauty of this is that it behaves just like any other scikit-learn model. You train it with .fit() and make predictions with .predict(). All the internal steps are handled automatically.
Training and Prediction
Let's see this in action. The pipeline is fitted on the raw training data, and all transformations are learned and applied internally.
Machine Learning Pipelines in Python: Step-by-Step Guide with Scikit-Learn
Now for the payoff. Let's watch how simple it is to train and use our complete pipeline.
Watch from 16:35 to 19:42. Observe how the pipeline is treated as a single unit. We call .fit(X_train, y_train) once, and it handles all the imputation, scaling, encoding, and model training. Then, .predict(X_test) applies all the same learned transformations to the test data before making a prediction.
Saving and Loading for Reuse
A key benefit of pipelines is their reusability. Once you have trained a pipeline, you can save it to a file. Later, you can load it back into memory to make predictions on new data without having to retrain it. This is essential for deploying models into production applications.
A Comprehensive Guide For scikit-learn Pipelines
The 'MJ Blog' article provides a concise guide on how to save and load your trained pipeline using the joblib library.
Read the section 'Saving and Loading Pipelines'. The code snippets for joblib.dump (to save) and joblib.load (to load) are straightforward and are standard practice in the field.
Conclusion
Congratulations! You've learned how to assemble the individual preprocessing steps from our previous lessons into a single, robust, and reusable object. This skill is fundamental to writing clean, reliable, and professional machine learning code.
Key Takeaways:
- Pipelines are essential for organizing your workflow, preventing data leakage, and ensuring reproducibility.
- A
Pipelineobject chains sequential steps that apply to the same data. - A
ColumnTransformerobject applies different steps or pipelines to different columns of your data. - You can combine these into a full pipeline that includes a preprocessor (
ColumnTransformer) and a model (estimator). - This full pipeline acts as a single
scikit-learnobject that can be trained with.fit(), used for prediction with.predict(), and saved for later use withjoblib.
Preview of the next lesson:
In today's lesson, we used a simple train-test split. In our next module, "Fundamentals of Model Validation," we will start by formally exploring the purpose of splitting data into training, validation, and test sets. We'll then see how the pipelines you built today are critical for performing more robust evaluation techniques like k-fold cross-validation without introducing data leakage.