Hello! Welcome to your next lesson in the Advanced Linux and Network Security module.
In our last session, we dove into the network layer with tcpdump, learning how to capture and analyze raw packets to troubleshoot connectivity. Today, we shift our focus from the network to storage, another critical area of system administration for any DevOps professional.
Your learning outcome for this lesson is to configure Logical Volume Manager (LVM) to create, resize, and manage flexible storage volumes. Imagine you have an EC2 instance with several EBS volumes attached. Instead of managing them as separate filesystems, LVM allows you to pool them into a single, flexible storage space that can be carved up and resized on the fly without downtime. This is an incredibly powerful technique for managing servers, whether in the cloud or on-premises.
We will cover the entire lifecycle of LVM management:
- Understanding the core components: Physical Volumes, Volume Groups, and Logical Volumes.
- Creating a complete LVM setup from scratch on new disks.
- The primary benefit of LVM: extending a volume when it runs out of space.
- Safely removing a physical disk from the system.
1. Why LVM? The Problem with Static Partitions
Traditionally, a hard drive is partitioned into fixed-size segments (e.g., /dev/sda1, /dev/sda2). If your /var/log partition fills up, you're in trouble. You can't easily give it space from another partition. This inflexibility is a major challenge in dynamic server environments.
LVM solves this by adding a layer of abstraction between your physical disks and your filesystems. Let's see a practical demonstration of the problem and the LVM solution.
Linux Logical Volume Manager (LVM) Deep Dive Tutorial
The video 'Linux Logical Volume Manager (LVM) Deep Dive Tutorial' from Learn Linux TV starts with a perfect scenario: a server running out of disk space. It vividly contrasts the limitations of a non-LVM system with the flexibility of an LVM-enabled one.
Watch the segment from 00:47 to 10:49. Focus on: The demonstration of a filesystem filling up and the inability to expand it on a standard setup. How the same problem on an LVM system is resolved in seconds with a single command, without a reboot.
2. The Architecture of LVM
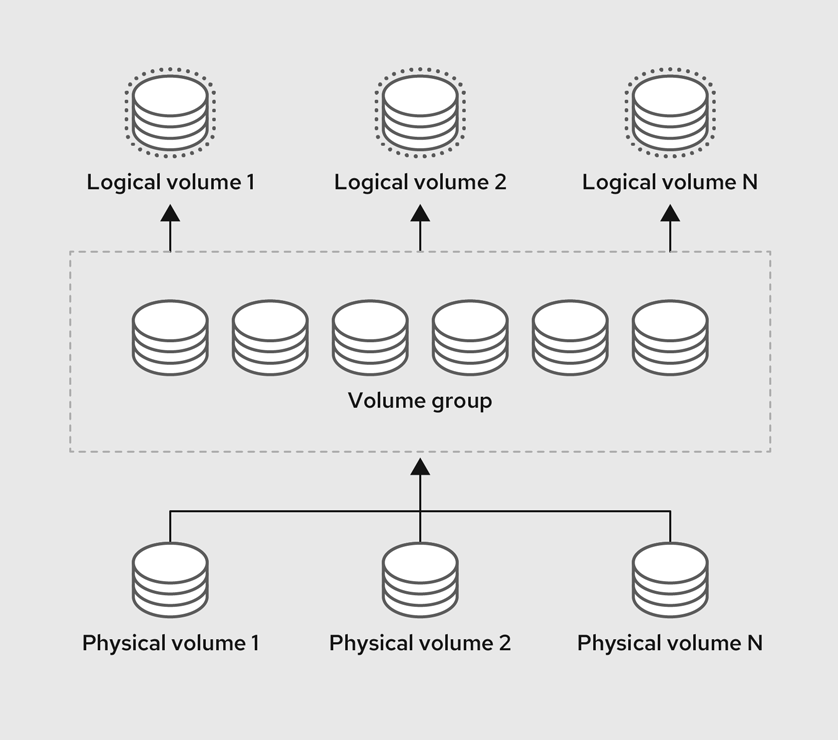
The magic of LVM comes from its three core components, which form a hierarchy:
- Physical Volumes (PVs): These are the raw building blocks. A PV can be a whole disk (like
/dev/sdb), a partition (like/dev/sdb1), or any block device. You initialize a device as a PV to tell LVM it's available for use. - Volume Groups (VGs): A VG is a pool of storage created by grouping one or more PVs. Think of it as one giant, virtual disk. You can add more PVs to a VG at any time to increase the size of the pool.
- Logical Volumes (LVs): An LV is what your operating system sees and uses. You carve LVs out of the space available in a VG. These LVs behave like regular partitions—you format them with a filesystem (like
ext4orxfs) and mount them. The key difference is that they can be easily resized as long as there is free space in the parent Volume Group.
This diagram from the Red Hat documentation clearly illustrates the relationship:
To get a more dynamic explanation of this structure, let's turn back to the video.
Linux Logical Volume Manager (LVM) Deep Dive Tutorial
The 'LVM Deep Dive' video provides a concise explanation of these components and their relationships.
Watch the section from 17:35 to 21:18. The presenter uses a similar diagram to explain how PVs, VGs, and LVs work together and how you can add more physical disks to expand the VG.
3. Creating an LVM Setup: A Step-by-Step Guide
Let's walk through the process of taking new, raw disks and turning them into a usable, flexible filesystem with LVM. We'll use a scenario-based approach, which is common when setting up a new server. For this, we'll follow a tutorial that uses Red Hat-based tools and the XFS filesystem, which are common in enterprise environments.
The video below provides a very clear, command-line-driven walkthrough. I recommend you open a terminal and follow along on a practice VM if you have one.
Logical Volume Manager (LVM) Deep Dive - RHCSA 10 Review (RHEL 9 Compatible)
The video 'Logical Volume Manager (LVM) Deep Dive - RHCSA 10 Review' by beanologi is an excellent, condensed guide to the creation process. It covers everything from partitioning the disk to mounting the final filesystem.
Watch the video from the beginning up to 19:32. The instructor will guide you through: Introduction & LVM Layers (00:00 - 04:19): A quick review of the PV/VG/LV structure. Creating Physical Volumes (04:19 - 10:05): Using fdisk to create a partition and pvcreate to initialize it as a PV. Note how he also shows creating a PV on a raw disk without a partition table. Creating a Volume Group (10:05 - 11:16): Using vgcreate to pool the PVs together. Creating and Mounting a Logical Volume (11:16 - 19:32): Using lvcreate to create the LV, mkfs.xfs to format it, and finally mounting it and configuring /etc/fstab for persistence.
Here is a summary of the key commands from that process:
| Command | Purpose |
|---|---|
fdisk /dev/sdb |
Creates a partition on the disk /dev/sdb. (We'll cover fdisk in depth next lesson). |
pvcreate /dev/sdb1 |
Initializes the partition /dev/sdb1 as a Physical Volume. |
vgcreate my_vg /dev/sdb1 /dev/sdc1 |
Creates a Volume Group named my_vg from two Physical Volumes. |
lvcreate -n my_lv -L 10G my_vg |
Creates a 10-Gigabyte Logical Volume named my_lv from my_vg. |
mkfs.xfs /dev/my_vg/my_lv |
Formats the new Logical Volume with the XFS filesystem. |
mount /dev/my_vg/my_lv /data |
Mounts the LV at the /data directory. |
For an official reference on these commands, the Red Hat documentation is an invaluable resource.
Configuring and managing logical volumes | Red Hat Enterprise Linux
Let's consult the official documentation, 'Configuring and managing logical volumes', to see the formal definitions and syntax for the commands you just saw.
Skim the following sections as a quick reference. Don't worry about memorizing every detail; just see how the commands map to the concepts. Chapter 2, Section 2.1: 'Creating an LVM physical volume' (pvcreate). Chapter 3, Section 3.1: 'Creating an LVM volume group' (vgcreate). Chapter 4, Section 4.2.1: 'Creating a linear (thick) logical volume' (lvcreate).
4. Resizing LVM Volumes: The Core Advantage
Now for the main event. Your application's data volume, /dev/my_vg/my_lv, is 85% full. You've attached a new disk to the VM. Let's extend the volume.
The process involves working up the LVM hierarchy and then back down to the filesystem:
- Initialize the new disk as a Physical Volume (
pvcreate). - Extend the Volume Group to include the new PV (
vgextend). - Extend the Logical Volume to use the new space (
lvextend). - Resize the filesystem to recognize and use the larger LV size (
resize2fsorxfs_growfs).
The video from beanologi demonstrates this flow perfectly.
Logical Volume Manager (LVM) Deep Dive - RHCSA 10 Review (RHEL 9 Compatible)
Let's continue with the 'RHCSA 10 Review' video. The instructor simulates running out of space and walks through the entire extension process.
Watch from 19:32 to 25:32. Pay close attention to: Using parted to prepare the new disk. vgextend to add the new PV to the volume group. lvextend to increase the logical volume's size. xfs_growfs to expand the filesystem to use the new space. This is a critical step!
The -r / --resizefs Shortcut
Many LVM commands have a powerful shortcut option, -r or --resizefs, that performs the final filesystem resize for you. This combines steps 3 and 4 into a single, atomic operation.
For an ext4 filesystem:# lvextend -L +5G -r /dev/my_vg/my_lv
For an xfs filesystem, you'd use xfs_growfs as shown in the video, because XFS resizing capabilities are handled by its own toolset which lvextend -r may not always correctly invoke depending on the system version. However, modern LVM versions often handle this correctly. The explicit two-step process (lvextend then xfs_growfs) is always safe.
The next video segment shows this shortcut and also discusses shrinking volumes.
Logical Volume Manager (LVM) Deep Dive - RHCSA 10 Review (RHEL 9 Compatible)
The 'RHCSA 10 Review' video demonstrates this convenient shortcut and also covers the more advanced and risky operation of shrinking a volume.
Watch from 25:32 to 33:47. Key points include: The lvextend -r command to extend an LV and resize the filesystem in one go. The process for shrinking an ext4 volume, noting that it's an offline operation (the filesystem must be unmounted) and riskier than extending. The important fact that XFS filesystems cannot be shrunk.
5. Management Task: Safely Removing a Disk
Another common real-world scenario is decommissioning a disk. You can't simply pull a physical disk that is part of an active volume group. LVM provides a safe, non-disruptive way to do this.
The process is:
pvmove /dev/sdd1: This command migrates all data off the PV you want to remove (/dev/sdd1) and onto other PVs within the same VG. This can be done while the filesystem is online.vgreduce my_vg /dev/sdd1: Once the PV is empty, this command removes it from the VG.pvremove /dev/sdd1: This removes the LVM metadata from the disk, making it a plain block device again, ready to be physically removed from the server.
Logical Volume Manager (LVM) Deep Dive - RHCSA 10 Review (RHEL 9 Compatible)
This final clip from the 'RHCSA 10 Review' video demonstrates this critical maintenance task.
Watch from 33:47 to 36:58. The instructor clearly shows how to use pvmove, vgreduce, and pvremove to safely retire a disk from a volume group without any downtime for the mounted logical volumes.
Conclusion
You have now mastered the fundamentals of LVM, a cornerstone of modern Linux storage management. You've moved beyond simple, static partitions into a world of flexible, dynamic volumes that are essential for the kinds of systems you manage as a DevOps engineer.
Key Takeaways:
- LVM abstracts physical storage into a flexible pool (PV -> VG -> LV).
- The primary workflow is
pvcreate->vgcreate->lvcreate->mkfs->mount. - To extend a volume, you extend the VG (
vgextend), then the LV (lvextend), and finally the filesystem (resize2fs/xfs_growfs). The-rflag can simplify this. - Safely removing a disk is a three-step process:
pvmove,vgreduce,pvremove.
Preview of the Next Lesson:
In this lesson, we worked with partitions as the basis for our Physical Volumes. In the next lesson, we will dig deeper into the tools used to create and manage those partitions. The learning outcome will be to manage disk partitions using fdisk or parted and create, mount, and manage filesystems (ext4, xfs). This will complete your knowledge of the full storage stack, from raw disk to mounted filesystem.