Welcome to our third lesson. In our previous sessions, you learned how to give a web page its fundamental structure with semantic HTML and how to populate it with content like links, images, and lists. We've focused on how a user receives information from a page. Now, we'll shift our focus to a crucial part of any interactive product: how a user gives information back.
This lesson is all about building HTML forms. As a UI/UX designer, you spend countless hours crafting intuitive and clean forms in Figma for everything from user registration to e-commerce checkouts. Today, you'll learn to build the underlying HTML skeleton for those designs. We will cover the essential tags for creating forms, including various input types like text fields, dropdown menus, and checkboxes, as well as the all-important submit button. Most importantly, we'll connect these technical elements to the principles of good user experience you already know.
The <form> Element: A Container for User Input
Every form on a web page begins with the <form> element. Think of it as the frame that holds all your input fields, labels, and buttons together. By itself, it doesn't display anything, but it tells the browser, "Everything inside here is part of a form that will be sent somewhere."
The two most important attributes of the <form> tag are action and method.
- The
actionattribute specifies the URL where the form data should be sent for processing (e.g., a server endpoint). - The
methodattribute defines how the data is sent. The two most common methods areGETandPOST.
The difference between GET and POST is a fundamental concept in web development that has direct implications for user experience and security. A GET request appends the form data to the URL, making it visible to anyone. A POST request sends the data in the body of the HTTP request, keeping it hidden from the URL. You would never use GET for sensitive information like passwords.
To see a clear, practical demonstration of this difference, let's watch a segment from a tutorial by Dave Gray.
HTML Forms and Inputs | HTML5 Tutorial for Beginners
This video provides a very clear explanation of how form submissions work, visually showing the difference between GET and POST requests.
Watch the segment from the start of the button section where he adds submit and reset buttons. Then, pay close attention to the explanation starting at the httpbin demonstration. He first submits with GET and points out how all the form data appears in the URL. Then he submits with POST and shows that the URL remains clean. This is a critical distinction.
Labels and Inputs: The Building Blocks of Forms
Every input field in your form needs a corresponding <label>. This is non-negotiable from both an accessibility and usability standpoint. A label tells users what information the input field requires. For a screen reader user, a properly associated label is the only way they know what to type.
The connection between a <label> and an <input> is created using the for and id attributes. The for attribute on the label must match the id of the input.
<label for="user-email">Email Address</label>
<input type="text" id="user-email" name="user_email">
Notice the name attribute on the <input>. While id links the input to its label, name is what identifies the data on the server after submission.
The "Building Forms" guide by Shay Howe provides an excellent, detailed walkthrough of all the essential form elements. Let's start by reading about the core components.
Building Forms - Learn to Code HTML & CSS
This guide is a perfect reference for the foundational tags and attributes used in forms. We will refer back to it throughout the lesson.
First, read the section Initializing a Form to solidify your understanding of the <form> tag. Next, jump down to the section "Organizing Form Elements." Read about the label element. Pay close attention to how the for and id attributes work together. Finally, read the section "Form & Input Attributes," specifically focusing on the descriptions for placeholder and required. These attributes are directly related to the user experience of your forms.
Capturing User Data: A Tour of Input Types
HTML provides a variety of elements to capture different kinds of data. As a designer, you choose these based on the information you need and the best way to let the user provide it. In HTML, we select the appropriate tag or type attribute.
Let's explore the most common ones by continuing with the Shay Howe guide.
Building Forms - Learn to Code HTML & CSS
This reading covers the specific HTML elements you'll use to build out the body of your form.
Text Fields: Read the section Text Fields & Textareas. This covers single-line inputs (<input type="text">, <input type="email">, etc.) and multi-line inputs (<textarea>). Notice how different type values can provide specialized user interfaces on mobile devices. Multiple Choice: Now read Multiple Choice Inputs & Menus. This section is critical. It explains: Radio Buttons (<input type="radio">): For selecting one option from a group. Note the importance of all radio buttons in a group sharing the same name attribute. Checkboxes (<input type="checkbox">): For selecting zero or more options. Drop-Down Lists (<select> and <option>): Ideal for long lists of options where you want to save space. Buttons: Finally, read the short section on Form Buttons. This explains how to create the all-important submit button using either <input type="submit"> or the more flexible <button> element.
Organizing Forms with Fieldsets
In your design work, you instinctively group related fields together—like "Personal Information" or "Shipping Address"—to reduce cognitive load for the user. HTML provides a semantic way to do this using the <fieldset> and <legend> elements.
<fieldset>wraps a group of related form controls.<legend>provides a caption or title for that group.
This not only creates a visual grouping (browsers typically draw a border around a fieldset) but also provides crucial context for screen reader users, who will hear the legend announced as they enter the group.
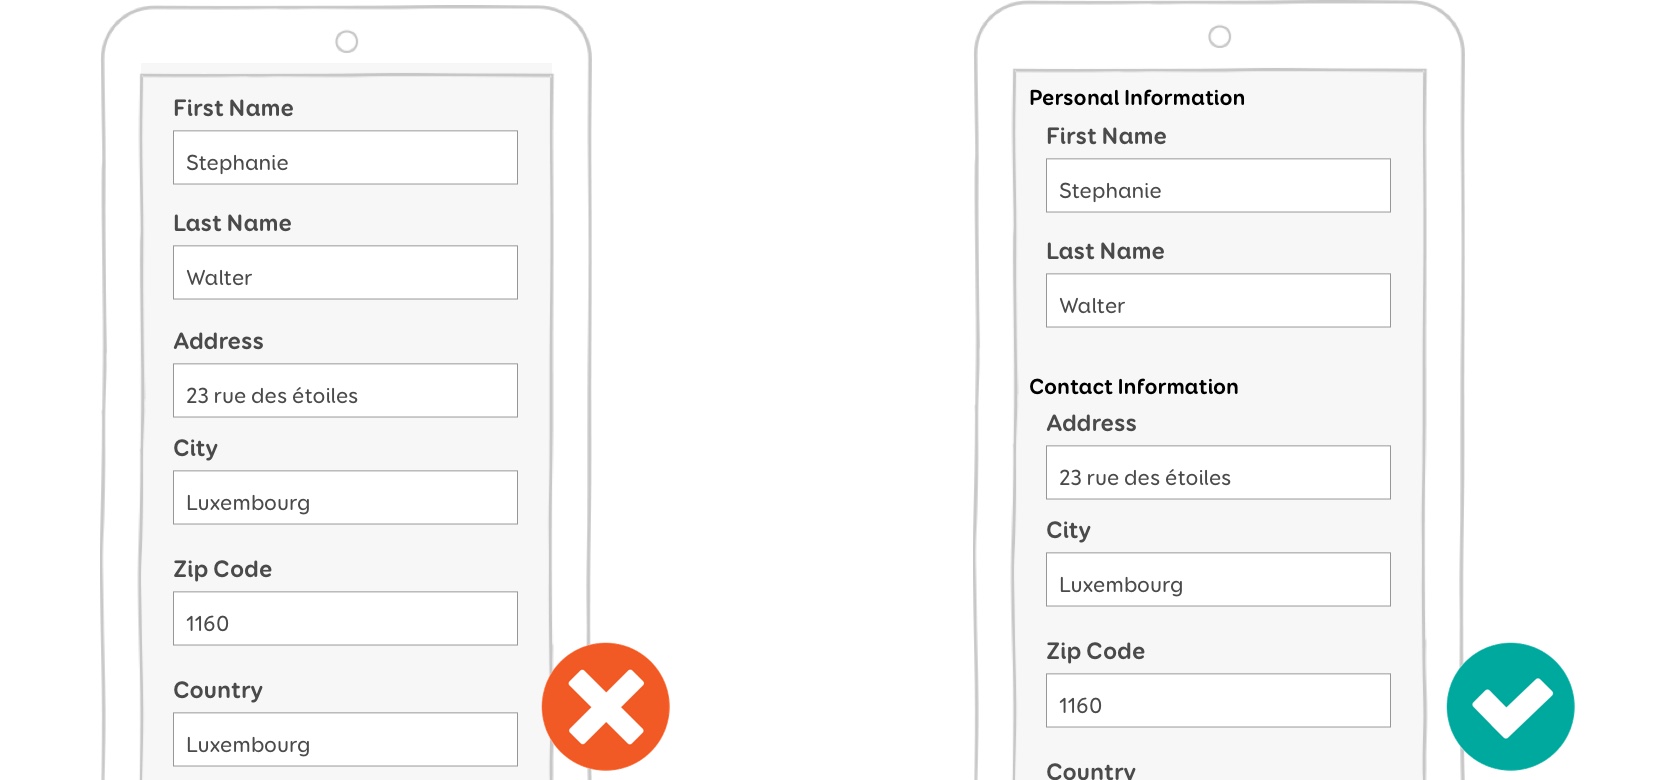
Let's read a quick explanation on how to implement this. The TestParty blog has a great article focused on accessibility.
How to Create Accessible Forms: HTML5 & ARIA Tutorial | TestParty
This article frames form design through the lens of accessibility, which aligns perfectly with your focus on User & Product Thinking.
Read the section titled Grouping Related Fields. It clearly demonstrates how <fieldset> and <legend> provide necessary context for groups of inputs like radio buttons or address fields.
Your Turn: Build a Contact Form
Now it's time to put all these pieces together. Your task is to write the HTML for a simple contact form based on the following requirements. Don't worry about styling; focus purely on the correct HTML structure.
Requirements:
- A main form container.
- A section for personal details, grouped under the title "Your Details".
- A required text input for "Name".
- A required email input for "Email".
- A section for the message, grouped under the title "Your Message".
- A dropdown menu for "Inquiry Type" with options: "General Question", "Technical Support", "Billing Issue".
- A checkbox to "Receive our newsletter".
- A multi-line text area for the "Message" itself.
- A "Send Message" submit button.
Use <form>, <fieldset>, <legend>, <label>, <input>, <select>, <option>, <textarea>, and <button> to build this.
View a possible solution
<form action="/contact-submit" method="post">

  <fieldset>
    <legend>Your Details</legend>

    <p>
      <label for="name">Name:</label>
      <input type="text" id="name" name="user_name" required>
    </p>

    <p>
      <label for="email">Email:</label>
      <input type="email" id="email" name="user_email" required>
    </p>
  </fieldset>

  <fieldset>
    <legend>Your Message</legend>

    <p>
      <label for="inquiry">Inquiry Type:</label>
      <select id="inquiry" name="inquiry_type">
        <option value="general">General Question</option>
        <option value="support">Technical Support</option>
        <option value="billing">Billing Issue</option>
      </select>
    </p>

    <p>
      <label for="newsletter">
        <input type="checkbox" id="newsletter" name="newsletter_subscribe" value="yes">
        Receive our newsletter
      </label>
    </p>

    <p>
      <label for="message">Message:</label><br>
      <textarea id="message" name="user_message" rows="5" cols="40"></textarea>
    </p>
  </fieldset>

  <button type="submit">Send Message</button>

</form>
Note: The <p> tags are used here for simple spacing; in a real project, we would use CSS for layout.
Conclusion
You have now built your first complete HTML form! You've moved from simply structuring content to creating interactive controls for collecting user data. This is a massive step in your journey to becoming a Design Engineer, directly bridging the gap between your Figma mockups and a functional web interface.
Key Takeaways:
- The
<form>element is the container for all inputs, usingactionandmethodattributes to define where and how data is sent. - Every
<input>must have a corresponding<label>, linked via theforandidattributes, for accessibility and usability. - HTML offers specific input types for different data:
text,email,passwordfor text;<select>for dropdowns;checkboxfor multi-select;radiofor single-select; and<textarea>for long-form text. - The
<fieldset>and<legend>elements are the semantic HTML equivalent of the visual groupings you create in your designs, providing structure and context. - A
<button type="submit">is used to trigger the form submission process.
In our next lesson, we will finally start making things look good. You'll be introduced to the CSS box model, the fundamental concept that governs the size, spacing, and layout of every element on a page. We've built the skeleton; now it's time to give it shape.