Hello! In our last lesson, you mastered event delegation, a crucial pattern for handling events on dynamic elements efficiently. Now, it's time to put all your DOM manipulation and event handling skills together to build your first complete, interactive web application.
Today's lesson addresses the learning outcome: Build a to-do list application that adds, deletes, and marks items as complete. This is a classic project for any aspiring web developer, and it will solidify the concepts we've covered, from creating and appending elements to managing user events on a list that changes.
We will build the application shown below. While we won't focus on the exact styling, we will implement all the core functionality.
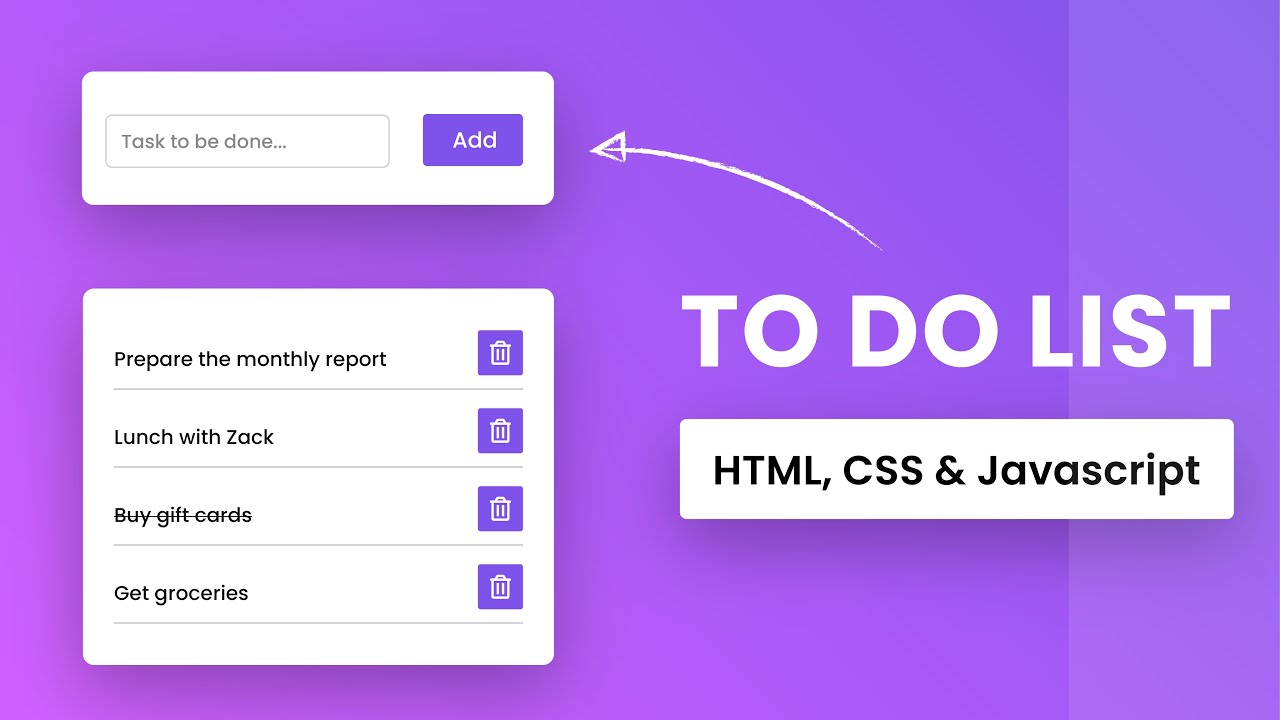
A Professional Approach: State-Driven UI
Before we write any code, let's talk strategy. A common way to start is by directly manipulating the DOM for every action. For example, when adding a task, you could create an <li> and append it. When deleting, you could find that <li> and remove it.
However, a more robust and scalable approach—one that will be fundamental when you learn React—is a state-driven UI. The idea is simple:
- State: All your application's data lives in a single place. For our to-do list, this will be a JavaScript array of objects.
- View: You have a function whose only job is to take the current state and render the entire UI based on it.
- Actions: User interactions (like clicking "add" or "delete") don't touch the DOM directly. Instead, they trigger functions that modify the state. After the state is modified, you simply call the render function again to update the UI.
This "data-first" approach keeps your code organized and predictable. Let's build our app this way.
1. The HTML and JavaScript Setup
First, we need a basic HTML structure and to select the elements we'll be working with in our JavaScript.
Create an index.html file with a form containing an input and a button, and an empty <ul> to hold our list.
<!-- index.html -->
<header>
    <h1>My To-Do List</h1>
</header>
<form id="todo-form">
    <input type="text" id="todo-input" placeholder="Add a new task..." autocomplete="off">
    <button type="submit">Add</button>
</form>
<ul id="todo-list">
    <!-- To-do items will be generated here by JavaScript -->
</ul>
Now, in your app.js file, let's define our state array and select the necessary DOM elements.
// app.js

// STATE: Our application's data
let todos = [];

// SELECTORS: The DOM elements we'll interact with
const todoForm = document.querySelector('#todo-form');
const todoInput = document.querySelector('#todo-input');
const todoList = document.querySelector('#todo-list');
2. Adding a New To-Do
Our first action is adding a new task. We'll listen for the submit event on the form.
The process will be:
- Prevent the form from causing a page refresh.
- Get the text from the input field. If it's empty, do nothing.
- Create a new to-do object with a unique ID, the text, and a
completedstatus. - Push this object into our
todosarray (modify the state). - Clear the input field.
- Call a
render()function to update the view.
HOW TO create a To Do List App With JavaScript, HTML and CSS | ES6 For Beginners
The video 'HOW TO create a To Do List App' by Code Explained provides an excellent walkthrough of this data-centric approach. We'll watch the section on saving the to-do to an array.
Watch from 09:49 to 17:35. The key takeaway is how a new to-do is created as an object and pushed into an array. Don't worry about the duplicate-checking or random color generation for now; focus on the core logic of creating an object and adding it to the todos array. Also, ignore the part about localStorage for now; we'll cover that in the next lesson.
Based on that video, let's implement our addTodo logic.
// Add an event listener to the form
todoForm.addEventListener('submit', function(event) {
    // 1. Prevent page refresh
    event.preventDefault();

    // 2. Get the input text
    const todoText = todoInput.value.trim();

    if (todoText !== '') {
        // 3. Create a to-do object
        const todo = {
            id: Date.now(), // A simple unique ID using a timestamp
            text: todoText,
            completed: false
        };

        // 4. Push to the todos array
        todos.push(todo);

        // 5. Clear the input
        todoInput.value = '';

        // 6. Re-render the list
        renderTodos();
    }
});
3. Rendering the List
Now for the central piece of our architecture: the renderTodos() function. Its responsibility is to make the DOM match the todos array.
The process is:
- Clear the entire
<ul>element. This prevents duplicating items every time we render. - Loop through the
todosarray. - For each
todoobject, create the corresponding<li>element with its content and buttons. - Append the new
<li>to the<ul>.
HOW TO create a To Do List App With JavaScript, HTML and CSS | ES6 For Beginners
Let's continue with the same video to see how the renderToDos function works. It takes the data from the array and builds the HTML.
Watch from 22:15 to 28:39. Notice how the function first clears the list (innerHTML = '') and then uses a forEach loop to build the list from the todos array. This pattern—clear and redraw—is simple and effective.
Let's write our renderTodos function.
function renderTodos() {
    // 1. Clear the existing list
    todoList.innerHTML = '';

    // 2. Loop through the todos array
    todos.forEach(function(todo) {
        // 3. Create the <li> element
        const li = document.createElement('li');

        // Add a class if the to-do is completed
        if (todo.completed) {
            li.classList.add('completed');
        }

        // Use a data attribute to store the todo's ID
        li.setAttribute('data-id', todo.id);

        // Set the inner HTML for the list item
        li.innerHTML = `
            <span>${todo.text}</span>
            <button class="complete-btn">✔</button>
            <button class="delete-btn">✖</button>
        `;

        // 4. Append to the ul
        todoList.appendChild(li);
    });
}
At this point, you should be able to add new tasks and see them appear on the screen!
4. Deleting and Completing Tasks with Event Delegation
Now we need to make the "delete" and "complete" buttons work. Since these buttons are created dynamically, this is a perfect use case for the event delegation pattern you learned in the last lesson.
We will add a single click listener to the parent todoList (<ul>). Inside the listener, we'll check what was clicked.
The process for our event handler:
- Check if the clicked element (
event.target) was adelete-btn. - If so, find the parent
<li>and get itsdata-id. - Use
.filter()to update thetodosstate array, removing the object with that ID. - Check if the clicked element was a
complete-btn. - If so, find the parent
<li>and get itsdata-id. - Use
.map()to update thetodosstate array, toggling thecompletedproperty for the matching object. - Finally, call
renderTodos()to update the UI with the new state.
Beginner Vanilla Javascript Project Tutorial
This is the most complex part. The 'developedbyed' tutorial clearly demonstrates how to use event delegation to handle clicks for deleting and completing items.
Watch from 30:38 to 38:31. The video shows adding one event listener to the to-do-list container. Pay close attention to how it uses event.target.classList to check which button was clicked and item.parentElement to find the <li> to act upon.
Let's add our event delegation logic.
todoList.addEventListener('click', function(event) {
    const target = event.target;
    const parentLi = target.closest('li');

    if (!parentLi) return; // Exit if the click was not inside an <li>

    const todoId = Number(parentLi.getAttribute('data-id'));

    // Handle Delete
    if (target.matches('.delete-btn')) {
        // Update state by filtering out the deleted todo
        todos = todos.filter(function(todo) {
            return todo.id !== todoId;
        });
        // Re-render
        renderTodos();
    }

    // Handle Complete
    if (target.matches('.complete-btn')) {
        // Update state by mapping over the todos
        todos = todos.map(function(todo) {
            if (todo.id === todoId) {
                // Toggle the 'completed' property
                return {
                    id: todo.id,
                    text: todo.text,
                    completed: !todo.completed
                };
            } else {
                return todo;
            }
        });
        // Re-render
        renderTodos();
    }
});
With this final piece, you now have a fully functional to-do list application! You can add tasks, mark them as complete (which will apply a CSS class for styling), and delete them.
Test your understanding!
Currently, our application allows adding empty tasks if the user just types spaces into the input. How would you modify the submit event listener to prevent this?
Show answer
You would use the .trim() method on the input value to remove leading and trailing whitespace before checking if it's an empty string.
The modification would be in the submit event listener:
todoForm.addEventListener('submit', function(event) {
    event.preventDefault();

    // Use .trim() to remove whitespace from both ends
    const todoText = todoInput.value.trim();

    // The rest of the condition works as before
    if (todoText !== '') {
        // ... a
dd the todo
    }
});
This ensures that inputs containing only spaces are treated as empty and are not added to the list.
Conclusion
Congratulations! You've just built your first dynamic web application from scratch. More importantly, you've done it using a professional, state-driven pattern that will be invaluable as you progress.
Key Takeaways:
- State-Driven UI: The best practice is to keep your application's data in a "state" (like our
todosarray) and write functions that render the UI based on that state. - Actions Modify State: User actions should trigger functions that modify the state, not the DOM directly.
- Render on State Change: After any state change, call a
render()function to redraw the UI, ensuring it's always in sync with your data. - Immutable Updates: Using methods like
.map()and.filter()to create new arrays is a powerful pattern. It avoids directly mutating the state, which is a core principle in modern frameworks like React. - Event Delegation in Action: This project was a perfect demonstration of why event delegation is essential for handling events on dynamically generated elements.
There's one problem with our app: if you refresh the page, all your tasks are gone! In our next lesson, we will solve this by learning how to persist application state across browser sessions by saving and loading data from localStorage.