Hello! Welcome to the first lesson of our second module, "Interactive Frontend with the DOM."
In the last module, you built a strong foundation in JavaScript's core concepts, culminating in mastering how to work with data in both arrays and objects. You're now proficient at transforming data using modern JavaScript.
Now, we shift our focus from the console to the browser window. This module is all about bringing your web pages to life, and that journey begins with today's learning outcome: Select and manipulate HTML elements using querySelector() and querySelectorAll().
We'll start by exploring the Document Object Model (DOM), the crucial link between your HTML structure and your JavaScript code. Then, you'll learn the two most important and powerful methods for finding and grabbing any element on a page. This is the first and most fundamental skill for creating dynamic, interactive user interfaces.
The DOM: Your Page's Interactive Blueprint
When a browser loads an HTML document, it doesn't just display it; it creates a model of the page in memory. This model is called the Document Object Model, or DOM. The DOM represents the entire page as a tree-like structure of objects, where each object corresponds to an HTML element, attribute, or piece of text.
JavaScript can access and modify this DOM tree, and any changes you make are instantly reflected on the visible page. The global document object is your main entry point to interacting with the DOM.
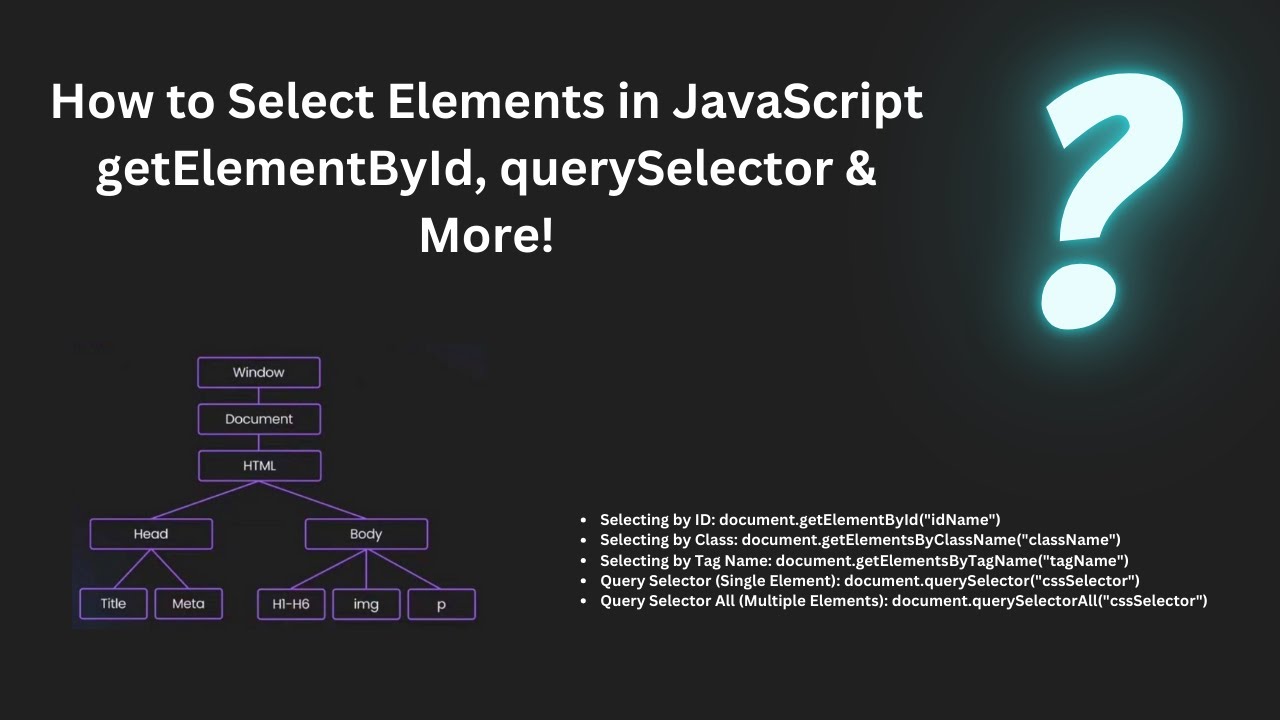
Before we select anything, there's one crucial setup detail. To ensure your JavaScript code doesn't run before the HTML elements it's trying to find have been created by the browser, it's a best practice to place your <script> tag right before the closing </body> tag in your HTML file.
<!-- index.html -->
<body>
  <h1>My Web Page</h1>
  <p>Some content.</p>

  <!-- Script goes at the end! -->
  <script src="app.js"></script>
</body>
The following reading explains why this is important and also shows an alternative approach. For this course, we'll stick to placing the script at the end of the body.
Let's read a short section from Wes Bos's article 'Selecting Elements' that explains the importance of script placement.
Read the section titled 'Where to Load JavaScript When Selecting Elements'. This will clarify why your document.querySelector('p') might return null if the script is loaded in the <head> without any precautions.
Modern Element Selection: querySelector and querySelectorAll
While older methods like getElementById() or getElementsByClassName() exist, modern JavaScript development primarily relies on two versatile methods:
document.querySelector()document.querySelectorAll()
Their main advantage is that they use CSS selector strings to find elements. Since you're already familiar with CSS, you can use the same selectors you'd use in your stylesheet (e.g., .my-class, #main-section, nav ul li) to select elements in JavaScript, making them incredibly powerful and flexible.
Let's start with a quick overview of what each method does.
This documentation page from Codecademy provides a concise definition of querySelector() and a clear comparison with querySelectorAll().
Read the introduction, the 'Syntax' section, and the 'querySelector() Vs. querySelectorAll()' section. This will give you the formal definitions and highlight the key difference between the two.
Selecting a Single Element with querySelector()
As you just read, document.querySelector() finds and returns the first element in the document that matches the specified CSS selector. If no element is found, it returns null.
Let's see it in action. This short video clip demonstrates how to select elements by tag, class, or ID.
Learn JavaScript ELEMENT SELECTORS easy! 📑
The video 'Learn JavaScript ELEMENT SELECTORS easy!' by Bro Code provides a clear, practical demonstration of element selection.
Watch from 12:39 to 14:25. The presenter shows how querySelector works with different CSS selectors and what happens when a match isn't found.
Here's how you would use it in your code. Imagine you have this HTML:
<div id="main">
  <p class="content">This is the first paragraph.</p>
  <p class="content">This is the second paragraph.</p>
</div>
You could select elements in these ways:
// Select by ID ('#')
const mainDiv = document.querySelector('#main');
mainDiv.style.border = '1px solid black'; // Let's manipulate it!

// Select by class ('.') - will only get the FIRST one
const firstParagraph = document.querySelector('.content');
firstParagraph.style.color = 'blue';

// Select by tag - will also get the FIRST one
const anyParagraph = document.querySelector('p');
// This selects the same element as the line above in this specific HTML
Selecting Multiple Elements with querySelectorAll()
When you need to grab all elements that match a selector, you use document.querySelectorAll(). This method returns a NodeList, which is a collection of the matching elements.
A NodeList is similar to an array, and most importantly, you can iterate over it using the forEach() method, which you're already familiar with from the previous module. This makes it easy to apply a change to multiple elements at once.
Let's watch the next segment of the video to see this in practice.
Learn JavaScript ELEMENT SELECTORS easy! 📑
Continuing with the same video, let's see how querySelectorAll works and how it differs from querySelector.
Watch from 14:25 to 16:45. Pay close attention to how a NodeList is returned and how the presenter uses forEach to apply styles to all selected elements—a very common pattern.
Using our same HTML example:
// Select all elements with the class 'content'
const allParagraphs = document.querySelectorAll('.content');

console.log(allParagraphs.length); // Output: 2

// Use forEach to manipulate each element in the NodeList
allParagraphs.forEach(paragraph => {
  paragraph.style.fontWeight = 'bold';
});
This pattern of selecting a group of elements and looping through them is fundamental to web development.
Test your understanding!
Given the following HTML, write a single JavaScript statement to change the text color of only the list item "Banana" to yellow.
<ul>
  <li class="fruit">Apple</li>
  <li class="fruit" id="second">Banana</li>
  <li class="fruit">Cherry</li>
</ul>
Show answer
The most specific selector for "Banana" is its ID.
document.querySelector('#second').style.color = 'yellow';
You could also use document.querySelectorAll('.fruit')[1], but selecting by ID is more direct and robust.
The Real Power: Complex CSS Selectors
The true strength of querySelector and querySelectorAll comes from their ability to use any CSS selector, including complex ones. This allows you to be incredibly precise in targeting elements. Given your background in CSE, you can think of this as writing a very specific query to find a node in a tree.
Here are a few examples:
- Descendant Selector:
document.querySelector('#main p')selects the first<p>anywhere inside the element withid="main". - Child Selector:
document.querySelector('ul > li')selects the first<li>that is a direct child of a<ul>. - Attribute Selector:
document.querySelector('input[type="password"]')selects the first<input>element with atypeattribute set to"password".
The following video demonstrates a variety of these advanced selectors.
Selecting DOM Elements with Pure JavaScript: querySelector and querySelectorAll
The video 'Selecting DOM Elements with Pure JavaScript' by All Things JavaScript, LLC, does a great job of showcasing the flexibility of these methods.
Watch from 04:07 to 09:20. You don't need to memorize every selector shown. The goal is to appreciate the range of possibilities, from selecting children to using pseudo-classes like :nth-of-type(3).
This precision is invaluable when you're working on large, complex web applications.
A Note for the Curious: Static vs. Live Collections
Here's a detail that your computer science background might find interesting. The NodeList returned by querySelectorAll is static. This means it's a snapshot of the matching elements at the moment you run the command. If you add new matching elements to the page later with JavaScript, your original NodeList will not be updated.
In contrast, older methods like getElementsByClassName() return a live HTMLCollection, which automatically updates if you add or remove elements that match its criteria. While this might sound useful, it can also lead to unexpected behavior. The static nature of NodeList is generally more predictable and preferred in modern development.
Conclusion
In this lesson, you took your first major step into making web pages interactive. You've moved beyond simple data manipulation and learned how to query the live document itself.
Key Takeaways:
- The DOM is the browser's object-based representation of an HTML document, which JavaScript can interact with via the
documentobject. document.querySelector(selector)is the modern, flexible way to select the first HTML element that matches a CSS selector. It returns an element object ornull.document.querySelectorAll(selector)selects all elements matching a CSS selector and returns aNodeList.- You can iterate over a
NodeListwithforEach()to manipulate multiple elements at once. - The power of these methods lies in their ability to use the full syntax of CSS selectors, allowing for precise and complex element targeting.
Now that you know how to select elements, the next logical question is: what can you do with them? In our next lesson, "Modify element content, attributes, and styles," you will learn how to change an element's text, update its HTML attributes like src or href, and dynamically control its CSS styles.