Hello! In our last lesson, you successfully completed the mid-course project by adding localStorage to persist your favorite movies. Your movie search app is now functional, stylish, and remembers user selections. However, it's still a single-view application. To build more complex web apps, you'll need to create distinct "pages" or views, like a dashboard, a user profile page, or detailed views for specific items.
This lesson marks the beginning of our "Advanced React" module. We'll tackle the first learning outcome: Set up client-side routing using React Router to create a single-page application (SPA). You will learn what client-side routing is, why it's essential for modern web development, and how to configure the foundational routing structure for a React application.
What is a Single-Page Application (SPA)?
Before we write any code, it's crucial to understand the "why." Traditionally, when you click a link on a website (a Multi-Page Application or MPA), your browser sends a request to a server, which then returns a completely new HTML page. This results in a full-page refresh.
In a React application, we want to avoid this full refresh to create a faster, more "app-like" experience. An SPA achieves this by loading a single HTML page and then dynamically rewriting the content using JavaScript as the user navigates. React Router is the standard library for managing this "client-side routing" in React.
The diagram below illustrates the difference in data flow between the two approaches.
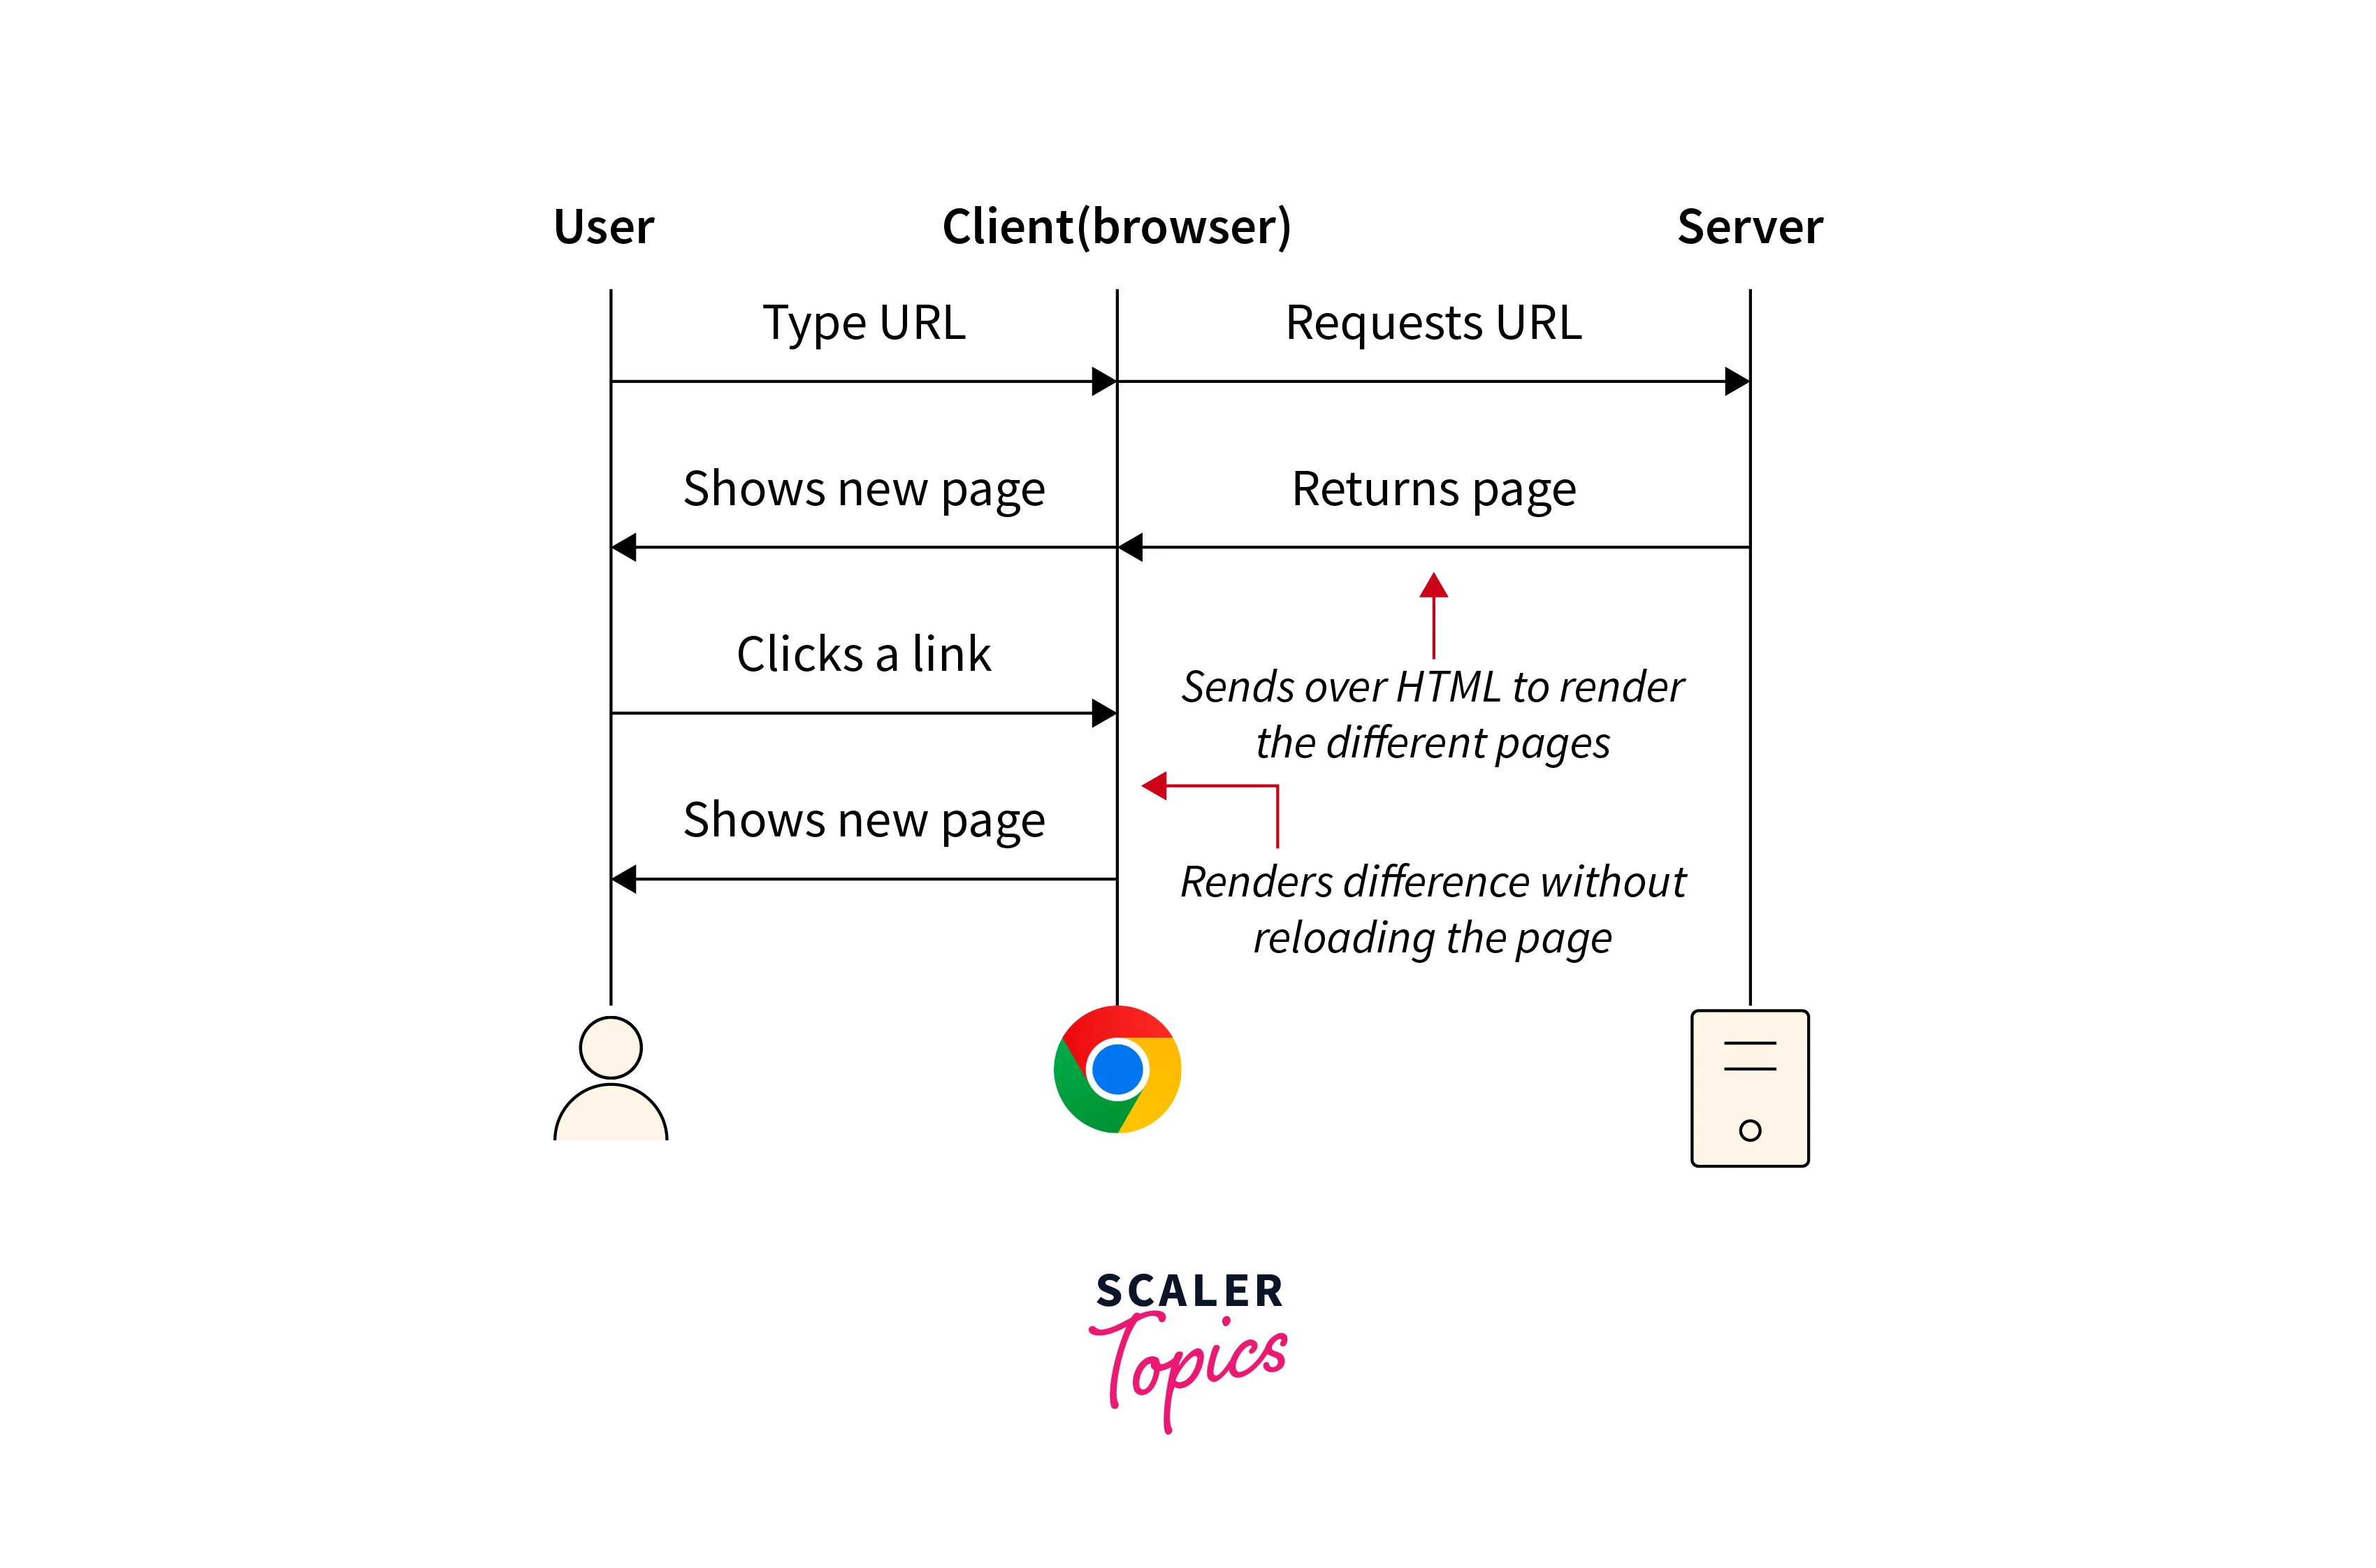
To see this in action, the following video gives a great explanation of SPAs and the problem React Router solves.
React Router 6 – Tutorial for Beginners
This video from freeCodeCamp.org provides a clear, concise overview of what a Single-Page Application is and why we use libraries like React Router.
Watch from the beginning until 02:06 to understand the core concept of an SPA and how it differs from a traditional website.
Getting Started with React Router
Let's start integrating React Router into a new project. For this module, you can either create a fresh React project with Vite or continue with a copy of your movie app project and strip it down to a basic App.jsx component.
Step 1: Installation
First, open your project's terminal and install react-router-dom, which contains the bindings for web applications.
npm install react-router-dom
This command adds the library to your project's dependencies.
React Router Version 6 Tutorial – How to Set Up ...
For a quick text reference, this section of a freeCodeCamp article confirms the installation command.
Briefly review the 'How to Install React Router' section. The command is the key takeaway here.
Step 2: Creating the Router
With React Router v6.4+, the recommended way to configure routing is by creating a "data router." We will use the createBrowserRouter function for this. This approach is more powerful and is what you should learn for modern React development.
We'll define our routes in main.jsx and provide the router to our entire application. This keeps our routing configuration separate from our UI components.
Watch this video to see how to set up the basic router infrastructure.
React Router - Complete Tutorial
This excellent tutorial from Cosden Solutions demonstrates the modern, recommended way to set up React Router using createBrowserRouter and RouterProvider.
Watch from the beginning until 04:25. Pay close attention to: Importing createBrowserRouter and RouterProvider. Creating the router object with an array of routes (it will be empty at first). Replacing your <App /> component with <RouterProvider router={router} /> in your ReactDOM.createRoot call.
After following the video, your main.jsx should look something like this:
// src/main.jsx
import React from 'react';
import ReactDOM from 'react-dom/client';
import {
  createBrowserRouter,
  RouterProvider,
} from "react-router-dom";

// We'll define our page components here later
import App from './App.jsx';
import './index.css';

const router = createBrowserRouter([
  // Routes will be added here
]);

ReactDOM.createRoot(document.getElementById('root')).render(
  <React.StrictMode>
    <RouterProvider router={router} />
  </React.StrictMode>
);
Note: The video uses main.tsx, but the code is identical for a .jsx file. The key takeaway is that RouterProvider now becomes the entry point for rendering your application.
Defining Your First Routes
Now that the router is set up, let's define some routes. A route is a mapping between a URL path and a React component. We define each route as an object in the array we pass to createBrowserRouter. Each route object needs at least a path and an element.
First, let's create a couple of simple page components to act as our pages.
- Create a
pagesfolder insidesrc. - Inside
src/pages, createHomePage.jsx:// src/pages/HomePage.jsx function HomePage() { return ( <div> <h1>Home Page</h1> <p>Welcome to our site!</p> </div> ); } export default HomePage; - Inside
src/pages, createAboutPage.jsx:// src/pages/AboutPage.jsx function AboutPage() { return ( <div> <h1>About Us</h1> <p>This is the about page.</p> </div> ); } export default AboutPage;
Now, let's wire them up in main.jsx.
// src/main.jsx

// ... other imports
import HomePage from './pages/HomePage.jsx';
import AboutPage from './pages/AboutPage.jsx';

const router = createBrowserRouter([
  {
    path: "/",
    element: <HomePage />,
  },
  {
    path: "/about",
    element: <AboutPage />,
  },
]);

// ... ReactDOM.createRoot call
Now, run your application (npm run dev).
- When you visit
http://localhost:5173/, you should see theHomePagecomponent. - If you manually change the URL to
http://localhost:5173/about, theAboutPagecomponent will render instantly, without a full page refresh!
Handling "Not Found" Pages (404s)
What happens if a user navigates to a URL that doesn't exist, like /contact? Currently, React Router will show an error screen. We can provide a better user experience by creating a custom "404 Not Found" page.
With the data router setup, we can define an errorElement on our root route. This element will be rendered whenever an error occurs, including when a route cannot be found.
-
First, create the
NotFoundPage.jsxcomponent:// src/pages/NotFoundPage.jsx function NotFoundPage() { return ( <div> <h1>404 - Page Not Found</h1> <p>Sorry, the page you are looking for does not exist.</p> </div> ); } export default NotFoundPage; -
Update your
routerconfiguration inmain.jsx. We will add a "root" route that contains our other routes aschildrenand has theerrorElement.// src/main.jsx // ... other imports import HomePage from './pages/HomePage.jsx'; import AboutPage from './pages/AboutPage.jsx'; import NotFoundPage from './pages/NotFoundPage.jsx'; import App from './App.jsx'; // A root layout component const router = createBrowserRouter([ { path: "/", element: <App />, // We'll discuss this layout component in a later lesson errorElement: <NotFoundPage />, children: [ { index: true, // index: true makes this the default child route element: <HomePage />, }, { path: "about", element: <AboutPage />, }, ], }, ]);- Notice we've nested our routes inside a parent route (
path: "/"). TheApp.jsxcomponent can now serve as a layout (e.g., containing a navbar). We will explore this concept of layouts with the<Outlet />component later. For now,App.jsxcan just be an empty container. - The
HomePageroute now usesindex: trueinstead ofpath: "/". This tells the router it's the default component to show for the parent's path (/). - The
errorElementis attached to the parent route. It will catch any routing errors for its children.
- Notice we've nested our routes inside a parent route (
Now if you navigate to a non-existent path like /asdf, you will see your custom NotFoundPage.
Test your understanding!
Based on the final router configuration above, what change would you need to make to add a new page at the URL /contact? List the files you would create/modify and the code you would add.
Show answer
- Create a new page component: Create a file
src/pages/ContactPage.jsxwith the component content (e.g., an<h1>that says "Contact Us"). - Modify the router configuration: In
main.jsx, import your newContactPagecomponent. Then, add a new route object to thechildrenarray:// In main.jsx, inside the children array: { path: "contact", element: <ContactPage />, }
Conclusion
In this lesson, you took the first and most critical step toward building multi-page React applications. You've learned what an SPA is and configured the fundamental routing structure using the modern React Router API.
Key Takeaways:
- Single-Page Applications (SPAs) provide a faster user experience by avoiding full-page reloads.
- React Router is the standard library for handling client-side routing in React.
- The modern setup uses
createBrowserRouterto define routes as an array of objects. RouterProvideris used at the top level of your app to make the router available.- Each route object maps a
pathto a Reactelement. - You can use an
errorElementon a parent route to create a custom 404/error page.
Currently, users can only switch pages by typing the URL manually. That's not very useful! In our next lesson, we will build on this foundation to define routes and create navigation links between different pages using the <Link> component, allowing users to navigate your app with a simple click.