Welcome to the first lesson in our new module, "Backend Foundations with Node.js & Express"!
In the previous modules, we focused exclusively on the "frontend"—the part of a web application that users see and interact with in their browser, which we built using React. You learned how to manage application state on the client-side, including using the Context API to handle global data like themes.
Now, we're making a significant shift to the "backend" or "server-side." This is where the core logic of an application lives: interacting with databases, handling business rules, and managing user authentication. The frontend and backend communicate with each other using APIs.
Today, your goal is to set up a Node.js project and create a basic web server with the Express framework. This is the foundational step for building the REST APIs that your React applications will eventually consume. By the end of this lesson, you'll have a simple but functional server running on your own machine.
What are Node.js and Express?
Before we start coding, let's clarify what these two technologies are.
- Node.js: This is a runtime environment that allows you to execute JavaScript code outside of a web browser. Before Node.js, JavaScript was primarily a language for client-side scripting. Node.js unlocked the ability to use JavaScript for server-side development, which is a massive advantage because you can use the same language for both your frontend and backend.
- Express.js: This is a web application framework that runs on top of Node.js. While you could build a web server using only Node.js, it would be quite complex. Express provides a minimal, flexible set of tools that dramatically simplifies building web servers and APIs. Think of Node.js as the engine and Express as the car's frame and steering wheel—it provides the structure you need to build something useful quickly.
The following video gives a great overview of what Express is and uses a helpful restaurant analogy to explain how clients (like your React app) and servers (our new Express app) communicate.
Express JS #1 - Introduction & Setup
Watch this introductory clip from the video 'Express JS #1 - Introduction & Setup' by Anson. It explains what Express is, why it's popular, and provides a clear analogy for the client-server relationship.
Watch from the beginning until 04:02. The first part introduces Express, and the second part explains the client-server model with a restaurant analogy.
Setting Up Your First Express Project
Now let's get our hands dirty and build our first server. The process involves initializing a Node.js project, installing the necessary packages, and writing the server code.
For a comprehensive guide on setting up a Node.js development environment, the MDN Web Docs are an excellent resource. You can refer to it if you encounter any issues or want to understand the tooling in more depth.
Setting up a Node development environment
This MDN article, 'Setting up a Node development environment,' provides a thorough overview of the tools and steps involved. You don't need to read it all now, but it's a valuable reference.
Skim the 'Express development environment overview' to reinforce what we've discussed. Then, pay closer attention to the section 'Using npm,' particularly the part about initializing a project and installing Express. This will complement the video guide.
We will now follow a guided video tutorial to perform these steps. The video uses modern JavaScript (ES Modules), which aligns with the ES6+ syntax you're already familiar with from working with React.
Express JS #1 - Introduction & Setup
The same video from Anson provides a clear, step-by-step walkthrough of creating the project from scratch. Follow along with the video to set up your own project.
Watch from 04:02 to 07:52. Follow the instructions to: Create a new project folder. Initialize it with npm init -y. Install express. Install nodemon as a dev dependency. Configure your package.json file with "type": "module" and the start:dev script.
After following the video, your package.json file should look something like this:
{
  "name": "expressjs-tutorial",
  "version": "1.0.0",
  "description": "",
  "main": "index.js",
  "type": "module",
  "scripts": {
    "start:dev": "nodemon src/index.mjs",
    "start": "node src/index.mjs"
  },
  "keywords": [],
  "author": "",
  "license": "ISC",
  "dependencies": {
    "express": "^4.18.2"
  },
  "devDependencies": {
    "nodemon": "^3.0.1"
  }
}
Note: Your package versions might be slightly different.
Writing the "Hello World" Server Code
With the project structure in place, it's time to write the JavaScript code that will actually create and start our web server.
- Create a
srcfolder in your project directory. - Inside
src, create a new file namedindex.mjs. (The.mjsextension signifies it's an ES Module, as we specified inpackage.json).
Now, let's add the code to start the server. The next segment of the video will guide you through this.
Express JS #1 - Introduction & Setup
This clip demonstrates how to write the minimal code needed to get an Express server running.
Watch from 07:52 to 10:03. Follow along to: Import express. Create the app instance. Define the port with a fallback to an environment variable (this is excellent practice). Use app.listen() to start the server.
Your src/index.mjs file should now contain this code:
import express from 'express';

const app = express();
const PORT = process.env.PORT || 3000;

app.listen(PORT, () => {
    console.log(`Running on Port ${PORT}`);
});
Running the Server and Handling Requests
Let's run the server! Open your terminal in the project directory and execute the development script we created:
npm run start:dev
You should see the message "Running on Port 3000" in your console. This confirms the server is active!
Now, open your web browser and navigate to http://localhost:3000.
You'll see a message that says Cannot GET /. This is not an error! It's actually a good sign. It means our server is running and received your browser's request, but it doesn't know how to respond yet because we haven't defined any "routes."
A route is a rule that tells the server what to do when it receives a request for a specific URL path (like /, /about, or /api/users).
Let's add a simple route to handle requests to the root path (/) and send back a "Hello World!" message. The following video explains this step very clearly.
Learn Express JS In 35 Minutes
This clip from Web Dev Simplified's 'Learn Express JS In 35 Minutes' shows you how to create your very first route to handle a GET request and send a response.
Watch from 02:45 to 04:10. This part covers: The basic syntax of app.get(). The req (request) and res (response) objects. How to use res.send() to return a simple text response.
Add the following code to your src/index.mjs file, right before the app.listen() call:
// Add this route handler
app.get('/', (req, res) => {
    res.send('Hello World!');
});
Your complete src/index.mjs file should now look like this:
import express from 'express';

const app = express();
const PORT = process.env.PORT || 3000;

// A route that handles GET requests to the root URL ('/')
app.get('/', (req, res) => {
    res.send('Hello World!');
});

app.listen(PORT, () => {
    console.log(`Running on Port ${PORT}`);
});
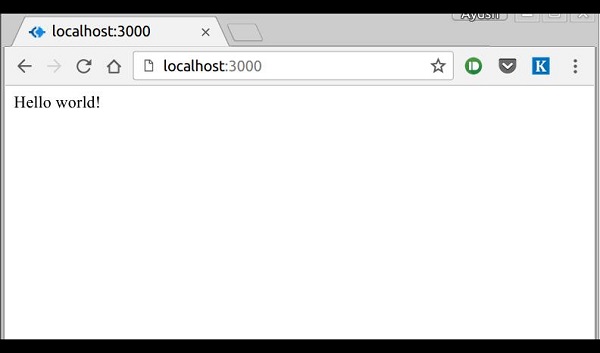
Because nodemon is running, your server automatically restarted when you saved the file. Now, refresh http://localhost:3000 in your browser. Success!
Test your understanding!
Imagine you want to add another page to your server at the URL http://localhost:3000/about. What line of code would you add to your index.mjs file to make it send the text "This is the about page." when a user visits that URL?
Show answer
You would add another app.get() route handler, but this time with the path /about.
app.get('/about', (req, res) => {
    res.send('This is the about page.');
});
This demonstrates how you can easily define different responses for different URL paths.
Conclusion
Congratulations! You've successfully built and run your first web server with Node.js and Express. This is a fundamental skill for any full-stack or backend developer.
Key Takeaways:
- Node.js is a JavaScript runtime for the server-side.
- Express.js is a minimal framework that makes building web applications with Node.js much easier.
- A project is initialized with
npm init, and dependencies likeexpressare installed vianpm install. nodemonis an essential development tool that automatically restarts your server on file changes.- The core of an Express app involves creating an
appinstance, defining aPORT, and starting the server withapp.listen(). - Routes, defined with methods like
app.get(), tell the server how to respond to incoming requests for specific URLs.
Preview of the Next Lesson:
In this lesson, we created a single GET route. In the real world, APIs need to handle various types of requests to perform different actions (like creating, reading, updating, and deleting data). In our next lesson, we will dive deeper into this by learning how to implement API endpoints for different HTTP methods (GET, POST, PUT, DELETE). This will allow us to build much more powerful and interactive backend services.