Hello! In the last lesson, you successfully implemented the DELETE endpoint, completing the full set of CRUD operations for your user API. Your API can now create, read, update, and delete data. However, there's a critical vulnerability: it blindly trusts any data sent to it.
This lesson addresses that gap. Our learning outcome is to add server-side input validation to ensure data integrity. We'll make our API more robust and secure by rejecting invalid or malicious data before it ever reaches our database.
Why Server-Side Validation is Crucial
You might think, "Can't I just add required or type='email' to my HTML form on the frontend?" While client-side validation is great for user experience, it offers zero security. A savvy user (or a malicious actor) can easily bypass your frontend and send requests directly to your API using tools like Postman or simple scripts.
Server-side validation is your API's last line of defense. It ensures that no matter where a request comes from, the data adheres to the rules you define.
To understand why this is so important, watch the first couple of minutes of this video by Anson. He explains perfectly why client-side validation is never enough.
Watch from the beginning (00:04) to 01:55. Focus on the core argument: your API doesn't know where the data is coming from and cannot trust the client.
As the video highlights, server-side validation is about protecting the integrity of your system—your database, your business logic, and the consistency of your data.

Introducing express-validator
To implement validation, we'll use express-validator, the most popular validation library for Express. It provides a set of middleware functions that you can chain together to create powerful validation rules.
First, let's install it in your project:
npm install express-validator
The core idea of express-validator revolves around three concepts:
- Validation Chains: You define a "chain" of rules for each input field (e.g.,
namemust not be empty AND must be at least 3 characters long). - Middleware: These chains are passed as middleware to your Express routes. They run before your main controller logic.
- Result Handling: You check the result of the validation in your controller. If there are errors, you stop execution and send a
400 Bad Requestresponse.
Step 1: Implementing Validation for the createUser Endpoint
Let's apply validation to our POST /api/user route. We want to enforce two rules:
- The
namemust be a non-empty string. - The
emailmust be in a valid email format.
1. Add the Validation Middleware
In your src/routes/userRoutes.js file, import the body function from express-validator and add the validation chains to your POST route.
// src/routes/userRoutes.js
import express from 'express';
import {
  createUser,
  deleteUser,
  getAllUsers,
  getUserById,
  updateUser,
} from '../controllers/userController.js';
// Import the 'body' function
import { body } from 'express-validator';

const router = express.Router();

// ... other routes

router.post(
  '/user',
  // Add validation middleware here
  [
    body('name', 'Name is required').notEmpty(),
    body('email', 'A valid email is required').isEmail(),
  ],
  createUser
);

// ... other routes

export default router;
Let's break this down:
body('name', ...): We're targeting thenamefield in the request body. The second argument,'Name is required', is a default error message..notEmpty(): This is a validator that checks if the field is not empty.body('email', ...): We target theemailfield..isEmail(): This validator checks if the string is in a valid email format.- The array
[...]groups our validation middleware. Express will run them in order.
2. Handle Validation Results in the Controller
The validation middleware doesn't automatically stop the request on failure. It just attaches the errors to the request object. It's our job to check for these errors in the createUser controller.
In src/controllers/userController.js, import validationResult and add the error-checking logic.
// src/controllers/userController.js

// Import validationResult
import { validationResult } from 'express-validator';
import {
  createUserService,
  // ... other services
} from '../models/user.js';
import handleResponse from '../utils/handleResponse.js';

export const createUser = async (req, res, next) => {
  // 1. Check for validation errors
  const errors = validationResult(req);
  if (!errors.isEmpty()) {
    return res.status(400).json({ errors: errors.array() });
  }

  // 2. If valid, proceed with existing logic
  try {
    const { name, email } = req.body;
    const newUser = await createUserService({ name, email });
    handleResponse(res, 201, 'User created successfully', newUser);
  } catch (error) {
    next(error);
  }
};

// ... other controllers
The flow is simple:
validationResult(req)gathers all validation errors.!errors.isEmpty()checks if theerrorsobject contains any failures.- If it does, we immediately return a
400status with a JSON object containing an array of the errors. The request goes no further. - If it's empty, we proceed to the
try...catchblock as before.
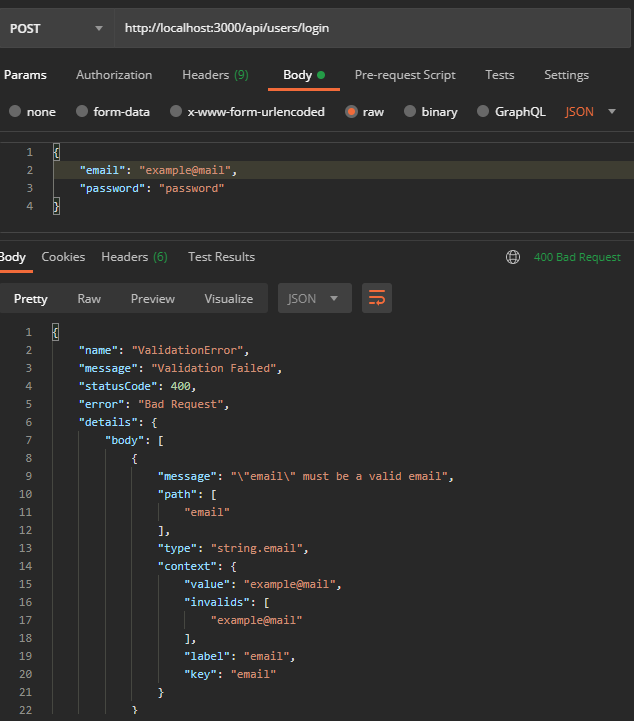
Now, try sending an invalid request to your POST /api/user endpoint, for example, with an empty body or an invalid email. You'll receive a 400 Bad Request response with specific error messages.
Step 2: Refining Validation with Sanitizers and Custom Messages
express-validator can do more than just validate; it can also sanitize inputs. A common sanitizer is trim(), which removes leading and trailing whitespace. This is great for preventing entries like " John Doe ".
You can also provide more specific error messages using the .withMessage() method. Let's improve our validation chain.
// src/routes/userRoutes.js

// ...

router.post(
  '/user',
  [
    body('name')
      .trim() // Sanitize first
      .notEmpty()
      .withMessage('Name cannot be empty.') // Custom message for notEmpty
      .isLength({ min: 3 })
      .withMessage('Name must be at least 3 characters long.'), // Custom message for isLength

    body('email')
      .isEmail()
      .withMessage('Please provide a valid email address.')
      .normalizeEmail(), // Sanitizer to convert email to a canonical form
  ],
  createUser
);

// ...
Here's what we added:
trim(): Removes whitespace from thenamefield.isLength({ min: 3 }): Adds a length requirement.withMessage(): Provides a specific message for each validation rule that fails.normalizeEmail(): A powerful sanitizer that canonicalizes the email address (e.g., converts the domain to lowercase).
Test your understanding!
Now it's your turn. Apply similar validation rules to the PUT /api/user/:id route. You should validate the name and email fields in the request body. What changes do you need to make in userRoutes.js and the updateUser controller in userController.js?
Show answer
-
In
userRoutes.js: You would add the same validation middleware array to therouter.put('/user/:id', ...)definition.// src/routes/userRoutes.js router.put( '/user/:id', [ body('name') .trim() .notEmpty() .withMessage('Name cannot be empty.') .isLength({ min: 3 }) .withMessage('Name must be at least 3 characters long.'), body('email') .isEmail() .withMessage('Please provide a valid email address.') .normalizeEmail(), ], updateUser ); -
In
userController.js: You would add the samevalidationResultcheck at the beginning of theupdateUserfunction.// src/controllers/userController.js export const updateUser = async (req, res, next) => { const errors = validationResult(req); if (!errors.isEmpty()) { return res.status(400).json({ errors: errors.array() }); } try { // ... existing logic } catch (error) { next(error); } };
Step 3: Organizing Validation with Schemas
As you can see, the validation array can get quite long. For complex applications, it's a best practice to extract this logic into a separate file. express-validator supports this with checkSchema.
-
Create a validation schema file.
Create a new directorysrc/utilsand a file inside it namedvalidationSchemas.js.// src/utils/validationSchemas.js export const createUserSchema = { name: { in: ['body'], trim: true, notEmpty: { errorMessage: 'Name cannot be empty.', }, isLength: { options: { min: 3 }, errorMessage: 'Name must be at least 3 characters long.', }, }, email: { in: ['body'], isEmail: { errorMessage: 'Please provide a valid email address.', }, normalizeEmail: true, }, };This object defines the same rules as before, but in a more structured and declarative way.
-
Use
checkSchemain your route.
Now, updateuserRoutes.jsto import and use this schema.// src/routes/userRoutes.js import express from 'express'; // ... // Import checkSchema and the new schema object import { checkSchema } from 'express-validator'; import { createUserSchema } from '../utils/validationSchemas.js'; const router = express.Router(); // ... router.post('/user', checkSchema(createUserSchema), createUser); // For the PUT route, you can reuse the same schema! router.put('/user/:id', checkSchema(createUserSchema), updateUser); // ...This makes your route definition much cleaner and your validation logic reusable.
This video provides a great walkthrough of moving validation rules into a schema object. It uses a slightly different syntax but the concept is identical.
Watch from 22:54 to 28:40. Pay attention to how a separate file is created for the schema and how checkSchema is used in the route handler to keep the code clean.
Step 4: Safely Using Validated Data with matchedData
There's one final, important step. After validation, you should only use the data that has been validated and sanitized. A request body might contain extra, unexpected fields. If you blindly use req.body, you might inadvertently use this untrusted data.
express-validator provides a helper function called matchedData that returns an object containing only the fields that passed validation.
Let's update the createUser controller to use it.
// src/controllers/userController.js
import { validationResult, matchedData } from 'express-validator';
// ...

export const createUser = async (req, res, next) => {
  const errors = validationResult(req);
  if (!errors.isEmpty()) {
    return res.status(400).json({ errors: errors.array() });
  }

  try {
    // Use matchedData to get a sanitized object of validated data
    const validatedData = matchedData(req);

    // Pass this clean data to your service
    const newUser = await createUserService(validatedData);

    handleResponse(res, 201, 'User created successfully', newUser);
  } catch (error) {
    next(error);
  }
};
By using matchedData(req) instead of req.body, you ensure that your service layer only ever receives data that your application expects and has explicitly validated. This is a key principle of secure coding.
The same video also covers matchedData very effectively. This short clip will show you exactly how and why to use it.
Watch from 20:33 to 22:54. Focus on the difference between using req.body and using the object returned by matchedData(req).
Conclusion
Congratulations! You have significantly hardened your API. By adding server-side validation, you've ensured that your application maintains data integrity and is protected against a common class of vulnerabilities.
Key Takeaways:
- Server-side validation is mandatory for security and data integrity; client-side validation is only for user experience.
express-validatorprovides a middleware-based system for defining validation chains.- The standard flow is: define rules in the route, check for errors with
validationResultin the controller, and return a400 Bad Requestif any errors exist. - Sanitizers like
trim()andnormalizeEmail()clean the data before it's used. - For clean code, organize complex rules into schemas and use
checkSchema. - Always use
matchedData()in your controller to work with a safe, validated subset of the request data.
Preview of the Next Lesson:
Your API is now complete and robust. But how do you confirm every part of it works as expected? In the next lesson, we will focus on how to test all API endpoints using a client tool like Postman or Thunder Client. We'll create a systematic testing suite to verify every success case, error case, and now, every validation failure case for your API.