Hello! In our last session, you successfully implemented a POST endpoint to create new users, mastering the "C" in CRUD. You learned how to handle incoming data from the request body and insert it into your PostgreSQL database using the INSERT command.
Today, we're moving to the "U" in CRUD: Update. You'll learn how to build an endpoint that modifies an existing record in the database. This is a fundamental operation for any dynamic application, whether it's editing a user profile, updating a to-do item's status, or changing a blog post's content.
Our learning outcome is to implement a PUT/PATCH endpoint to update an existing record. We will primarily focus on building a PUT endpoint to update a user's information and then discuss how a PATCH request differs and how it can be implemented.
The Two Flavors of Update: PUT vs. PATCH
Before we write any code, it's important to understand the two primary HTTP methods used for updates: PUT and PATCH. While they both modify a resource, they do so with different intentions.
-
PUT: This method is used to completely replace the target resource with the new data provided in the request body. If you send aPUTrequest with only a user'sname, any other fields likeemailmight be erased or set tonullbecausePUTexpects the entire resource representation. It is idempotent, meaning making the samePUTrequest multiple times will always result in the same state on the server. -
PATCH: This method is used to apply a partial update to the resource. You only need to send the fields you want to change. For example, to update just a user's email, your request body would only contain theemailfield. This is more efficient for large resources.PATCHis not necessarily idempotent (e.g., a request to "add 1 to a counter" would change the state with each call).
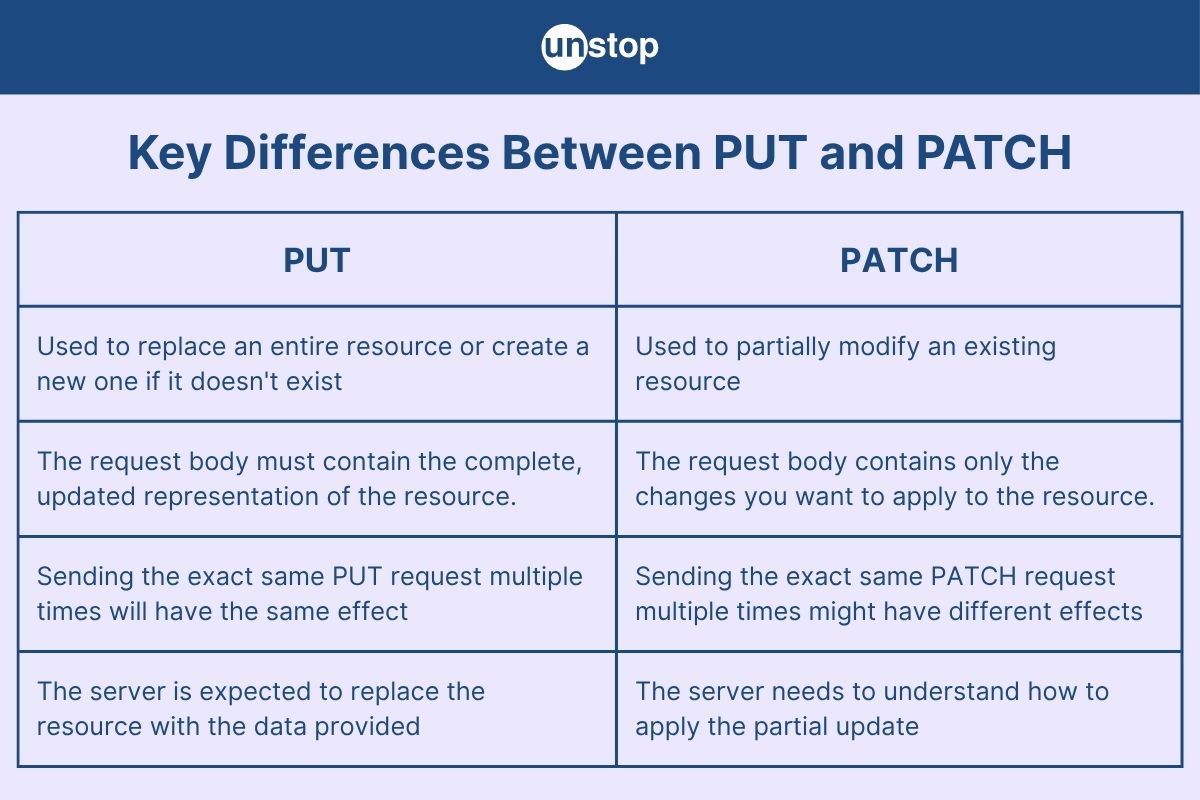
To get a solid grasp of this concept, which is a common topic in developer interviews, please read the following article. It provides clear examples and explains the "why" behind choosing one over the other.
What is the Difference Between PUT and PATCH?
The article "What is the Difference Between PUT and PATCH?" from Abstract API provides an excellent breakdown of these two methods.
Read the sections "The Full Replacement Method: Understanding PUT," "The Partial Modification Method: Understanding PATCH," and "The Critical Difference: Idempotency Explained." Focus on the examples to understand how a PUT request replaces a whole resource while a PATCH request modifies parts of it.
Implementing a PUT Endpoint (Full Update)
We'll start by building a PUT endpoint at /api/user/:id. This endpoint will expect a request body containing the full name and email for a user and will update the corresponding record in the database.
Step 1: The Service Layer and SQL UPDATE Query
The core of the update operation happens in the service layer, where we construct and execute the SQL query. The syntax is UPDATE table_name SET column1 = $1, column2 = $2 WHERE id = $3;.
Crucially, the WHERE clause is non-negotiable. Without it, you would update every single row in your table. We'll also use RETURNING * again to get the updated record back in our response.
Let's watch how to write the service function for this.
Build a CRUD Rest API with Node.js, Express, PostgreSQL & Docker
This clip from Dipesh Malvia's tutorial demonstrates how to write the updateUserService function, which handles the SQL UPDATE logic.
Watch from 31:00 to 32:14. Pay close attention to: The UPDATE statement: UPDATE users SET name = $1, email = $2 ... The WHERE clause: ... WHERE id = $3. This is critical for targeting the correct record. Parameterized Values: The array [name, email, id] is passed to pool.query to prevent SQL injection.
Step 2: The Controller and Route
Next, the controller function will tie everything together. It needs to:
- Extract the user's
idfrom the request parameters (req.params.id). - Extract the new
nameandemailfrom the request body (req.body). - Call our new
updateUserServicewith these three pieces of data. - Handle the response, sending back the updated user or a "not found" error.
Build a CRUD Rest API with Node.js, Express, PostgreSQL & Docker
Now let's build the updateUser controller and hook it up to a route.
Watch from 37:04 to 38:01. This section covers creating the controller function. Notice how it gets the id from req.params and the updated data from req.body. You will also need to add the route router.put('/user/:id', updateUser); to your userRoutes.js file, similar to how you added the POST route.
Test your understanding!
In your controller, you get the user ID from req.params.id. What would happen if a client made a PUT request to /api/user/ but forgot to include the ID at the end?
Show answer
Express would not match the request to your router.put('/user/:id', ...) route, because the path patterns don't align. The client would likely receive a 404 Not Found error, as no other route handles PUT requests to /api/user/. This shows how route parameters are a mandatory part of the URL pattern.
Step 3: Testing the PUT Endpoint
Like POST, you'll need an API client to test your PUT endpoint.
- First, use your
GET /api/usersendpoint to find theidof a user you want to update. - In your API client, create a new request.
- Set the method to PUT.
- Set the URL to
http://localhost:5001/api/user/<ID>, replacing<ID>with the user's actual ID. - Go to the "Body" tab, select "JSON", and provide the full object with the updated details, for example:
{ "name": "Ada Lovelace King", "email": "ada.king@example.com" } - Send the request. You should receive a
200 OKstatus and the updated user object in the response.
Build a CRUD Rest API with Node.js, Express, PostgreSQL & Docker
Let's see this in action. This clip demonstrates testing the PUT endpoint using Thunder Client.
Watch from 45:12 to 46:51. Replicate the process shown to update one of the users in your own database. After a successful update, you can use your GET endpoints to further verify the change.
For another perspective, you can see an image of this process in Postman in the LogRocket article.
CRUD REST API with Node.js, Express, and PostgreSQL
The LogRocket article also provides a visual for testing a PUT request.
Scroll to the section PUT updated data in an existing user and look at the image under the text "Here’s an example of sending a PUT request...". This reinforces the testing process.
From PUT to PATCH (Partial Updates)
Now, how would we implement a PATCH endpoint for partial updates? A naive PATCH implementation could accept partial data and still use the same UPDATE users SET name=$1, email=$2... query. The problem is that if the client only sends a name, the email in the query would become undefined, potentially corrupting your data.
A robust and common approach is to read-then-write:
- Fetch the existing data for the user from the database.
- Merge the existing data with the partial data from the request body. Your knowledge of the JavaScript spread operator (
...) is perfect for this. - Update the record using the complete, merged object.
Here’s what a PATCH controller in Express might look like conceptually (this example uses an in-memory array, but the logic applies):
// A conceptual PATCH handler using Express
app.patch("/users/:id", (req, res) => {
  const id = parseInt(req.params.id);

  // Find the user in the database (or array)
  const existingUser = users.find(u => u.id === id);

  if (!existingUser) {
    return res.status(404).json({ message: "User not found" });
  }

  // Merge existing data with new data from the request body
  const updatedUser = { ...existingUser, ...req.body };

  // Now, you would use this 'updatedUser' object in your SQL UPDATE query
  // For our array example, we'll just replace it
  users = users.map(u => (u.id === id ? updatedUser : u));

  res.json({ message: "User updated", user: updatedUser });
});
This approach allows the client to send only the fields they want to change, fulfilling the purpose of PATCH while ensuring you always perform a complete and valid UPDATE on your database. Implementing this is a great next step to make your API more flexible.
A Note on Validation
Just like with creating users, you should validate the data coming in for an update. The good news is you can often reuse the same validation logic. For example, the Joi schema you might have created for the POST endpoint can be applied as middleware to the PUT route to ensure the updated data is still valid.
Build a CRUD Rest API with Node.js, Express, PostgreSQL & Docker
The Joi validation middleware we discussed in the last lesson can be attached directly to the update route.
Quickly watch from 50:40 to 51:08. Notice how the validateUser middleware is simply added to the updateUser route definition in the same way it was for createUser. This is a powerful aspect of middleware.
Conclusion
Congratulations! You have now implemented the "Update" operation, a critical piece of any data-driven application. You can create, read, and update users in your API.
Key Takeaways:
PUTvs.PATCH:PUTreplaces a resource entirely, whilePATCHapplies a partial update.- SQL
UPDATE: The command for modifying records isUPDATE table SET ... WHERE .... - The
WHEREclause is essential to target the specific record you want to change. - The update endpoint needs both a route parameter (
:id) to identify the resource and a request body to provide the new data. - A pragmatic way to implement
PATCHwith SQL is to fetch the existing data, merge it with the new partial data, and then perform a fullUPDATE.
Preview of the Next Lesson:
We've covered 'C', 'R', and 'U'. The final piece of the puzzle is 'D'—Delete. In the next lesson, you will implement a DELETE endpoint to remove a record from the database, completing your first full CRUD API.