Hello! Welcome to your next lesson.
In our last session, we built the backend security for our application. We created endpoints for registration and login that issue JWTs, and we wrote middleware to act as a bouncer, protecting specific routes from unauthorized access. The backend is now secure.
However, our React frontend is still unaware of the user's authentication status. This lesson bridges that gap. Our goal is to provide global authentication state to a React application using the Context API. This will allow any component in our app to know if a user is logged in, who they are, and to provide functions for logging in and out.
By the end of this lesson, you'll be able to manage application-wide state cleanly, a crucial skill for building complex, interactive React applications.
The Problem: Prop Drilling
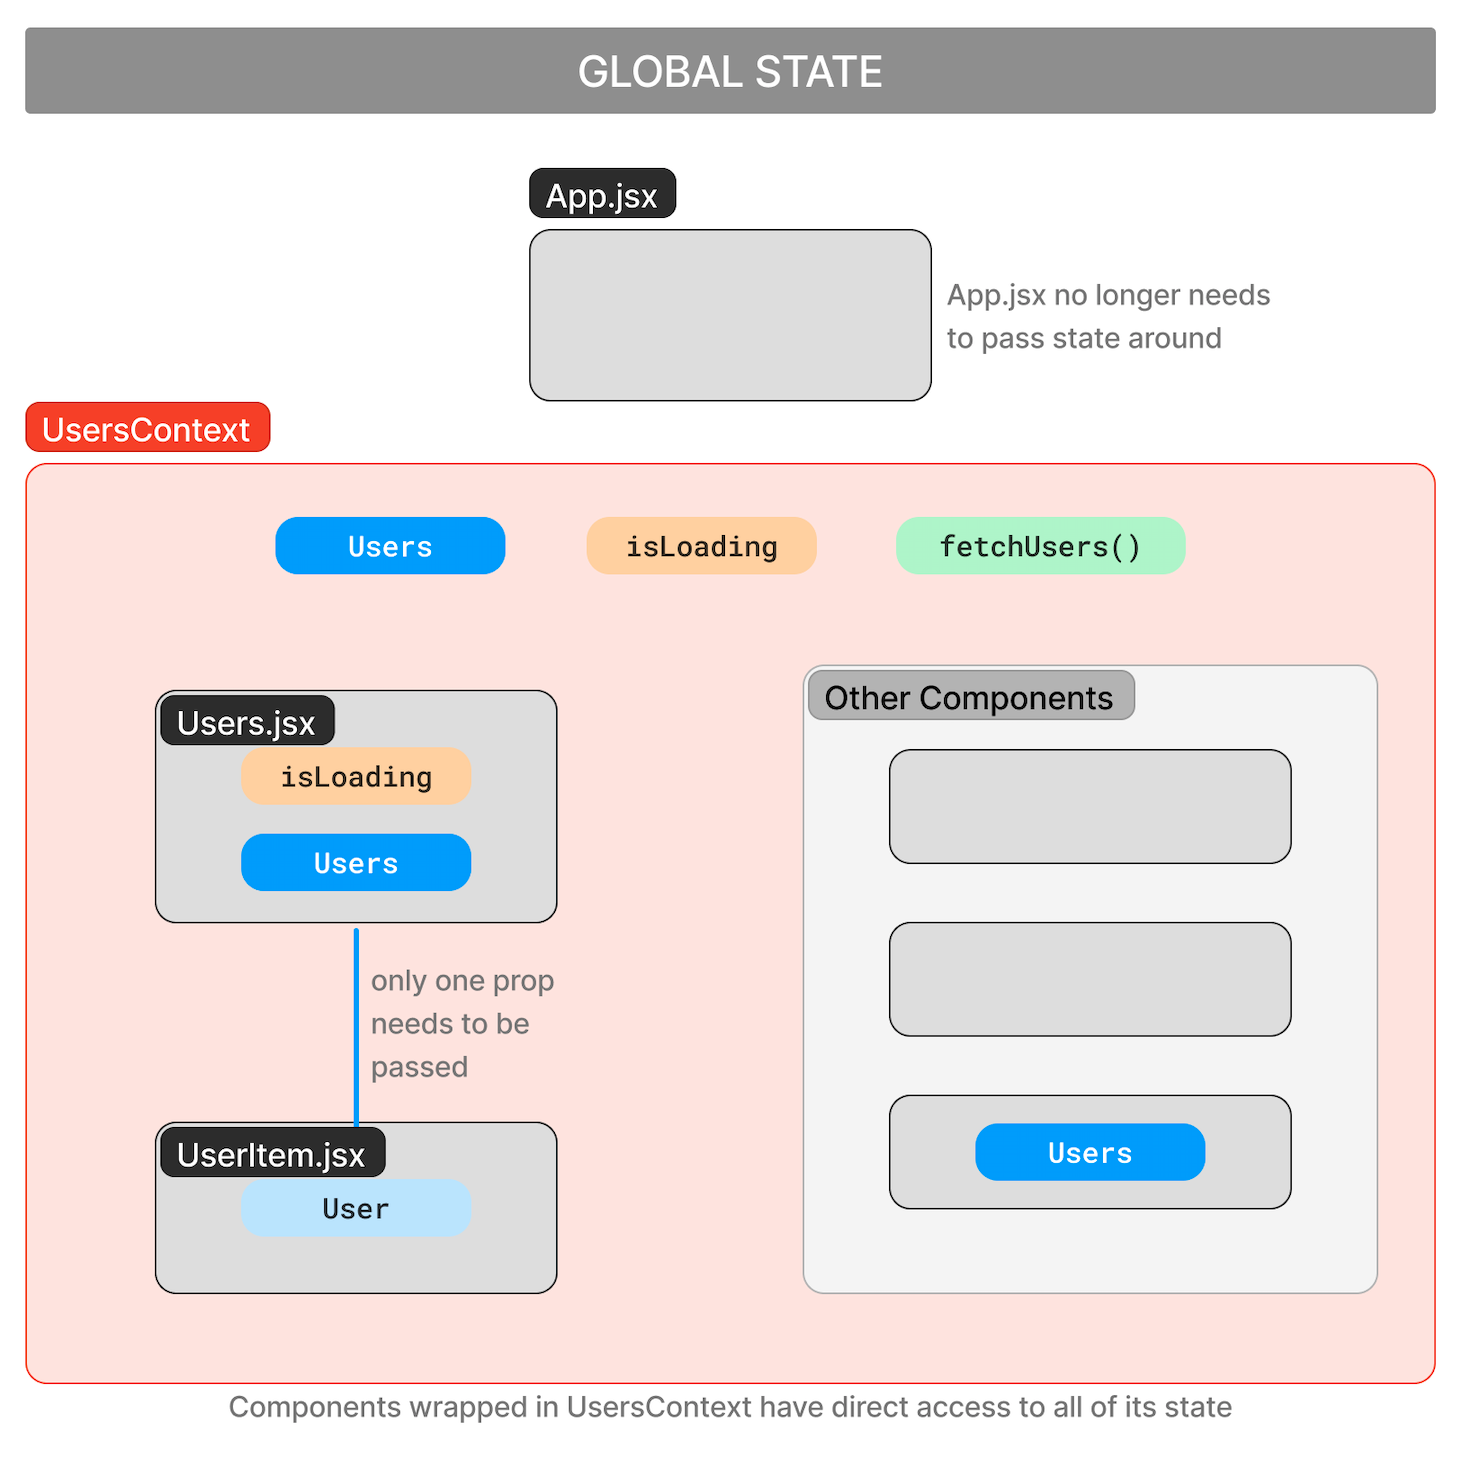
Imagine you have a main App component that holds the user's login status. Now, a deeply nested Navbar component needs to display the user's name. To get that information to the Navbar, you would have to pass it as a prop through every single component in the chain between App and Navbar, even if the intermediate components don't need it. This is called prop drilling.
Prop drilling makes code hard to read, refactor, and maintain. As your application grows, it becomes a significant headache.
To see a clear explanation of this problem, let's watch a short segment from a video by Fullstack Simplified.
React Context API | Manage Global State
This video, 'React Context API | Manage Global State', starts by perfectly illustrating the problem of prop drilling and introducing the Context API as the solution.
Watch from 00:46 to 02:53. Focus on understanding the diagram that shows state being passed down through multiple components and how Context provides a more direct path.
React's Context API is the built-in solution to this exact problem. It allows us to create a global state that any component can subscribe to without props being passed down manually.
How the Context API Works
The Context API is built on three core concepts:
createContext: A function you call to create aContextobject. Think of this as creating a new, shared data channel.Context.Provider: A special component that comes with every Context object. You wrap it around a part of your component tree. It has avalueprop where you pass the data you want to share.useContext: A React Hook that you use inside a component to subscribe to a context and get the current value passed by its nearestProviderup the tree.
Let's see this in action. The following video by PedroTech provides a simple and clear walkthrough of creating a login system using these three pillars.
Context API Tutorial For Beginners - Using React Hooks
This tutorial, 'Context API Tutorial For Beginners', demonstrates the entire process of setting up and using the Context API for a simple login feature.
Please watch from 02:58 to 12:13. Pay close attention to these steps: Creating the context (loginContext.js) using createContext. Wrapping the app in LoginContext.Provider and passing states and functions into the value prop. Accessing the shared state (username) and functions (setUsername, setShowProfile) in child components using the useContext hook.
A Professional Pattern: The AuthProvider and useAuth Hook
The video demonstrates the core mechanics perfectly. Now, let's organize this into a more robust and reusable pattern that's common in professional codebases. Instead of putting all the logic directly in App.js, we'll create:
- An
AuthProvidercomponent: A dedicated component to manage all authentication state (like theuserobject and loading status) and logic (likeloginandlogoutfunctions). - A
useAuthcustom hook: A simple hook that wrapsuseContext, making it easier and cleaner for components to consume the authentication context.
This pattern is great because it encapsulates all authentication logic in one place.
Let's read through an article that implements this exact pattern. It's more advanced, using TypeScript and API calls, but the core structure is what we want to focus on.
Predictable React authentication with the Context API - Blog
The article 'Predictable React authentication with the Context API' from the Finiam blog presents a production-grade approach to managing authentication.
Read the code block for the useAuth.tsx file. Don't worry about the TypeScript syntax (: AuthContextType, etc.) or the API calls for now. Focus on the overall structure: The AuthContext is created with createContext. The AuthProvider function component holds the state (user, loading) and the functions (login, logout). It returns <AuthContext.Provider> wrapping the children. The useAuth custom hook is a simple function that returns the result of useContext(AuthContext).
Let's implement a simplified version of this pattern in our own project.
Step 1: Create the Auth Context
First, we create the context. It's good practice to keep this in its own file.
src/context/AuthContext.js
import { createContext } from 'react';

// Create the context with a default value of null
const AuthContext = createContext(null);

export default AuthContext;
Step 2: Create the AuthProvider Component
This component will hold our state and functions, and provide them to the rest of the app.
src/context/AuthProvider.js
import React, { useState } from 'react';
import AuthContext from './AuthContext';

// We'll be using this later to connect to our backend
// import api from '../services/api';

export const AuthProvider = ({ children }) => {
  const [user, setUser] = useState(null); // No user logged in by default
  const [loading, setLoading] = useState(false); // To handle loading states

  // Login function
  const login = async (email, password) => {
    setLoading(true);
    try {
      // In a real app, you'd make an API call here.
      // const response = await api.post('/login', { email, password });
      // const userData = response.data.user;
      // setUser(userData);

      // For now, let's mock it
      setUser({ name: 'Test User', email: email });
      console.log('User logged in');
    } catch (error) {
      console.error('Login failed:', error);
      // Handle login error (e.g., show a message)
    } finally {
      setLoading(false);
    }
  };

  // Logout function
  const logout = () => {
    // In a real app, you might also call a /logout endpoint on the server.
    setUser(null);
    console.log('User logged out');
  };

  // The value object includes the user state and the functions to change it
  const value = {
    user,
    loading,
    login,
    logout,
  };

  return (
    <AuthContext.Provider value={value}>
      {children}
    </AuthContext.Provider>
  );
};
Step 3: Create the useAuth Custom Hook
This small hook makes consuming our context much cleaner.
src/hooks/useAuth.js
import { useContext } from 'react';
import AuthContext from '../context/AuthContext';

const useAuth = () => {
  return useContext(AuthContext);
};

export default useAuth;
Step 4: Wrap the App and Use the Hook
Finally, we wrap our entire application with the AuthProvider in our main App.js or index.js file, and then we can use our useAuth hook anywhere inside.
src/App.js
import { AuthProvider } from './context/AuthProvider';
import useAuth from './hooks/useAuth';

// A component that needs auth info
const Navbar = () => {
  const { user, logout } = useAuth(); // Cleanly get what we need!

  return (
    <nav>
      {user ? (
        <div>
          <span>Welcome, {user.name}!</span>
          <button onClick={logout}>Logout</button>
        </div>
      ) : (
        <span>You are not logged in.</span>
      )}
    </nav>
  );
};

function App() {
  return (
    <AuthProvider>
      <div className="App">
        <Navbar />
        {/* All other components go here and can use useAuth() */}
      </div>
    </AuthProvider>
  );
}

export default App;
With this setup, any component within <AuthProvider> can now call useAuth() to get the current user and the login/logout functions. No more prop drilling!
Test your understanding!
You are building a LoginPage component. It should contain a form with email and password fields, and a "Login" button. When the button is clicked, it should call the login function from your authentication context.
Using the useAuth hook we just created, how would you structure this component? You don't need to write the full JSX for the form inputs, just show how you would get the login function and how you would call it.
Show answer
import React, { useState } from 'react';
import useAuth from '../hooks/useAuth';

const LoginPage = () => {
  // 1. Get the login function from our custom hook
  const { login, loading } = useAuth();

  // 2. Local state for the form inputs
  const [email, setEmail] = useState('');
  const [password, setPassword] = useState('');

  // 3. Handler function to call the context's login method
  const handleSubmit = async (e) => {
    e.preventDefault();
    await login(email, password);
    // After login, you would typically redirect the user. We'll cover that later.
  };

  return (
    <form onSubmit={handleSubmit}>
      {/* Inputs for email and password would go here */}
      <input
        type="email"
        value={email}
        onChange={(e) => setEmail(e.target.value)}
        placeholder="Email"
      />
      <input
        type="password"
        value={password}
        onChange={(e) => setPassword(e.target.value)}
        placeholder="Password"
      />
      <button type="submit" disabled={loading}>
        {loading ? 'Logging in...' : 'Login'}
      </button>
    </form>
  );
};

export default LoginPage;
This demonstrates how a component can be completely decoupled from the implementation of the login logic. It just knows it has access to a login function and calls it.
Conclusion
Congratulations! You have learned one of the most powerful and essential patterns in modern React development. By centralizing your authentication state with the Context API, you've made your application more scalable, maintainable, and easier to reason about.
Key Takeaways:
- Prop drilling is the problem of passing props through intermediate components that don't need them.
- The React Context API is the solution for managing global state, avoiding prop drilling.
- The core pieces are
createContext, theProvidercomponent, and theuseContexthook. - A professional pattern is to create a dedicated
AuthProvidercomponent to hold state and logic, and auseAuthcustom hook for easy consumption.
Preview of the Next Lesson:
We now have a global user object available everywhere in our app. The next logical step is to use this information to control access to certain parts of our application. How do we prevent a non-logged-in user from visiting the /dashboard page?
In the next lesson, we will create protected route components in React to restrict access to authenticated users, building directly on the useAuth hook we created today.