Hello! In our last lesson, we successfully tested our entire User API using Postman, ensuring it's robust and works exactly as expected. That was the final step in building the functional part of our backend.
Now, we pivot to a topic that is critical for any real-world application: security. Our API currently allows anyone to create, read, update, or delete users. We need a way to protect these endpoints and verify the identity of the person making the request.
This lesson marks the beginning of our "Full-Stack User Authentication" module. Our goal is to explain the token-based authentication flow using JSON Web Tokens (JWT). This is the modern, standard approach for securing APIs in the kind of web applications you aim to build. We'll focus on the "what" and the "why" before we dive into the "how" in subsequent lessons.
Authentication vs. Authorization
Before we go further, it's essential to understand two fundamental concepts that are often confused.
- Authentication is the process of verifying who you are. Think of it as showing your ID at a security checkpoint. In web apps, this is typically done by providing a username and password.
- Authorization is the process of checking if you have permission to access a specific resource. After your ID is verified (authentication), this is like checking if your security pass grants you access to a specific room.
To get a clear and concise explanation of this distinction, let's watch the first minute of this video.
How Does JWT Authentication Work? (JSON Web Token) | Tokens vs Sessions
This video, 'How Does JWT Authentication Work?', starts with a great explanation of authentication versus authorization.
Watch from the beginning (00:14) until 01:00. Focus on the core difference between verifying an identity and granting permissions.
The Traditional Approach: Session-Based Authentication
To understand why JWT is so popular, it helps to first look at the traditional method: session-based authentication. You've likely interacted with this system hundreds of times without thinking about it.
The flow works like this:
- Login: You send your username and password to the server.
- Session Creation: The server verifies your credentials. If they are correct, it creates a "session" and stores information about you (like your user ID) on the server itself—either in memory or in a database.
- Cookie Issued: The server sends a unique Session ID back to your browser, which is stored in a cookie.
- Subsequent Requests: For every future request you make to the site, the browser automatically includes the cookie with the Session ID.
- Server Lookup: The server receives the Session ID, looks it up in its session store to find your information, and then processes the request.
The key takeaway here is that this model is stateful. The server must maintain a state (the session data) for every logged-in user.
This image provides an excellent visual comparison between session-based and the token-based flow we're about to discuss. Pay attention to the "Session-based" side for now.
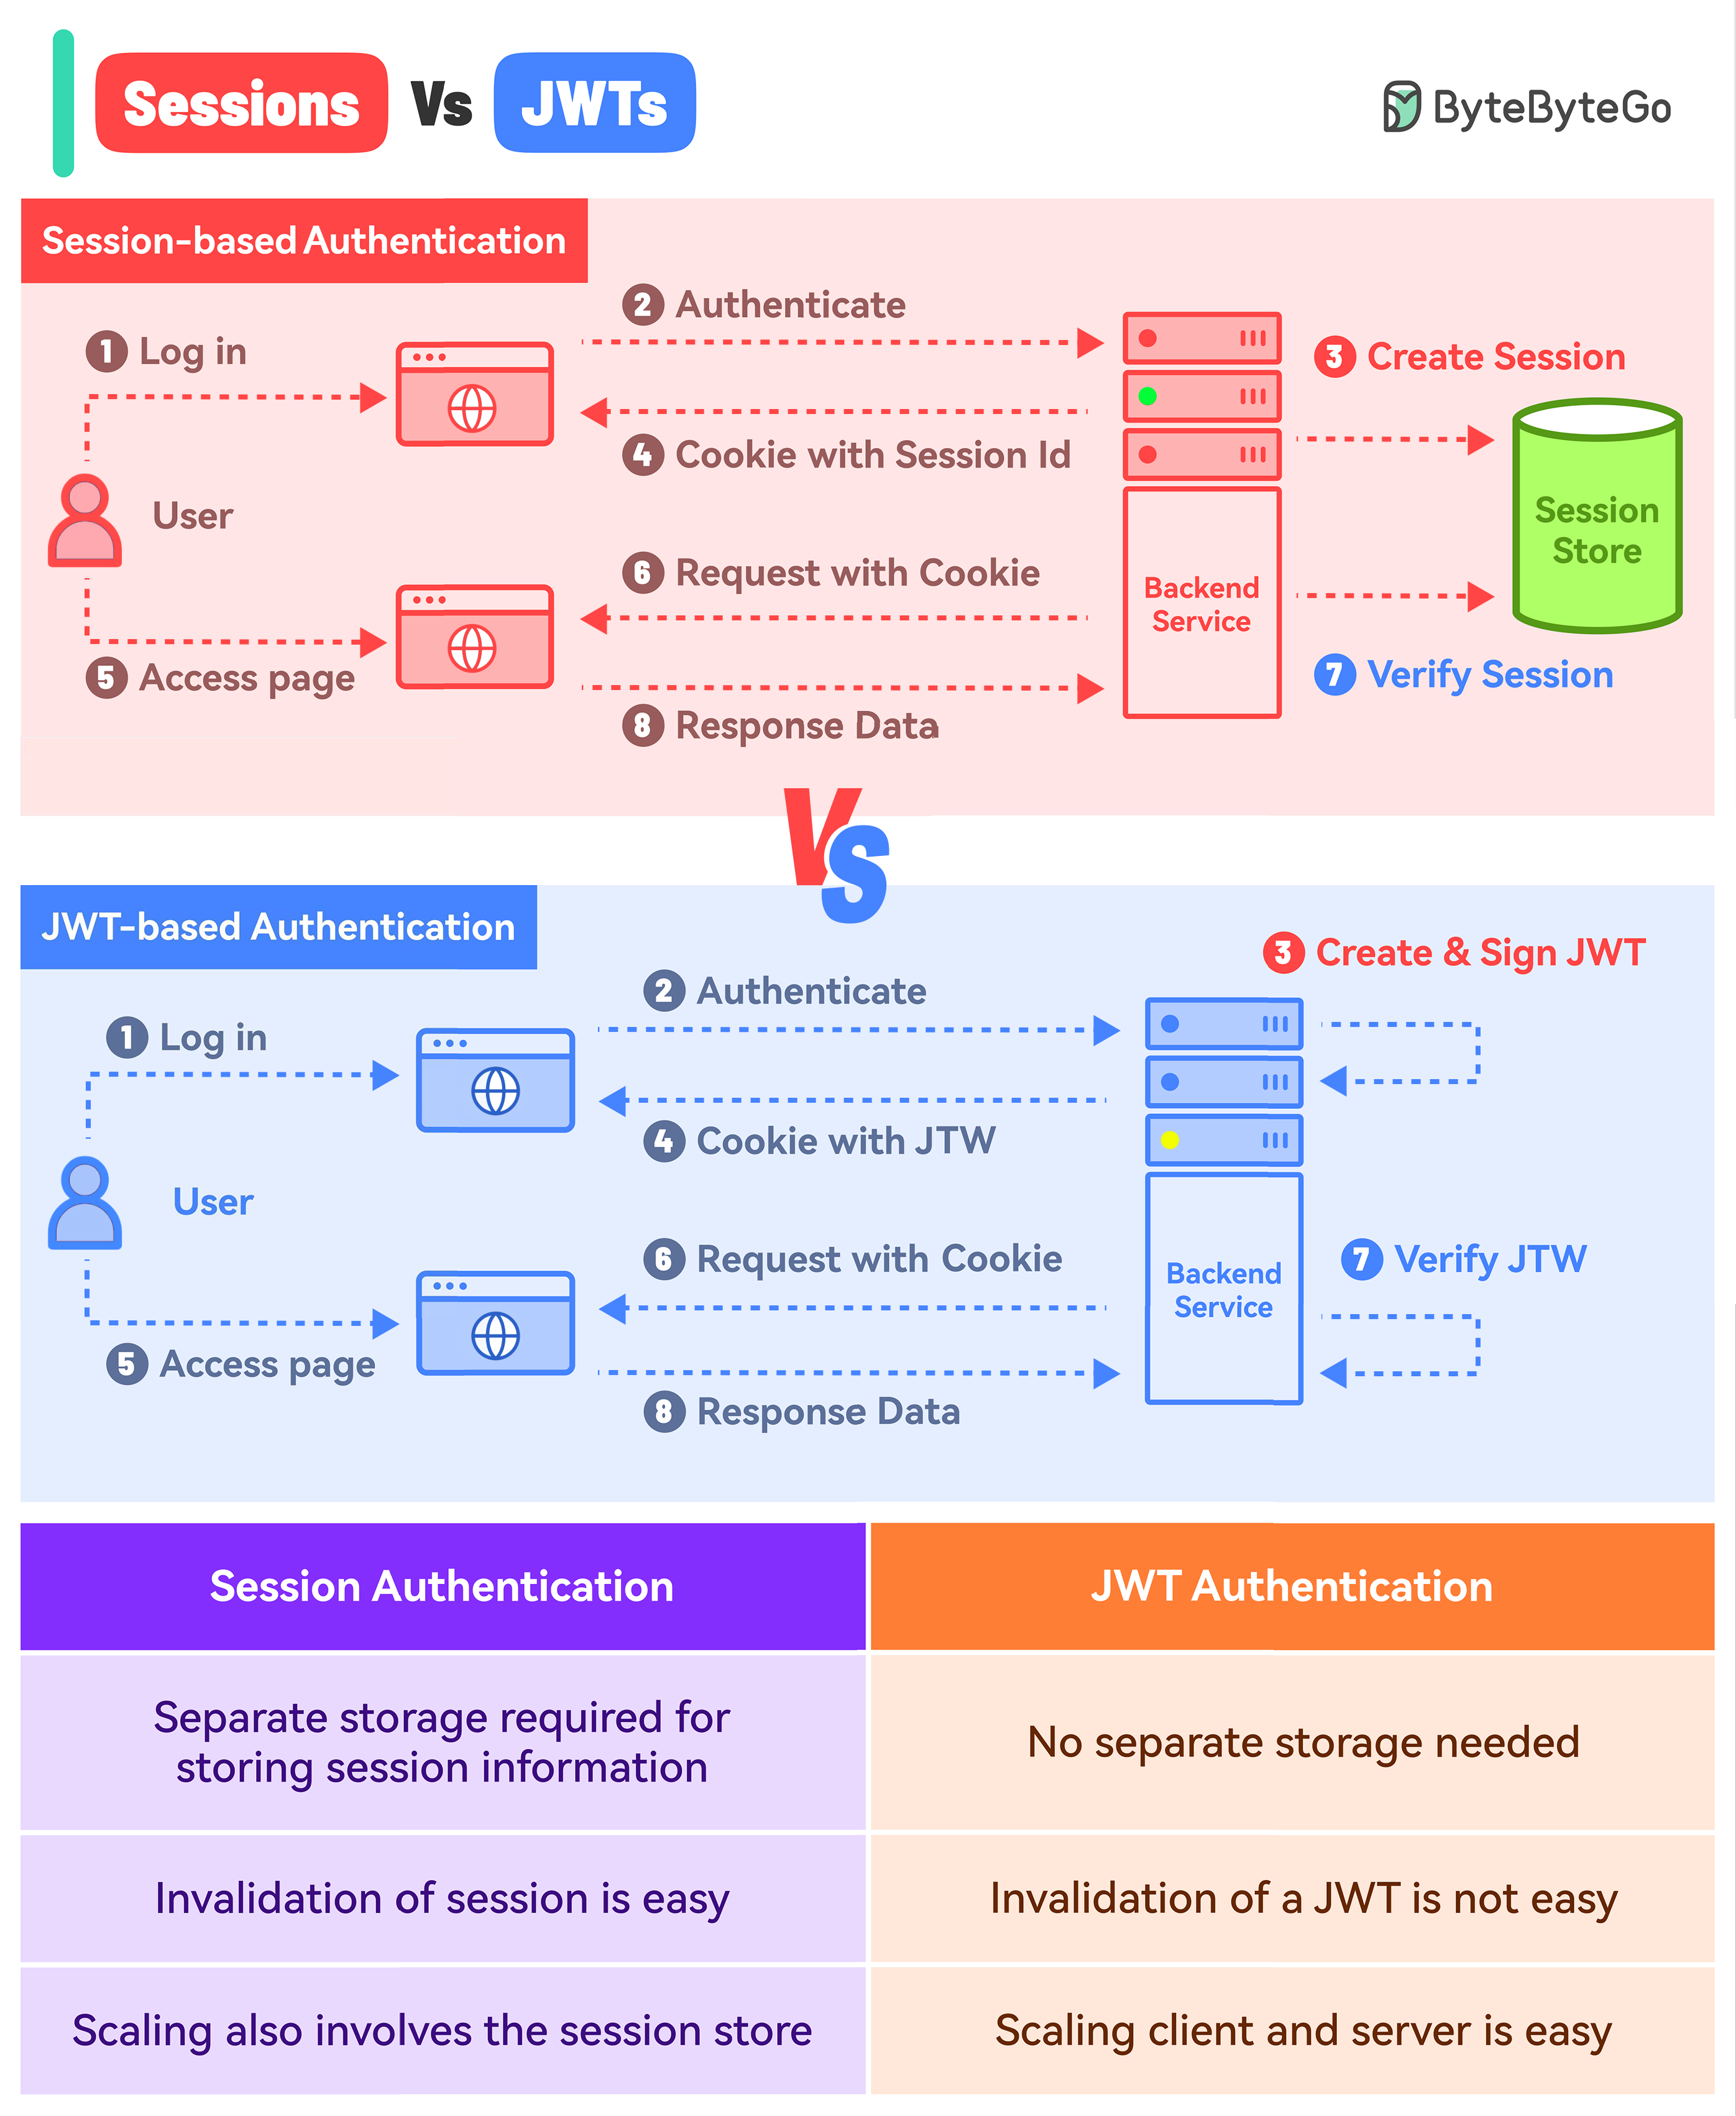
The Modern Approach: Token-Based Authentication with JWT
JWT offers a stateless alternative. The server doesn't need to keep track of logged-in users. Let's see how that's possible.
The flow is similar at the beginning, but diverges in a crucial way:
- Login: You send your username and password to the server.
- Token Creation: The server verifies your credentials. If they are correct, it creates a JSON Web Token (JWT). This token is a self-contained JSON object that includes information about the user (e.g., their ID and role).
- Signing: The server "signs" the token using a secret key that only it knows. This signature acts as a tamper-proof seal.
- Token Issued: The server sends the entire signed token back to the client (your browser).
- Client Storage: The client stores this token (for example, in memory or
localStorage). - Subsequent Requests: For every future request to a protected API endpoint, the client includes the JWT in the
Authorizationheader. - Server Verification: The server receives the token, checks the signature using its secret key, and if the signature is valid, it trusts the information inside the token. It can then authorize the request.
Notice the big difference: the server doesn't have to look up a session ID. All the information it needs is right there in the token sent by the client. It's stateless.
To see this flow in action, watch the following segment.
How Does JWT Authentication Work? (JSON Web Token) | Tokens vs Sessions
The same video provides a clear, animated walkthrough of the session-based flow and then the token-based flow, making the comparison easy to grasp.
Watch from 01:08 to 03:15. The first part covers the session flow, and the second part introduces the JWT flow. Focus on where the user's information is stored in each model.
Deconstructing a JWT
A JWT isn't an encrypted, unreadable blob. It's a string with three distinct parts, separated by dots: xxxxx.yyyyy.zzzzz.
Header.Payload.Signature
This diagram breaks down the structure and an example flow.

Let's examine each part.
-
Header: A simple JSON object that specifies the signing algorithm (
alg) and the token type (typ).{ "alg": "HS256", "typ": "JWT" } -
Payload: Another JSON object containing the "claims"—the actual data about the user and the token itself.
- Registered Claims: Standard fields like
iss(issuer),exp(expiration time), andsub(subject, often the user ID). - Public/Private Claims: Custom data you want to add, like a username or roles (
"roles": ["admin"]).
{
  "sub": "user123",
  "name": "Alex",
  "iat": 1516239022,
  "exp": 1516242622
}
Crucial Security Note: The Header and Payload are Base64Url encoded, which is a way of representing binary data in text format. It is NOT encryption. Anyone who gets ahold of your token can easily decode these two parts and read the contents. Never store sensitive information like passwords in the JWT payload.
- Registered Claims: Standard fields like
-
Signature: This is the part that ensures security. It's created by taking the encoded Header, the encoded Payload, and a
secretkey (known only to the server), and hashing them with the algorithm specified in the header.HMACSHA256( base64UrlEncode(header) + "." + base64UrlEncode(payload), secret )When the server receives a token, it performs the exact same calculation. If the signature it generates matches the signature on the token, it proves two things:
- The token was issued by this server (because no one else has the secret).
- The payload hasn't been tampered with (because any change would result in a different signature).
To see this in a more interactive way, the following video segment uses the popular jwt.io website to build a token piece by piece.
How Does JWT Authentication Work? (JSON Web Token) | Tokens vs Sessions
Let's return to the 'How Does JWT Authentication Work?' video. It now provides a fantastic visual breakdown of the three JWT parts.
Watch from 04:18 to 06:16. Pay close attention to how changing the payload or the secret instantly changes the final signature. This demonstrates the integrity-checking power of the signature.
Test your understanding!
Imagine an attacker intercepts a JWT. They decode the payload and change the user ID from "sub": "user123" to "sub": "admin-user-id". They then send this modified token to your server. What will happen and why?
Show answer
The server will reject the token as invalid. When the server receives the token, it will try to verify the signature. It will take the (original) header and the (modified) payload, hash them with its secret key, and generate a new signature. This new signature will not match the original signature that came with the token, because the payload has changed. This mismatch proves the token has been tampered with, and the server will deny the request.
Why is Statelessness Such a Big Deal?
The stateless nature of JWT is its superpower, especially for modern application architectures.
- Scalability: Imagine your application becomes very popular and you need to run it on multiple servers behind a load balancer. With sessions, you have a problem: if a user logs in on Server A, their session is stored there. If their next request goes to Server B, Server B doesn't know about their session, and they're effectively logged out. You'd need a complicated shared session store to solve this. With JWT, it doesn't matter which server gets the request. As long as all servers have the same secret key, any of them can validate the token independently.
- Microservices: Your background in CSE will make you familiar with the concept of microservice architecture. JWT is perfect for this. Your client can get a token from an authentication service and then use that same token to securely communicate with a dozen other microservices (a user service, a product service, an order service, etc.).
- Decoupling: It decouples your frontend from your backend's session management. The client is simply responsible for acquiring a token upon login and then attaching it to future requests.
This video from Web Dev Simplified gives an excellent explanation of these benefits.
What Is JWT and Why Should You Use JWT
In this video, 'What Is JWT and Why Should You Use JWT', the presenter clearly explains the advantages of JWTs in multi-server and microservice environments.
Watch from 10:56 to 14:35. Focus on understanding how JWTs solve the scaling problem that session-based authentication runs into.
The Full Flow: Access Tokens and Refresh Tokens
There's one more piece to the puzzle. If a JWT is stolen, the attacker can use it until it expires. To minimize this risk, we make the main token—the Access Token—have a very short lifespan (e.g., 15 minutes).
But you can't ask your users to log in every 15 minutes. That's a terrible user experience. The solution is the Refresh Token.
Here's the complete, production-grade flow:
- Login: User logs in.
- Issue Tokens: The server issues two tokens:
- A short-lived Access Token (e.g., 15-minute expiry).
- A long-lived Refresh Token (e.g., 7-day expiry).
- Storage: The client stores both. The Access Token is often kept in memory. The Refresh Token is stored more securely, typically in an
httpOnlycookie, which is inaccessible to JavaScript, protecting it from XSS attacks. - API Calls: The client uses the Access Token for all API requests.
- Token Expiration: After 15 minutes, the Access Token expires. The next API call fails with a
401 Unauthorizederror. - Token Refresh: The client's code catches this error. It then makes a request to a special endpoint (e.g.,
/api/refresh_token), sending the long-lived Refresh Token. - New Access Token: The server validates the Refresh Token. If it's valid, it issues a new Access Token.
- Retry Request: The client gets the new Access Token and automatically retries the original API call that failed. The user never notices anything happened.
This pattern gives you both security (short-lived access tokens) and a good user experience (long-lived sessions).
This final video segment visualizes this refresh token flow perfectly.
How Does JWT Authentication Work? (JSON Web Token) | Tokens vs Sessions
Let's conclude with the segment on Refresh Tokens from 'How Does JWT Authentication Work?'. It clearly explains this essential pattern for maintaining user sessions securely.
Watch from 09:20 to 11:07. Focus on the roles of the two different tokens and how they work together to provide a seamless and secure user experience.
Conclusion
You now have a solid theoretical understanding of modern, token-based authentication. This is a core concept for any web developer.
Key Takeaways:
- Authentication is about who you are; Authorization is about what you can do.
- Traditional session-based authentication is stateful, requiring the server to store session data for every user.
- JWT-based authentication is stateless. The token itself contains all the necessary user information, which is a major advantage for scalability and modern architectures.
- A JWT consists of a Header, a Payload (which is readable by anyone), and a Signature (which ensures the token's integrity).
- The production-standard authentication flow uses a short-lived Access Token for API requests and a long-lived Refresh Token to get new access tokens without forcing the user to log in again.
Preview of the Next Lesson:
We're ready to start building! The very first step in any authentication system is handling passwords. In the next lesson, you will learn to hash and salt user passwords securely during registration using bcrypt. You can't have a secure login system if you're storing passwords in plain text.