Hello! In our last lesson, we put the finishing touches on our Express server's architecture by implementing a centralized error handler. This crucial step ensures our API is robust and provides consistent, professional responses when things go wrong. Our server can now handle requests, use middleware, and manage errors gracefully. However, it's missing a critical piece: a memory. Right now, any data we work with is lost the moment the server restarts.
Today, we transition from the stateless world of server logic to the stateful world of data persistence. We'll begin working with PostgreSQL, a powerful and widely-used relational database. Your goal for this lesson is to install and configure a local PostgreSQL server, database, and user. This is the foundational step that will allow our backend application to store, retrieve, and manage data permanently.
What is PostgreSQL?
Before we jump into the installation, let's briefly understand what we're working with. PostgreSQL (often called "Postgres") is a powerful, open-source object-relational database system. Think of it as a highly structured and super-powered set of interconnected spreadsheets. Data is stored in tables, which have rows (records) and columns (attributes).
A key concept is the distinction between a server and a client:
- The PostgreSQL server is the core engine that runs in the background on your machine. It manages the data, handles queries, and ensures data integrity.
- A client is a tool you use to connect to the server and interact with it. This can be a graphical user interface (GUI) like pgAdmin, which we'll install, or a command-line interface (CLI) like
psql, which is essential for developers.
Installing and Using PostgreSQL Locally
For a quick overview of what PostgreSQL is and why it's so popular in the tech industry, read the introduction of this article from Codecademy.
Read the short section titled "What is Postgres?". It gives a concise definition and lists some major companies that rely on it.
1. Installing the PostgreSQL Server
This is the most hands-on part of the lesson. The installation process varies by operating system. Below are instructions for Windows, followed by resources for macOS and Linux.
For Windows Users
The most straightforward way to install PostgreSQL on Windows is by using the installer provided by EDB, which bundles the database server, the pgAdmin GUI, and command-line tools.
How to Download and Install PostgreSQL and PgAdmin 4 for Windows 10/11
This video from United Top Tech provides a clear, step-by-step walkthrough of the entire installation process on Windows. Follow along to get set up.
Watch from the beginning to 01:59. Follow the steps to download the installer from the official website. During the installation wizard, ensure all four components are checked: PostgreSQL Server, pgAdmin 4, Stack Builder, and Command Line Tools. Crucially, when prompted to set a password for the postgres superuser, choose a password you will remember. You will need this password to access your database server. You can leave the port as the default (5432). When the installation finishes, you can uncheck the option to launch Stack Builder; we won't need it.
For macOS and Linux Users
The installation process is different for macOS and Linux. The article from Codecademy provides excellent, concise instructions for both.
Installing and Using PostgreSQL Locally
This article provides specific command-line instructions for installing PostgreSQL on macOS and Linux.
In the section "Setting Up Postgres (server)", find the instructions for your operating system (Mac OS X or Linux) and follow them carefully. The article recommends Postgres.app for Mac, which is a great choice.
2. Creating Your First Database
With the server installed and running, let's connect to it and create a database for our future full-stack application. We'll do this using both the pgAdmin GUI and the psql CLI.
Using pgAdmin (The GUI Way)
pgAdmin provides a visual way to manage your databases. It's great for getting an overview and performing administrative tasks.
How to Download and Install PostgreSQL and PgAdmin 4 for Windows 10/11
Let's continue with the video from United Top Tech to see how to connect to the server with pgAdmin and create a database.
Watch from 02:21 to 03:43. Open pgAdmin 4. It will ask for the master password you set during installation. In the left-hand browser pane, expand Servers. It will prompt for the password for the postgres user—this is the same password you set during installation. Be sure to check "Save password". Right-click on Databases and select Create -> Database.... Let's name our database task_manager. You'll use this name later when connecting your Node.js app. Click Save.
You've now created your first database! You can see it listed under the Databases tree in pgAdmin.
Using psql (The Command-Line Way)
As a developer, you'll often work directly from the terminal. psql is the standard interactive terminal for PostgreSQL. Getting comfortable with it is a vital skill.
First, you need to open psql.
- On Windows: Search for "SQL Shell (psql)" in the Start Menu and open it. It will prompt you for the server, database, port, username, and password. You can press Enter to accept the defaults for the first four prompts and then type the password you set during installation.
- On macOS/Linux: You can typically open your terminal and type
psql -U postgres.
Once you are at the postgres=# prompt, you are connected as the superuser. Now, let's create a database with a SQL command.
Type the following command and press Enter:
CREATE DATABASE practice_db;
To see a list of all databases on the server and confirm yours was created, use the psql meta-command \l (that's a backslash and a lowercase L):
\l
You should see both task_manager (from pgAdmin) and practice_db in the list.

To exit psql, type \q and press Enter.
3. Creating a Dedicated Application User
It is a critical security best practice to not connect your application to the database using the postgres superuser account. That account has unlimited power. Instead, we'll create a new, dedicated user with privileges only on the task_manager database. This follows the principle of least privilege.
We'll do this using psql. Connect to psql as the postgres user again if you've exited.
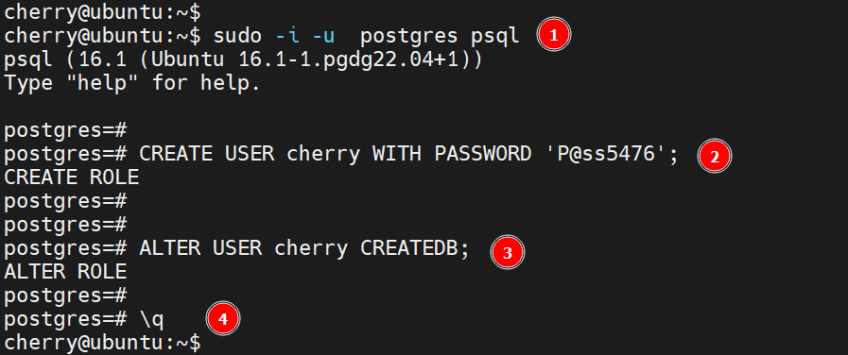
Step 1: Create a new user (role)
A "user" in PostgreSQL is technically a "role" that has login permissions. Let's create a user named task_manager_user. Run the following command, replacing 'your_password_here' with a secure password of your choice.
CREATE USER task_manager_user WITH ENCRYPTED PASSWORD 'your_password_here';
Step 2: Grant privileges to the user
Now that the user exists, we need to grant it permission to perform actions (like read, write, update, delete) on our task_manager database.
GRANT ALL PRIVILEGES ON DATABASE task_manager TO task_manager_user;
This command gives our new task_manager_user full control over the task_manager database, but no access to any other databases on the server.
Test your understanding!
You are tasked with setting up a new project for a blog. Using only psql commands, what are the three distinct SQL commands you would run to:
- Create a new database called
blog_db. - Create a new user called
blog_userwith the passwordsupersecret. - Give that new user full privileges on the
blog_dbdatabase.
Show answer
Here are the three commands you would run in psql:
CREATE DATABASE blog_db;CREATE USER blog_user WITH ENCRYPTED PASSWORD 'supersecret';GRANT ALL PRIVILEGES ON DATABASE blog_db TO blog_user;
Conclusion
Excellent work! You've successfully set up a complete, local PostgreSQL development environment. This is a massive step towards building a full-stack application.
Key Takeaways:
- You installed PostgreSQL, which includes the database server, the pgAdmin GUI client, and the
psqlcommand-line client. - You learned how to create a new database using both the user-friendly pgAdmin interface and the powerful
psqlcommand line. - Most importantly, you followed professional security practices by creating a dedicated, non-superuser role for your application and granting it specific privileges on the project database.
Preview of the Next Lesson:
Our database is ready and waiting. In the next lesson, we will bridge the gap between our Express server and PostgreSQL. You'll learn how to connect a Node.js application to PostgreSQL using a client library like pg, allowing our API to finally start interacting with a real database.