Hello! Welcome back to your wedding dress project.
In our last lesson, you did the essential prep work of selecting the correct Microtex needle and fine-weight thread. Think of that as specifying the high-precision components for your design. Now, with the right tools in hand, we shift our focus from the what to the how.
This lesson addresses a core challenge of working with your chosen fabrics: how to sew seams on sheer silk organza and chiffon without puckering or distortion. A beautifully executed seam on these fabrics should be flat, smooth, and almost invisible. A puckered, wavy seam, on the other hand, can disrupt the clean, architectural lines you envision for your gown.
Drawing on your product design background, you can think of this as a prototyping and process validation stage. Before going into "production" on your final skirt panels, we need to calibrate our primary tool—the sewing machine—and master the handling technique to achieve a flawless result every single time.
1. The Problem: Why Sheer Fabrics Pucker
First, let's diagnose the problem we're trying to solve. When you sew a seam, you're introducing thread that pulls the fabric together. On stable fabrics like cotton, this is not an issue. On delicate, lightweight silks, this can lead to unsightly puckering.
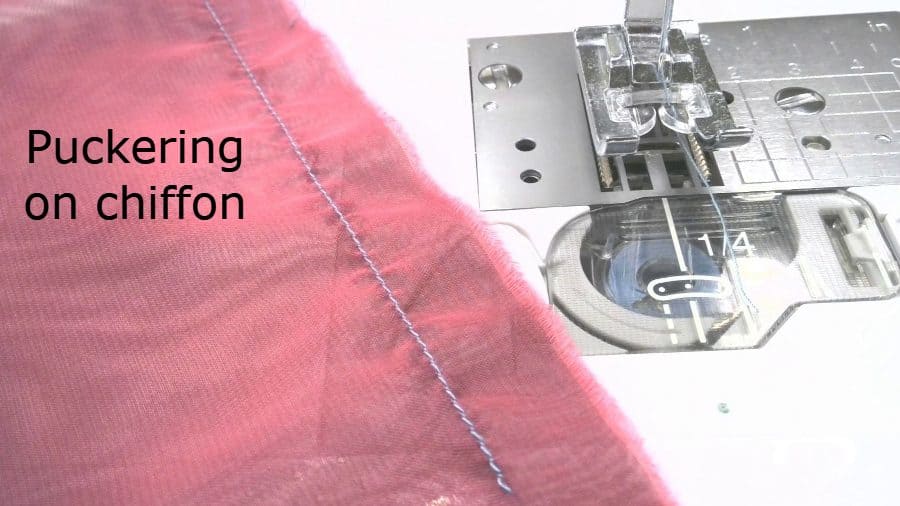
There are three main reasons this happens:
- Tension Imbalance: The sewing machine's upper and bobbin threads are pulling too tightly on the fine fabric fibers, causing them to bunch up.
- Fabric Instability: The lightweight fabric can shift and stretch as it moves through the machine. The feed dogs (the metal teeth under the presser foot) can also push the bottom layer of fabric at a slightly different rate than the top layer, causing ripples.
- The "Black Hole" Effect: Sheer fabric is so fine that the needle can push it down into the wide opening of a standard needle plate, causing it to get snagged and tangled.
2. Pre-Sewing Setup: Calibrating Your Machine
To counteract these issues, we must first adjust our machine settings. This isn't a "set it and forget it" process; it requires testing, just like you would test a digital prototype to find the optimal configuration.
Tips on how to sew with chiffon and silky fabrics
Let's begin by understanding the crucial machine adjustments needed for sheer fabrics. This video from Sheer Stitchery explains how to set up your machine to prevent the most common issues right from the start.
Please watch from 04:47 to 07:42. The presenter covers three key areas you need to address before sewing your first seam: Adjusting your stitch length and tension to avoid puckering. Solutions for preventing the fabric from being "eaten" by the throat plate. A quick recap of needle and thread choice, confirming what we learned in the last lesson.
Based on the video and sewing best practices, here are your starting points for calibration:
- Stitch Length: Reduce your stitch length. A good starting point is 2.0 mm. A shorter stitch has less length to pucker and provides more stability in a sheer fabric.
- Tension: Lower your upper thread tension. If your machine's default is 4, try setting it to 3 or 2.5. The goal is to create a balanced stitch that doesn't pull on the fabric.
- Needle Plate: If your machine has a straight stitch needle plate (one with a small round hole instead of a wide slot), now is the time to use it. If not, the "tape trick" shown in the video is a clever workaround.
3. The Technique: Creating a Stable Sewing Environment
With the machine calibrated, the next step is to control the fabric itself as you sew. The key is to add temporary stability.
Stabilize with Tissue Paper
One of the most effective and accessible methods is to use a stabilizer. You don't need anything fancy; simple gift-wrapping tissue paper works perfectly.
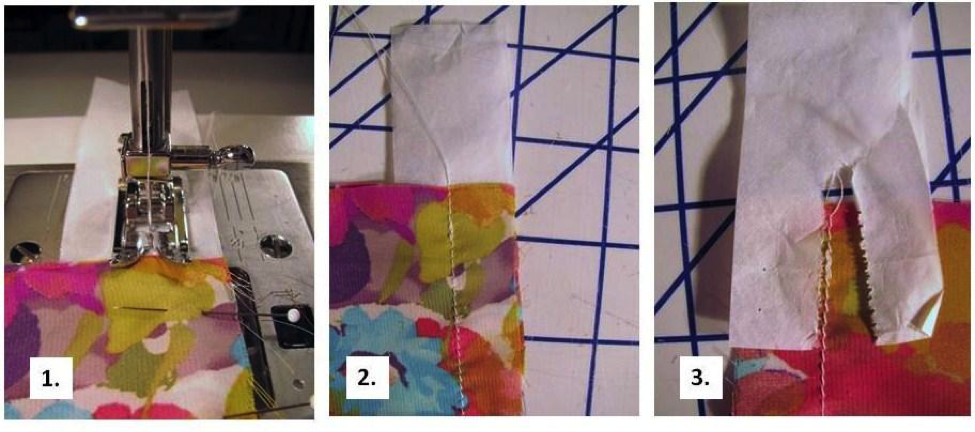
The tissue paper provides a stable foundation for the fabric. It gives the feed dogs something substantial to grip and prevents the fine silk from being pushed down into the needle plate.
Securing Seams without Backstitching
Backstitching at the beginning and end of a seam is standard practice, but on sheers, it's a mistake. It creates a bulky, visible knot of thread and is a prime moment for the fabric to get tangled in the machine.
Instead, we will use a more elegant technique that you've likely used when sewing darts.
Tips on how to sew with chiffon and silky fabrics
Let's return to the Sheer Stitchery video to watch two essential techniques for managing the fabric during sewing.
Please watch two more clips from this video: Stabilizing the Fabric (07:37 - 08:34): This clip demonstrates the tissue paper method. Also, note the mention of a walking foot as another potential tool for advanced control. Securing Your Seam (08:43 - 09:45): This is critical. Understand why you must avoid backstitching and learn the professional alternative of leaving long thread tails to tie off by hand.
4. Your Turn: The Prototyping Phase
Now it's time to put theory into practice. Treat this exactly like a prototyping sprint: the goal is to test your setup and refine your technique on inexpensive scraps before touching the final garment pieces.
Your Action Plan:
-
Set Up:
- Install your new Microtex 70/10 needle.
- Thread your machine with your 80wt polyester thread.
- Set your stitch length to 2.0 mm and your tension to 3.
- If you have a straight stitch plate, install it.
- Prepare several small squares of your organza or chiffon fabric scraps, along with sheets of tissue paper.
-
Execute the Test:
- Place two layers of silk on top of one layer of tissue paper.
- Position the layers under the presser foot, a few millimeters in from the edge.
- Lower the needle into the fabric. Before you start sewing, gently hold both the top and bobbin thread tails behind the presser foot. This prevents tangling on the first few stitches.
- Sew a straight seam, allowing the machine to feed the fabric. Your job is to guide it gently with your fingertips; do not push or pull it.
- Do not backstitch at the beginning or end.
- When you reach the end, stitch off the fabric and leave long thread tails (about 4-5 inches).
-
Evaluate:
- Gently tear the tissue paper away from the seam.
- Pull the thread tails to the wrong side of the fabric and tie a secure double or triple knot. Snip the excess thread.
- Examine the seam. Is it flat and smooth? Or is there any puckering? Press the seam lightly (with a press cloth and low heat) to see its final state.
- Iterate: If you see puckering, lower the tension slightly (e.g., from 3 to 2.5) and sew another test seam. Repeat until you achieve a perfectly flat seam.
This iterative testing process is the single most important step to ensuring success on your final skirt.
5. Looking Ahead: Seam Finishes for Sheers
Once you've mastered creating a flat seam, the next consideration is how to finish the raw edges. Because your skirt layers are transparent, the seam finish is not just functional; it's a visible design element. The inside must look as beautiful as the outside.
There are a few professional options, but the gold standard is the French Seam, which encloses the raw edges completely within the seam itself.
How to Sew Silk: the Complete Guide - Threads Monthly
To see how these techniques come together and to look ahead at finishing options, let's review a section from the 'How to Sew Silk' guide by Threads Monthly. The author shares a relevant experience from making her own wedding dress.
Please read the sections 'How to machine sew silk' and 'What seams to use & how to finish the raw edges'. Notice the confirmation of using tissue paper and avoiding sewing over pins. Pay special attention to the author's description of the narrow zigzag technique she used on her sheer silk gauze wedding dress skirt. This is a fantastic real-world example of choosing a technique to suit the fabric's specific behavior.
Conclusion
You now have the complete process for sewing a perfect, pucker-free seam on your delicate silks. By meticulously calibrating your machine and using stabilizers, you can overcome the challenges these beautiful fabrics present.
Key Takeaways:
- Calibrate your machine: Use a shorter stitch length (2.0mm) and lower thread tension.
- Stabilize your fabric: Sew with a layer of tissue paper underneath your silk to prevent shifting and puckering.
- Rethink your start and finish: Do not backstitch. Instead, start by holding the thread tails taut, and finish by leaving long tails to tie off by hand.
- Prototype your seams: Always test your settings on scraps of your fashion fabric before sewing the final garment. Iterate until you achieve a perfectly flat seam.
In our next lesson, we will build directly on this foundation. You will learn to execute a perfect French seam, the elegant and durable finish that will make the inside of your sheer skirt layers as stunning as the outside.