Hello! Welcome to the final lesson in our "Sewing Foundations & Machine Mastery" module.
In our last session, you mastered the art of sewing darts, learning how to transform a flat piece of fabric into a three-dimensional form. This was a critical step in understanding the architectural principles of garment construction.
Today, we'll focus on the integrity and polish of your construction. Once pieces are sewn together, their raw edges are vulnerable to fraying, which can compromise the strength and lifespan of your garment. The solution is a seam finish. Think of this as the final, protective coating on a finished product—it's not just for looks; it ensures durability and a professional outcome.
Your learning outcome for this lesson is to finish raw edges using two methods: overlocking/zigzag and French seams. These two techniques represent different approaches to a similar problem, and you'll use both in the construction of your wedding dress. The zigzag finish is a strong, utilitarian workhorse perfect for the internal seams of your structured bodice, while the French seam is an elegant, couture-level finish essential for the delicate, sheer layers of your skirt.
1. The Workhorse Finish: Zigzag & Overlocking
The most common and straightforward way to prevent fraying on woven fabrics is to use a stitch that wraps around the raw edge.
- Overlocking (or Serging): This is done with a specialized machine called an overlocker or serger. It trims the fabric edge and sews a thread-encased seam in one fast operation. This is the standard in ready-to-wear clothing.
- Zigzag Stitch: This is the equivalent finish that you can achieve on your standard home sewing machine. It's incredibly effective and versatile.
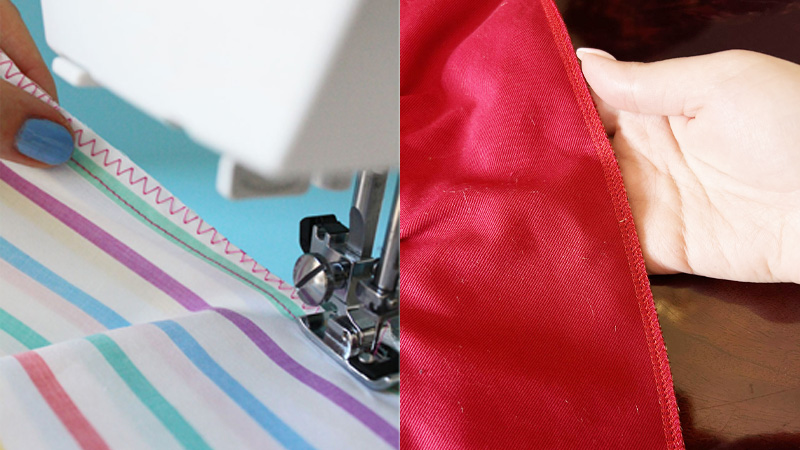
The key benefit of these finishes is that they protect the edge without adding significant bulk, allowing seams to be pressed open for a flatter, less visible result—a technique you practiced in our third lesson.
A Guide To Seam Finishes for Woven Fabrics
To understand the application of a zigzag stitch, let's look at this brief guide from Grainline Studio.
Please read the section titled 'Zig-Zag'. Notice the two distinct methods described: you can stitch the seam allowances together, or you can finish each edge separately before sewing the seam. The latter allows you to press the seam open, which is ideal for reducing bulk in a structured garment like your bodice.
The choice of stitch width and length will depend on your fabric. A general rule is that heavier fabrics that fray a lot require a wider, denser stitch, while lighter fabrics need a shorter, narrower one. Always test on a scrap piece first!
2. The Couture Finish: French Seams
While a zigzag stitch is functional, some situations call for a more refined solution. For sheer and delicate fabrics like the silk organza and chiffon you plan to use for your skirt, you want a finish where no raw edges are visible at all. The French seam is the perfect answer.
A French seam is a "seam within a seam." The raw edge is completely enclosed, creating a narrow, tidy, and surprisingly strong finish that looks beautiful from both the inside and the outside.

This technique is fundamental to bridal and couture sewing. As this article on wedding dress fabrics highlights, French seams are the preferred method for working with chiffon and organza.
Working with Chiffon, Satin, and Organza in Wedding Dress Construction
This blog post directly connects the French seam technique to the fabrics you'll be using for your dress. It reinforces why mastering this skill is so important for your project.
Please read the sections 'Characteristics of Chiffon', 'Features of Organza', and 'Best Practices for Seam Construction and Finishing'. Focus on how frequently French seams are mentioned as the go-to technique for these exact fabrics. Note point #2 under 'Best Practices', which gives precise measurements for a professional result.
How to Construct a French Seam
The process is counter-intuitive at first because you begin by sewing with the wrong sides of the fabric together. Let's watch a detailed demonstration.
7 Seam Finishes (5 are WITHOUT a SERGER) | Sewing Basics for Beginners
This video from Pattern Scout provides an excellent, clear, and step-by-step walkthrough of creating a perfect French seam. Pay close attention to the sequence of stitching, trimming, and pressing.
Watch the segment from 03:15 to 05:28. The demonstrator uses a 5/8 inch seam allowance as an example, which is very common in commercial patterns. Notice how she first sews a 3/8 inch seam, trims it down, presses, and then sews the final 1/4 inch seam to encase the raw edge.
The key steps are:
- First Pass: Place fabric wrong sides together and sew your first seam. This seam should be narrower than your final seam allowance.
- Trim: Carefully trim the seam allowance close to the stitching line (about 1/8 inch or 3mm).
- Press: Press the seam flat to set the stitches, then fold the fabric along the seam line so the right sides are now together. The tiny raw edge is now tucked inside the fold. Press this fold sharply.
- Second Pass: Stitch the second seam, making sure you are completely encasing the raw edge from the first pass. Press the final seam to one side.
Test your understanding!
When you sew a standard seam, you place the fabric pieces "right sides together." What is the critical difference in how you orient the fabric when you begin sewing a French seam?
Show answer
For a French seam, you begin by placing the fabric pieces "wrong sides together" for the first line of stitching. This is the opposite of a standard seam and is the key step that allows the raw edge to be enclosed later.
Your Practical Exercise: Building a Seam Finish Sampler
Estimated time: 30 minutes
Now it's time for you to create physical prototypes of these two seam finishes. You will need two pairs of fabric swatches, about 6x6 inches (15x15 cm) each. A medium-weight cotton or muslin is perfect for this exercise. Assume a standard 5/8" (1.5 cm) seam allowance.
Your Task:
-
Sample #1: The Zigzag Finish
- Take your first pair of swatches and place them right sides together.
- Sew a standard straight seam with a 5/8" seam allowance.
- Press the seam allowance open.
- Set your machine to a medium zigzag stitch (e.g., 2.5mm width, 2.0mm length - test on a scrap first).
- Carefully zigzag along the raw edge of each seam allowance separately.
- Give it a final press.
-
Sample #2: The French Seam
- Take your second pair of swatches and place them wrong sides together.
- Sew your first seam pass at a 3/8" (1 cm) seam allowance.
- Trim the seam allowance down to 1/8" (3-4 mm).
- Press the seam allowance to one side, then fold the fabric along the seam so the right sides are now together. Press this sharply.
- Sew your second seam pass at a 1/4" (6 mm) seam allowance, making sure the first seam's raw edge is fully enclosed.
- Press the finished seam to one side.
Analyze your work: Compare the two samples. Notice the clean, enclosed look of the French seam versus the flat, open profile of the zigzag-finished seam. Label these swatches and keep them. They are the first entries in your personal seam library—a critical reference tool for future decisions.
Conclusion
Excellent work! You have now completed the "Sewing Foundations" module. You've progressed from basic machine settings to creating seams, shaping fabric with darts, and now, professionally finishing your work.
Key Takeaways from Today's Lesson:
- Seam finishes are essential for preventing fraying and ensuring a garment's durability and professional appearance.
- The zigzag stitch is a versatile, accessible method for finishing most seams, especially those that will be hidden inside a lining. It allows seams to be pressed open to reduce bulk.
- The French seam is a couture technique that completely encloses the raw edge. It is the ideal finish for sheer, lightweight fabrics like organza and chiffon, which you will be using for your skirt.
You are now equipped with the core construction skills needed for your project. In our next lesson, we will move into the exciting world of materials. You will learn to distinguish between silk organza, silk chiffon, and silk crepe by hand and visual inspection. This is the first step in sourcing the beautiful fabrics that will become your wedding dress.