Hello! Welcome to your fourth lesson.
In our previous lessons, we built a solid foundation by mastering straight seams and the art of professional pressing. You learned that pressing isn't just about removing wrinkles; it's a shaping tool that sets the stage for a high-quality garment. Today, we'll use that foundation to move from two dimensions into three.
Your background in industrial design and architecture has given you a deep appreciation for how flat materials can be manipulated to create complex, three-dimensional forms. In sewing, the primary tool for this transformation is the dart. Think of darts as the structural engineering of garment construction. They are small, folded wedges of fabric that allow a flat piece of cloth to curve and contour around the human body, much like folded paper in origami creates form.
Today's learning outcome is to stitch darts accurately to shape flat fabric to body curves. Mastering this skill is absolutely essential for creating the fitted, architectural bodice you envision for your wedding dress.
1. The "Why": Understanding the Architecture of a Dart
Before we start sewing, let's understand what a dart does. It's a simple concept with a powerful effect. By removing a triangular wedge of fabric, you introduce a curve.

Darts are strategically placed to point towards the fullest part of a body curve, like the apex of the bust or the curve of the hip. For your gown, vertical darts in the bodice will be critical for shaping the fabric neatly around your bust and waist.
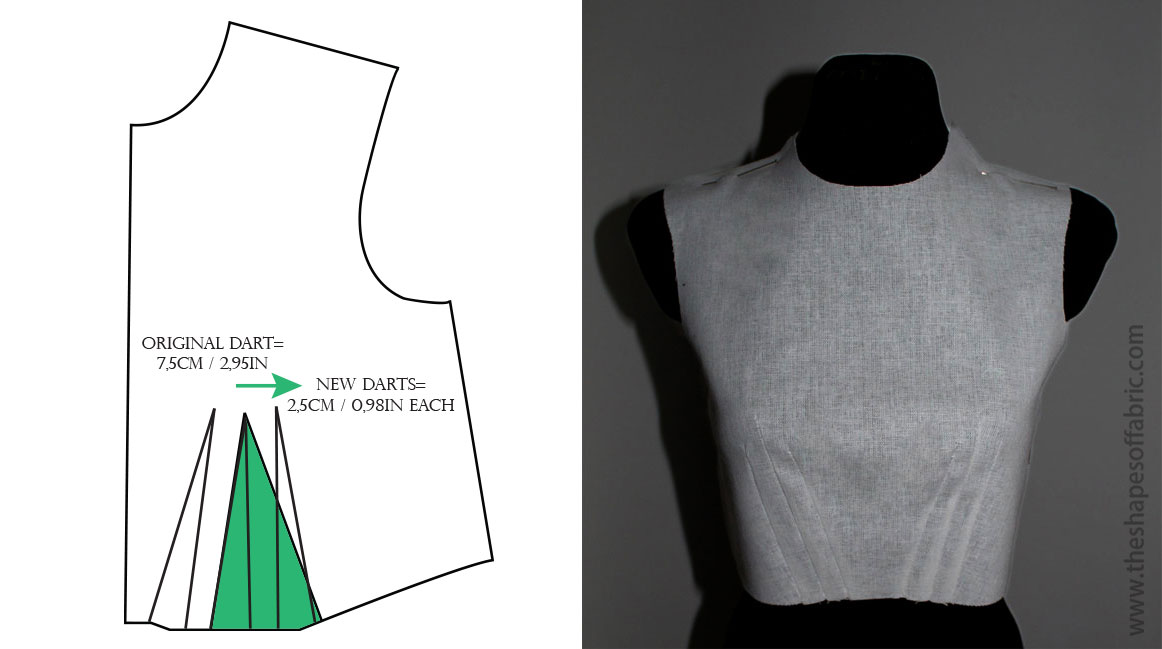
Your design includes vertical pleating on the bodice. This is actually a form of advanced dart manipulation. Multiple small darts (or pleats) can be used to control the shape in a very precise, decorative way.
How to Sew Darts for Garment Sewing and Contour
To start, let's watch a brief explanation of what darts are and the different ways you can transfer them from your pattern to your fabric.
Watch the first minute of this video from Professor Pincushion (00:00 - 01:16). Pay attention to the terminology (dart legs, apex) and the various marking methods shown. This gives you a good overview of your options.
2. The "How": A Four-Step Guide to a Perfect Dart
A perfect dart is the result of four precise steps: Marking, Folding & Pinning, Sewing, and Pressing. Let's go through each one.
Step 1: Marking
Accuracy starts here. Your pattern will have lines for the dart, which you need to transfer to the wrong side of your fabric. As you saw in the video, you can use chalk, a tracing wheel with transfer paper, or even tailor tacks.
Dart Sewing Secrets Every Beginner Should Learn (COMPLETE GUIDE)
The Seamwork channel demonstrates a particularly precise method using a screw punch and chalk. This is a great professional technique for ensuring your dart point (the apex) is marked perfectly.
Watch from 00:11 to 01:04. Notice how they punch a tiny hole at the dart tip on the paper pattern, then use chalk to mark through it onto the fabric. This is a very clean and accurate method.
Step 2: Folding and Pinning
The goal is to fold the fabric so the two "dart legs" you marked lie directly on top of each other.
- Fold the fabric along the center of the dart, with the right sides of the fabric facing each other.
- Push a pin through the marked line on the top layer.
- Flip the fabric over and check if the pin is coming out exactly on the marked line on the bottom layer. If not, adjust your fold slightly until they align perfectly.
- Once aligned, place pins along the dart leg, perpendicular to the fold, to hold it securely for sewing.
Step 3: Sewing the Dart
This is where the magic happens. The key to a beautiful dart is how you handle the tip, or apex. A common beginner mistake is to backstitch at the point, which creates a bulky, puckered "dimple."
Here are two professional methods to avoid this.
Method 1: The Standard Tie-Off
This is the most common and reliable method.
How to Sew Darts for Garment Sewing and Contour
Let's watch how to sew the dart, focusing on the correct direction and how to finish the point without backstitching.
Watch from 01:16 to 02:20. Key takeaways: start sewing from the wide edge, sew towards the point, and instead of backstitching, sew right off the fabric and tie the thread tails in a knot.
Method 2: The Tapered Finish (The "Secret Sauce")
This technique provides an even smoother, more invisible finish. It's an engineering solution to the problem of fabric stress. Instead of ending in an abrupt point, you gradually "walk" the stitch line onto the fold of the fabric.
Tutorial: Learn How to Sew a Dart - Made to Create
This written tutorial from WeAllSew explains the tapering technique beautifully. It's a fantastic skill for achieving high-end results.
Read sections 6 and 7, titled 'Taper the Dart Seam Before Reaching the Point' and 'Finish Stitch Along the Fold'. Focus on the logic: by shortening the stitch length and angling the seam to run along the fold for the last few stitches, you gradually release the fabric tension, preventing a pucker. The photos here are excellent.
Step 4: Pressing
This final step activates the 3D shape you've just created. All the skills from our last lesson come into play here.
- Vertical Darts (like those in your bodice) are typically pressed with the dart bulk towards the center of the garment (Center Front or Center Back).
- Horizontal Darts (like bust darts coming from the side seam) are pressed downwards, towards the waist.
Dart Sewing Secrets Every Beginner Should Learn (COMPLETE GUIDE)
Finally, let's watch how to press the dart correctly using a tailor's ham, which you were introduced to in our last lesson.
Watch from 02:46 to 03:44. Notice the two-step process: first, press the dart flat as it was sewn to 'set' the stitches. Second, place the dart over the curve of the tailor's ham and press again to mold the fabric into its final 3D shape.
Test your understanding!
You are sewing a dart for your bodice. What is the most common mistake made at the dart's point (apex), and what are two different ways you can avoid it to get a smooth, professional finish?
Show answer
The most common mistake is backstitching at the point, which creates a pucker or "dimple".
To avoid this, you can:
- Sew straight off the fabric at the point, leave long thread tails, and tie them securely in a knot by hand.
- Use the tapering method: shorten your stitch length near the point and angle your stitching to run right along the fold for the last few millimeters before tying off the threads.
Your Practical Exercise: Prototyping Your Darts
Estimated time: 30 minutes
Now it's time to put theory into practice. Think of this as creating small-scale prototypes. You will need two squares of medium-weight woven fabric (like cotton or muslin), about 8x8 inches (20x20 cm) each.
Your Task:
- Mark: On each fabric square, draw a standard straight dart. Make it about 4 inches (10 cm) long and 1 inch (2.5 cm) wide at the edge. Use your preferred marking tool.
- Sew Dart #1 (Tie-Off Method):
- Fold and pin the dart.
- Stitch from the wide edge to the point.
- Sew off the fabric, leave 4-inch thread tails, and tie them off securely.
- Clip the excess thread.
- Sew Dart #2 (Tapering Method):
- Fold and pin the second dart.
- Stitch from the wide edge. About 1/2 inch from the point, shorten your stitch length.
- Angle your stitching to run along the folded edge for the last few stitches.
- Leave thread tails and tie them off.
- Press Both Darts:
- For each dart, first press it flat to set the stitches.
- Then, place it over a tailor's ham (or a rolled-up towel) and press the bulk to one side, molding the fabric into a curve.
- Analyze Your Prototypes:
- Compare the two finished darts. Can you see a subtle difference at the point? Does one look smoother?
- Feel the curve you've created. You have successfully turned a flat piece of fabric into a shaped form.
Keep these samples. They are your first reference pieces for 3D shaping.
Conclusion and Next Steps
Fantastic work today. You have learned one of the most fundamental skills in garment construction. The ability to sew a clean, pucker-free dart is the key to creating tailored clothing that fits beautifully.
Key Takeaways from Today's Lesson:
- Darts are structural folds that transform 2D fabric into 3D shapes to fit the body's curves.
- A perfect dart requires precision in four steps: Marking, Folding, Sewing, and Pressing.
- The secret to a smooth dart point is to avoid backstitching. Instead, tie off the threads by hand or use the advanced tapering technique.
- Always press darts over a curved surface like a tailor's ham to set their three-dimensional shape.
In our next lesson, we will tackle another foundational skill: finishing raw edges using two methods: overlocking/zigzag and French seams. Now that we know how to join and shape fabric pieces, the next logical step is to learn how to finish their edges neatly and professionally. This will be especially important for your gown, as you'll use strong finishes for the bodice and delicate French seams for the sheer skirt layers.