Hello! Welcome back to your wedding dress project.
In our last lesson, you accomplished a major step: joining the pleated bodice shell and the smooth lining into a single, cohesive unit. By stitching the neckline, turning the bodice right-side-out, and giving it a good press, you've created the fundamental shape of the top of your gown.
Today, we're focusing on a refined technique that elevates a garment from good to great. The learning outcome for this lesson is to understitch the neckline to ensure the lining remains hidden. This is a crucial detail for a professional finish, especially on a strapless gown where the neckline is a prominent focal point.
From a design perspective, understitching is like a hidden constraint that ensures a perfect user experience—it guarantees the internal structure (the lining) never accidentally reveals itself. It’s what will give your architectural bodice that crisp, intentional edge.
1. What is Understitching and Why Is It Essential?
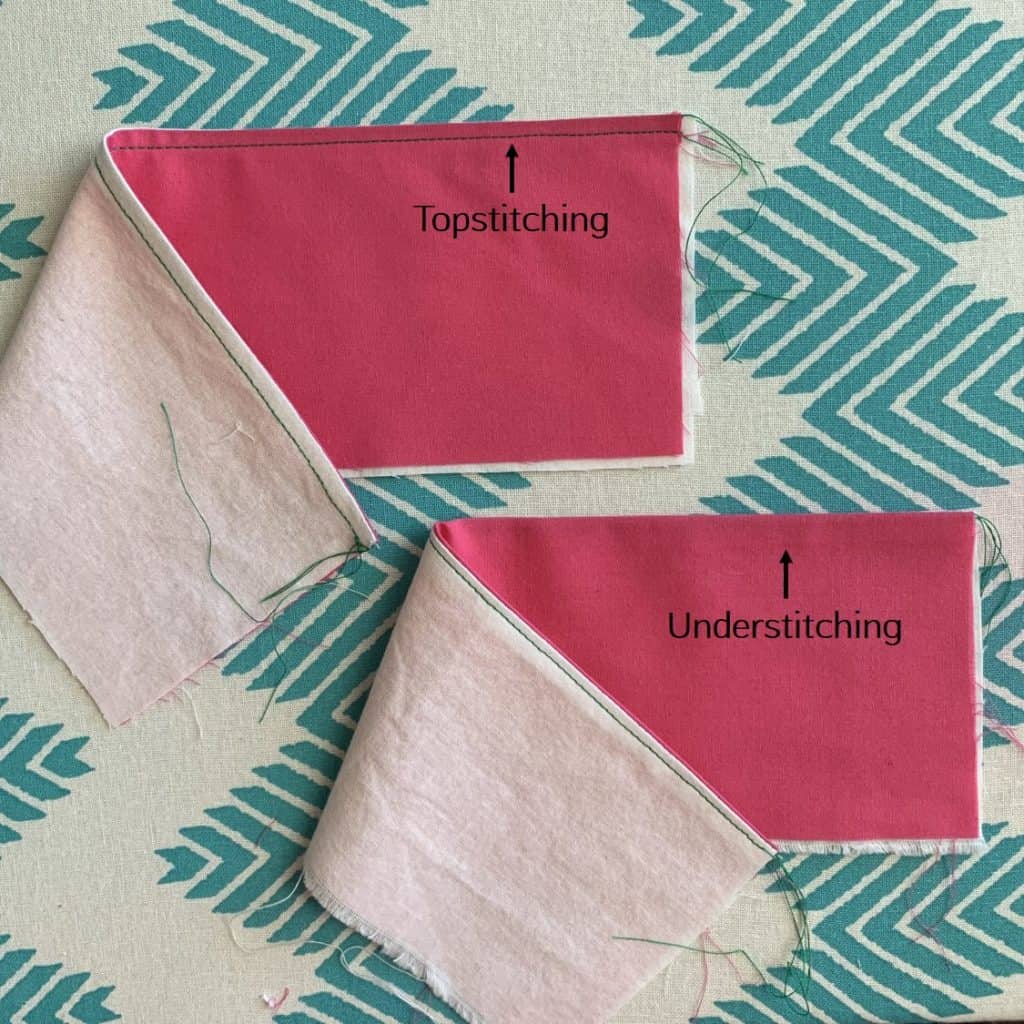
Before we begin, let's clarify what understitching is and, more importantly, why we do it. Understitching is a line of stitching sewn on the lining or facing, close to the seam line, that catches the seam allowances underneath. It is not visible from the outside of the garment.
Its purpose is to force the seam to roll slightly towards the inside, which permanently prevents the lining from peeking out over the top edge of your bodice.
To get a great overview of this concept, let's start with a video.
WHAT IS UNDERSTITCHING? Why you don't want to skip this crucial sewing step (esp. for pro finishes)!
The video 'WHAT IS UNDERSTITCHING?' from Evelyn Wood's channel provides an excellent explanation of what understitching is and why it's such a critical step for a professional finish. Pay attention to how she distinguishes it from topstitching.
Watch the segment from 02:23 to 04:27. Evelyn clearly defines the technique and uses a real-world example to show the dramatic difference it makes.
As the video highlights, understitching is different from topstitching, which is visible on the exterior of a garment. Here is a clear visual comparison:
2. The Technique: How to Understitch Your Bodice
Now let's walk through the process of understitching your bodice neckline. The key is to work carefully and ensure you are only stitching through the correct layers.
Step 1: Preparation
- Lay your bodice on a flat surface with the lining side facing up.
- Pull the lining away from the bodice shell so you can see the neckline seam.
- Ensure that the seam allowances from the neckline seam are all pressed towards the lining. You should have done this at the end of the last lesson, but double-check now. The seam allowances must lie flat against the lining.
Step 2: Stitching
You will now sew a line of stitches on the right side of the lining, approximately 2-3mm (about 1/8 inch) away from the neckline seam. This line of stitching must go through the lining layer AND both seam allowance layers underneath it. The main bodice fabric should be kept clear and not be caught in this stitching.

The following two resources demonstrate this technique perfectly. The first is specific to a strapless bodice, and the second offers some helpful tips.
How to Sew a Strapless Sweetheart Bodice
Let's watch a direct demonstration on a strapless bodice. The video 'How to Sew a Strapless Sweetheart Bodice' from Professor Pincushion gets straight to the point.
Watch the short clip from 02:44 to 03:00. It shows exactly where to place the stitch line and how to handle the fabric. The video also mentions it can be tricky on curves, so take your time and go as far into the corners as you comfortably can.
WHAT IS UNDERSTITCHING? Why you don't want to skip this crucial sewing step (esp. for pro finishes)!
For some extra tips, let's return to Evelyn Wood's video. She offers a great suggestion for maintaining a straight, even stitch.
Watch the section from 04:27 to 06:45. She demonstrates the process on a sample and suggests using a zipper foot to help guide the fabric and keep your stitch line consistently close to the seam.
For a static, step-by-step visual guide you can refer to while you are at your machine, this webpage is excellent.
Flatstitch to keep your facings or linings in place
The article 'Flatstitch to keep your facings or linings in place' from PatternsByPatternCos offers clear photos of the entire process on a strapless neckline.
Scroll down to the series of images showing the process on a strapless bodice. Focus on the steps after the initial seam is sewn: ironing the seam allowance towards the facing (your lining), and then stitching close to the seam. The images provide a very clear, static reference for each step.
Now, go ahead and understitch the neckline of your bodice. Work slowly, especially around the curves.
3. The Result and Final Pressing
Once you've finished understitching, you will immediately notice a difference. The lining will now naturally want to roll to the inside of the bodice.
WHAT IS UNDERSTITCHING? Why you don't want to skip this crucial sewing step (esp. for pro finishes)!
Let's see the 'before and after' effect clearly illustrated.
Watch the final segment of Evelyn's demonstration from 06:45 to 08:54. She shows two samples, one with and one without understitching. Look at how the understitched piece naturally creates a clean, rolled edge, even before pressing.
To complete the process, turn your lining back to the inside of the bodice. Take it to your ironing board and give the neckline a final, crisp press. Use a press cloth to protect your fabric. The understitching will make this step much easier, guiding the seam into its perfect, final position.
Conclusion
Congratulations! You have now mastered a fundamental technique in quality garment construction. By understitching the neckline, you have ensured the finish of your bodice will be sharp, clean, and professional—with no risk of the lining peeking out.
Key Takeaways:
- Understitching is a functional stitch on the lining that is not visible from the exterior.
- Its purpose is to secure the seam allowances and prevent the lining from rolling to the right side.
- The process involves stitching through the lining and all seam allowance layers, very close to the original seam line.
- A final press sets the seam for a crisp, permanent finish.
You have now fully completed and stabilized the top edge of your bodice. In our next lesson, we will move on to the internal structure by learning how to create boning channels within the bodice lining seams. This is where we will add the support system that gives your strapless gown its beautiful shape.