Introduction
In our last lesson, we established automation as the fundamental method for creating dynamic change and shaping a track's energy over time. We treated automation as a generalized control signal, affecting parameters like filter cutoff and effect levels to build and release macro-tension. Today, we shift our focus from these broad, section-long changes to the specific, event-driven elements that signal them: risers, downlifters, and drum fills.
This lesson will equip you to construct these critical transitional devices. We'll explore them not just as "effects," but as functional sonic signposts that guide the listener through your arrangement. Drawing on your background in physics and signal processing, we'll examine the psychoacoustic principles that make these elements effective and then dive into a range of practical sound design techniques for creating them from scratch.
1. The Function of Transitional Effects: Creating Expectation
Before building these sounds, it's crucial to understand why they work. In electronic music, which is often built on repetition, any deviation from the established loop signals that a change is imminent. Risers, in particular, capitalize on our innate psychological responses to certain sonic cues.
A riser is a type of continuous process, a musical gesture involving continuous, rather than discrete, changes to parameters. These processes create a powerful sense of expectation and tension.
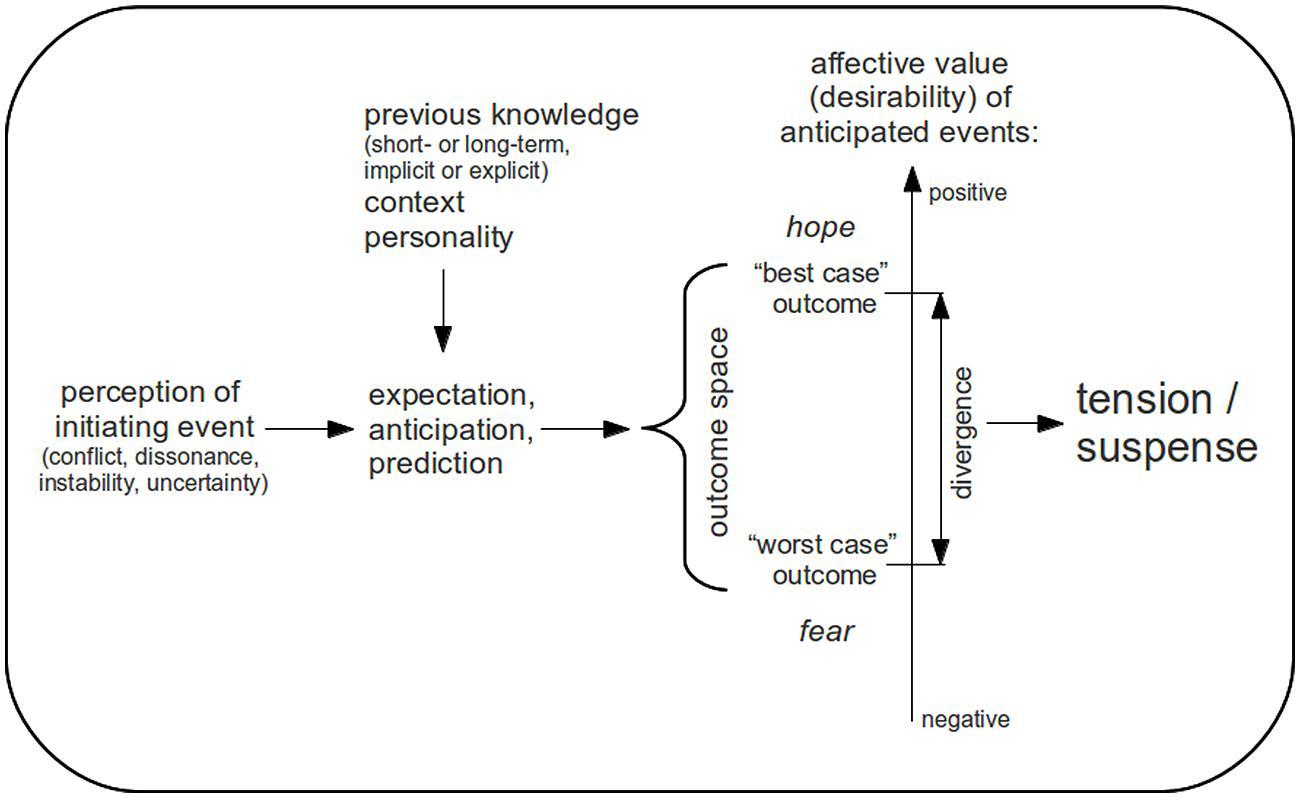
Academic music theory has a formal language for this. The following reading from Jeremy W. Smith's article on the topic will provide a solid theoretical framework for what we're about to build.
Smith, Continuous Processes in Contemporary Electronic Dance ...
This article formalizes the role of risers and downlifters in EDM. It connects directly to the concepts of tension and energy we discussed previously.
Please read the section titled Orientation. Pay close attention to how the author describes the function of "uplifters" (risers) and "downlifters" in orienting the listener and building tension toward a "drop." Note the discussion of common elements like ascending pitch slides, filter sweeps, and snare rolls.
As the paper discusses, risers function as "orienting" devices through intensification. They achieve this by leveraging several perceptual triggers simultaneously:
- Rising Pitch: Creates an intuitive sense of ascent and increasing energy.
- Increasing Brightness: Achieved by opening a low-pass filter, this adds high-frequency content, making the sound more present and intense.
- Increasing Volume: A simple crescendo builds energy.
- Increasing Rhythmic Density: Accelerating rhythmic patterns, like a snare roll, create a feeling of nearing a precipice.
- Increasing Harmonic/Textural Complexity: Adding noise, distortion, or layers of sound makes the texture feel more saturated and unstable.
Now, let's explore how to construct sounds that embody these principles.
2. Constructing Risers
A riser is not a single type of sound but a category of effects designed to build tension. The methods for creating them range from simple audio manipulation to complex synthesis.
Method 1: The Shepard Tone—An Infinite Ascent
A classic and potent riser technique involves the Shepard tone, an auditory illusion that provides the perception of a continuously rising pitch. For someone with your background, the underlying signal processing is particularly interesting. It's constructed by layering several tones (typically sine waves) an octave apart. As the tones glide upwards in pitch, their amplitudes are crossfaded: the rising tones fade out as they reach the top of the octave, while new tones fade in at the bottom. This creates a seamless loop where the pitch seems to ascend forever.

The Shepard tone: What it is and how it works - Blog - Splice
This article from Splice provides a clear, concise explanation of the Shepard tone illusion.
Please read the entire article, focusing on the definition, how it works (including the distinction between a discrete scale and a glissando), and its applications in film and music for creating tension.
While creating a perfect Shepard-Risset glissando from scratch is complex, many synthesizers and sample packs offer pre-made Shepard tone risers. The key takeaway is the principle: creating the illusion of infinite ascent is a powerful psychological tool for building anticipation.
Method 2: Synthesis-Based Risers
Modern synthesizers offer a vast toolkit for designing risers by automating multiple parameters simultaneously. The following video demonstrates several advanced methods using Ableton's built-in devices. Even if you don't use Ableton, the principles are universal to any capable synthesizer.
The video "Riser Sound Design" by Seed To Stage offers a series of practical, hands-on techniques for creating unique risers.
Focus on these three synthesis methods: Using FM Synthesis: This section shows how to use an FM synth (Operator) to create a riser. Note how the pitch envelope provides the primary rising motion, while the envelopes of modulating oscillators add harmonic complexity over time. Using the LFO: Continuing with Operator, this part demonstrates using an LFO, with its rate automated to increase over time, to modulate the pitch and volume of an oscillator for a "spin-up" effect. Using Wavetable Synthesis: This demonstrates creating a riser not with a pitch change, but by increasing the intensity of modulation. An LFO modulates the wavetable position, and an envelope is used to increase the LFO's rate over time, creating a sound that grows more frantic and complex.
These techniques move beyond a simple pitch sweep, instead creating tension through evolving timbre and modulation speed. This is especially relevant for industrial and noise genres, where textural evolution is often more important than melodic or harmonic changes.
Method 3: Sample-Based Risers
Perhaps the most common and straightforward way to create a transitional effect is by manipulating existing audio.
- Reverse and Stretch: The classic "reverse cymbal" is a form of riser. You can apply this to any sound with a decaying tail, like a long reverb or a crash cymbal. Simply reversing the audio file creates a natural-feeling crescendo.
- Granular Stretching: As demonstrated in the "Riser Sound Design" video (
using warping modes ), you can use a DAW's granular stretching algorithm (like Ableton's 'Texture' mode) to elongate a sound. Automating the grain size and pitch then turns this stretched sound into a textured, evolving riser.
Another powerful technique is creating a reverse reverb. This involves taking a sound (often the first note or syllable of a vocal or lead synth that will appear in the next section), applying a very long reverb to it, rendering that reverb tail to a new audio file, and then reversing that file. The result is a swelling, ethereal whoosh that perfectly anticipates the entrance of the source sound.
7 Transition Secrets the Pros Use (and how to use them in your music!) 👀
The video "7 Transition Secrets the Pros Use" shows a practical walkthrough of creating this effect.
Watch the section on boss level reverse reverb. The creator walks through the entire process: isolating a sound, adding effects, recording the tail, reversing it, and placing it before the drop.
3. Downlifters and Fills: Punctuation Marks in Your Arrangement
While risers build tension into a climax, downlifters and fills serve complementary roles.
Downlifters
A downlifter signals a decrease in energy, typically leading from a high-energy section into a breakdown or outro. They are, in essence, the inverse of risers.
- Creation: The simplest way to create a downlifter is to take a riser sample and reverse it. Many sound design techniques for risers can also be inverted:
- A descending pitch sweep.
- A low-pass filter closing, making the track sound "submerged" or distant.
- A noise sweep that fades out while its pitch descends.
- A decaying wash of delay or reverb.
Functionally, they provide a smooth ramp down in energy, letting the listener know that the intensity is about to subside.
Drum Fills
A drum fill is a short, often one- or two-bar, rhythmic variation that breaks the established drum pattern. Its purpose is to signal the end of a musical phrase (e.g., a 16-bar block) and create anticipation for the start of the next one. In the context of your interest in experimental rhythms, fills are an opportunity to introduce momentary complexity.
Common techniques for drum fills include:
- Snare Rolls: A rapid succession of snare hits, often increasing in speed (e.g., from 8th notes to 16th to 32nds).
- Tom Fills: A pattern played across a set of tom-tom drums, often descending in pitch.
- Silence/Mutes: Briefly cutting out the kick or the entire drum pattern for a beat or two before it slams back in creates a powerful sense of impact.
Like risers, fills are often enhanced with automation. A snare roll combined with an opening high-pass filter and a slight pitch bend creates a highly effective, energetic build.
7 Transition Secrets the Pros Use (and how to use them in your music!) 👀
The same "7 Transition Secrets" video has a great section on enhancing drum fills.
Watch the segment on the pitch bend as applied to a snare roll. This demonstrates combining increasing rhythmic density (the roll), increasing volume (velocity), and increasing pitch to create a classic buildup fill.
Conclusion
Today, we've moved from the general concept of automation to the specific construction of transitional events. We've seen that risers, downlifters, and fills are not mere decorative effects but crucial functional elements that manage a track's narrative and energy flow. They act as sonic instructions, preparing the listener for what's next by manipulating fundamental perceptual cues.
Key Takeaways:
- Function: Risers, downlifters, and fills are structural signposts that use continuous (or discrete) processes to manage listener expectation and signal changes in energy.
- Riser Principles: Effective risers build tension by creating a sense of ascent, intensification, and increasing complexity through rising pitch, volume, brightness, and rhythmic density.
- Riser Techniques: You can construct risers using a variety of methods, including the Shepard tone illusion, automated synthesizer parameters (pitch, filter, LFOs), and manipulation of audio samples (reversing, stretching, reverse reverb).
- Downlifters: These are the inverse of risers, signaling a decrease in energy. They are often created by reversing risers or using descending pitch/filter sweeps.
- Drum Fills: These are short rhythmic variations that break the cyclical pattern to punctuate the end of a section. They are made more effective when enhanced with automation of pitch, filters, and volume.
In our next lesson, we will put all the pieces from this module together. We'll analyze the arrangement and energy flow of a complete reference track, identifying how all these techniques—from automation to risers and fills—are used in concert to create a cohesive musical journey.