Hello! Welcome to the second lesson in our "Deep Learning Foundations" module.
In the previous lesson, we established the conceptual blueprint of a neural network. You learned about artificial neurons, the crucial role of non-linear activation functions like ReLU, and how these components are organized into input, hidden, and output layers.
Today, we transition from theory to practice. Our goal is to take that abstract architecture and build it using PyTorch, the industry-standard deep learning framework. This lesson is where your Python programming skills, particularly your understanding of Object-Oriented Programming (OOP), will be incredibly valuable.
By the end of this lesson, you will be able to define a complete feedforward neural network in PyTorch by creating a custom class that inherits from PyTorch's core nn.Module.
1. The PyTorch Approach: Building Models with torch.nn
Before we write any code, let's understand why we use a framework like PyTorch. While you could implement a neural network from scratch using only matrix operations (as we hinted at in the last lesson), it would be incredibly tedious. You would have to manually define and track all the weight matrices and bias vectors, write the forward pass logic, and—as we'll see soon—manually compute all the gradients for learning.
Frameworks like PyTorch abstract away this complexity. The torch.nn library is the heart of this abstraction, providing pre-built layers, activation functions, and a powerful base class, nn.Module, that handles all the complex backend work for you.
To see a direct comparison of implementing a network with and without torch.nn, take a look at the following article.
Mastering the Basics of torch.nn: A Comprehensive Guide
This article provides a great illustration of why torch.nn is so powerful by comparing a manual implementation with a torch.nn implementation side-by-side.
Read the section titled 'Comparing Neural Network Implementation With and Without torch.nn'. You don't need to run the code, just appreciate how much cleaner and more organized the torch.nn version is.
As you can see, torch.nn provides a much more structured and readable way to define a network. This structure is built entirely on a concept you're already familiar with: Python classes.
2. The nn.Module Blueprint: Your First PyTorch Class
In PyTorch, every neural network model you create is a Python class that inherits from torch.nn.Module. This base class provides all the essential machinery for a neural network, such as tracking all its learnable parameters (weights and biases).
Your job is to customize this nn.Module by implementing two essential methods:
__init__(): The constructor. This is where you define and initialize the layers of your network (e.g., linear layers, activation functions).forward(): This method defines how data flows through the network. You take an input tensor and pass it through the layers you defined in__init__.
The following video provides an excellent explanation of how these OOP concepts directly apply to building a neural network in PyTorch.
Dive into Deep Learning – Lec 6: Basics of Object-Oriented Programming in PyTorch (torch.nn.Module)
This video from Dr. Data Science connects the Python OOP concepts of classes, inheritance, and constructors directly to the task of defining a neural network with nn.Module.
Watch the segment from 15:42 to 19:51. Pay close attention to: How the custom network class inherits from nn.Module. The use of super().__init__() to initialize the parent class. How layers are defined as attributes in the __init__ method. The implementation of the forward method to specify the computation path.
This structure is the fundamental pattern for building any model in PyTorch. Let's formalize it.
3. Defining a Feedforward Network: Step by Step
We'll now build a simple feedforward neural network for classifying 28x28 images, like the ones in the FashionMNIST dataset. This network will have an input layer, two hidden layers, and an output layer.
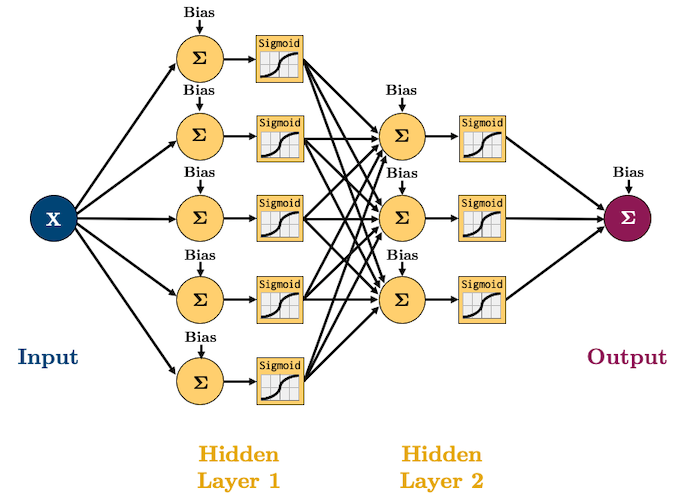
The official PyTorch documentation provides a clear and authoritative guide on how to do this.
Build the Neural Network - PyTorch documentation
This tutorial from the official PyTorch documentation is the canonical guide to building a model. We'll use it as our primary reference.
Read the sections 'Define the Class' and 'Model Layers'. Focus on understanding the code blocks that define the NeuralNetwork class and the explanations for nn.Flatten, nn.Linear, nn.ReLU, and nn.Sequential.
Let's break down the key pieces of code from that tutorial.
The Class Structure
All PyTorch models follow this template:
import torch
from torch import nn

class NeuralNetwork(nn.Module):
    def __init__(self):


        # 1. Initialize the parent nn.Module
        super().__init__()


        # 2. Define the layers you will use
        self.flatten = nn.Flatten()
        self.linear_relu_stack = nn.Sequential(
            nn.Linear(28*28, 512), # Input layer: 784 features in, 512 out
            nn.ReLU(),
            nn.Linear(512, 512),   # Hidden layer: 512 features in, 512 out
            nn.ReLU(),
            nn.Linear(512, 10)     # Output layer: 512 features in, 10 out (for 10 classes)
        )

    def forward(self, x):


        # 3. Define the forward pass logic
        x = self.flatten(x)
        logits = self.linear_relu_stack(x)
        return logits
Key Points:
super().__init__(): This line is mandatory. It calls the constructor of the parent class (nn.Module), which sets up the internal machinery needed to track layers and parameters.nn.Flatten(): A helpful utility layer that reshapes a multi-dimensional input tensor (like a 28x28 image) into a flat 1D vector (of 784 elements) so it can be fed into a linear layer.nn.Linear(in_features, out_features): This is your standard fully-connected layer.in_featuresmust match the number of features from the previous layer, andout_featuresis the number of neurons in this layer.nn.Sequential: This is a container that stacks layers in order. It's a convenient way to build simple networks where data flows straight through. The output of one layer is automatically passed as the input to the next.
Instantiating and Using the Model
Once the class is defined, you can create an instance of it and use it like a function:
# Create an instance of the network
model = NeuralNetwork()
print(model)


# Create a random dummy input tensor (1 image, 28x28 pixels)
X = torch.rand(1, 28, 28)


# Pass the input through the model to get output logits
logits = model(X)
print(f"Output logits shape: {logits.shape}")
Notice that you call model(X), not model.forward(X). While it seems like you're just calling the forward method, calling the model object itself (model(...)) triggers some important "hooks" in the background that PyTorch uses. Always call the model instance directly.
The output, logits, are the raw scores from the final linear layer. To turn these into probabilities, you'd pass them through a nn.Softmax function. However, as a practical tip, this step is often combined with the loss function during training for better numerical stability.
4. A Practical Coding Walkthrough
The nn.Sequential container is great for simple stacks, but sometimes you need more flexibility. The following video shows a slightly different but equally common way to define the forward pass by calling each layer explicitly.
PyTorch Tutorial 13 - Feed-Forward Neural Network
Patrick Loeber's tutorial provides a clear, practical example of building a feedforward network for the MNIST dataset. It's a great demonstration of the concepts we've just covered.
Watch the segment from 08:06 to 11:38. Notice how he defines each layer separately in __init__ and then calls them one by one in the forward method. This gives you more control over the data flow.
In his example, the forward method looks like this:
# Alternative forward pass implementation
def forward(self, x):


    # Here, 'self.l1', 'self.relu', and 'self.l2' are layers defined in __init__
    out = self.l1(x)
    out = self.relu(out)
    out = self.l2(out)
    return out
This explicit style is useful for more complex architectures where you might have skip connections or multiple branches. Both nn.Sequential and the explicit call style are valid and widely used.
Conclusion
Congratulations! You have now bridged the gap between the theory of neural networks and their practical implementation. You have learned the fundamental pattern for building any model in PyTorch.
Key Takeaways:
- All PyTorch models are Python classes that inherit from
nn.Module. - The
__init__()method is used to define the network's layers (e.g.,nn.Linear,nn.ReLU). - The
forward()method defines the computational path, specifying how data flows through the layers. - You must call
super().__init__()in your constructor. - You can use
nn.Sequentialfor simple, linear stacks of layers or call each layer explicitly inforwardfor more control. - To use your model, you create an instance of the class and call it directly with your input data (e.g.,
output = model(input)).
Preview of the Next Lesson:
We can now build a neural network, but its initial weights and biases are random. The network doesn't "know" anything yet. In the next lesson, "Explain backpropagation and compute gradients for a simple network," we will uncover the learning mechanism itself. You will learn how PyTorch automatically calculates the gradients that are essential for optimizing the model's parameters.