Hello! Welcome back to our series on computer vision.
In the previous lesson, you learned about transfer learning and implemented the feature extraction method. You saw how to load a pre-trained model like ResNet, freeze its convolutional layers, and train a new classifier head on a custom dataset. This is a powerful and efficient way to get good results quickly.
Today, we'll build directly on that knowledge to explore a technique that can often yield even better performance: fine-tuning. While feature extraction uses the pre-trained model as a static feature generator, fine-tuning allows the model to adapt its learned features to the nuances of our new dataset.
Your goal for this lesson is to learn how to fine-tune pre-trained models on custom datasets. You'll understand the key differences from feature extraction and learn how to implement it in PyTorch.
1. Fine-Tuning vs. Feature Extraction
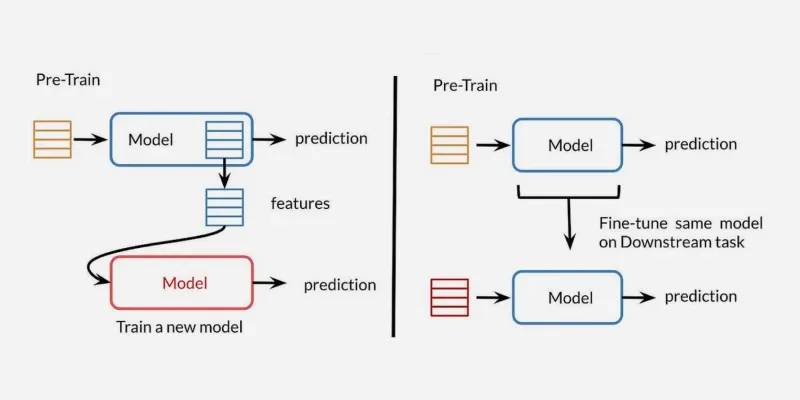
In the last lesson, we treated the pre-trained convolutional base as a fixed block of knowledge. This is effective but assumes the features learned on ImageNet are perfectly suitable for our task. What if we could slightly adjust those features to be even better for classifying, say, ants and bees? That's exactly what fine-tuning does.
Fine-tuning involves:
- Loading a pre-trained model.
- Replacing the classifier head, just as we did before.
- Unfreezing some or all of the pre-trained layers.
- Continuing to train these un-frozen layers on our new data, typically with a very low learning rate.
The low learning rate is critical. The pre-trained weights are already very good; we just want to nudge them in the right direction, not erase their valuable knowledge with large, random updates.
The image below provides a great visual summary of the difference between feature extraction (left) and fine-tuning (right). With fine-tuning, the new data is used to adjust the weights of the original model itself.
When to Choose Fine-Tuning:
- Feature Extraction is a great starting point, especially if your dataset is small and very similar to the original dataset (e.g., ImageNet). It's faster and less likely to overfit.
- Fine-Tuning is preferred when you have a reasonably large dataset (at least a few hundred images per class) and want to squeeze out maximum performance. It allows the model to learn more specialized features for your specific data.
Let's begin by looking at the simplest fine-tuning strategy: unfreezing the entire model.
2. Strategy 1: Fine-Tuning the Entire Model
The most straightforward way to fine-tune is to allow all the model's parameters to be updated during training. The implementation is very similar to feature extraction, with one crucial change in how we set up the optimizer.
The official PyTorch tutorial provides a clear example of this approach.
Transfer Learning for Computer Vision Tutorial
This section of the PyTorch tutorial demonstrates how to fine-tune a complete ResNet18 model. It highlights the simplicity of the approach, where the key is to configure the optimizer to update all model parameters.
Please read the section titled 'Finetuning the ConvNet'. Pay close attention to these lines of code: model_ft = models.resnet18(weights='IMAGENET1K_V1'): The pre-trained model is loaded. model_ft.fc = nn.Linear(num_ftrs, 2): The classifier head is replaced. optimizer_ft = optim.SGD(model_ft.parameters(), lr=0.001, momentum=0.9): The optimizer is configured. Notice that we pass model_ft.parameters() to the optimizer. This is the key difference from the last lesson, where we only passed the parameters of the final layer (model_conv.fc.parameters()). This change tells PyTorch to calculate gradients and update weights for the entire model.
By passing all parameters to the optimizer and using a small learning rate, we are gently adjusting the entire network—from the early edge detectors to the final classification layer—to become a specialist on our new task.
3. Strategy 2: Fine-Tuning Specific Layers
Fine-tuning the entire model works, but it can be computationally expensive and risks overfitting if our dataset isn't large enough. A more common and nuanced strategy is to freeze the early convolutional layers and only fine-tune the later ones.
The intuition is that the first few layers of a CNN learn very general features (like edges, corners, and colors) that are useful for almost any vision task. The later layers learn more abstract, task-specific features (like "dog ears" or "car wheels"). It's these later layers that benefit most from being adapted to our new dataset.
The following video provides an excellent code walkthrough of this more surgical approach.
L14.6.2 Transfer Learning in PyTorch -- Code Example
In this video, Dr. Sebastian Raschka demonstrates a more selective fine-tuning process. He shows how to freeze the convolutional base of a network and then unfreeze only the specific layers you want to adapt.
Watch the segment from 04:42 to 08:12. Observe the precise two-step process: Freeze Everything (04:42 - 06:50): First, he freezes the entire model by iterating through all parameters and setting requires_grad = False. Unfreeze Selectively (06:50 - 08:12): Then, he replaces the final output layer and manually unfreezes the parameters of the classifier layers he wants to train by setting their requires_grad = True.
This method gives you fine-grained control, allowing you to strike a balance between adapting the model and preventing overfitting.
4. A General Framework for Adapting Models
So far, we've focused on ResNet. However, different architectures like VGG, AlexNet, or Inception have slightly different structures for their final layers. To successfully fine-tune any model, you must first inspect its architecture to know which layer to replace.
The tutorial below provides a superb guide on how to handle several popular models and presents a robust coding pattern for setting up the optimizer.
This tutorial is a great resource for learning how to adapt different pre-trained models. It also shows a clever, flexible way to configure your optimizer for either feature extraction or fine-tuning.
First, quickly skim the section 'Initialize and Reshape the Networks'. You don't need to memorize it, but notice how the layer to be replaced is model.fc for ResNet, but model.classifier[6] for VGG and AlexNet. This shows the importance of inspecting the model structure first (print(model) is your best friend here). Next, read the section 'Create the Optimizer' very carefully. It shows how to create a list of parameters to optimize based on their requires_grad attribute. This is an elegant pattern that automatically sends the correct parameters to the optimizer, whether you're doing full fine-tuning, selective fine-tuning, or just feature extraction.
The main takeaway is this general workflow:
- Load your chosen pre-trained model.
- Print the model architecture to identify the final classification layer(s).
- Set the
requires_gradattribute for all parameters according to your strategy (freeze all, freeze some, or freeze none). - Replace the final classification layer with a new one for your custom task.
- Create an optimizer that only receives the parameters you want to update (i.e., those with
requires_grad=True).
5. Review: The End-to-End Workflow
Let's put everything into context by reviewing a complete project workflow. The following video walks through an entire image classification project, from data preparation to training and inference.
The specific technique used in the video is feature extraction, which you're already familiar with. Your goal here is to watch the complete process and identify exactly where you would insert the fine-tuning logic we've discussed today.
L-5 | Image Classification Using ResNet-18 and Pytorch
This video provides a complete, practical demonstration of a transfer learning project. While it implements feature extraction, the overall code structure is a perfect template for a fine-tuning project.
Watch the segment from 07:12 to 15:29. This covers loading the model, setting up the training components, and the main training loop. As you watch, think about how you would modify the code shown from 07:12 to 10:05 (the model and optimizer setup) to implement the fine-tuning strategies we've discussed: Full Fine-Tuning: What single change would you make to the optimizer line to train all layers? Selective Fine-Tuning: How would you adapt the loop that sets requires_grad to freeze only the first few blocks of ResNet while fine-tuning the rest?
This exercise should solidify your understanding of how fine-tuning fits into the larger training pipeline. It isn't a completely new process, but rather a modification of the transfer learning workflow you've already learned.
Conclusion
Excellent work! You've now moved beyond using pre-trained models as-is and learned how to adapt them to become specialists for your own tasks. Fine-tuning is a fundamental skill that is used in nearly all state-of-the-art computer vision applications.
Key Takeaways:
- Fine-tuning adapts a pre-trained model's weights to a new task by continuing to train them, usually with a low learning rate.
- It can achieve higher accuracy than feature extraction but requires careful implementation to avoid overfitting.
- You can choose to fine-tune the entire model or only specific (usually later) layers.
- The core implementation steps are:
- Load a pre-trained model and replace its head.
- Set
requires_grad=Truefor any layers you want to fine-tune. - Configure the optimizer to only update these "unfrozen" parameters.
Preview of the Next Lesson:
So far, our work has focused on image classification: assigning a single label to an entire image. In our next lesson, we will move to a more complex and powerful task: object detection. You'll be introduced to the famous YOLO architecture and learn how models can not only identify what is in an image but also determine where it is located with a bounding box.