Hello! Welcome to our next lesson on building robust forms in React.
In the last lesson, we successfully captured the form submission event using onSubmit, prevented the default browser refresh, and processed our component's state. However, we assumed the user's input was always perfect. In the real world, that's rarely the case. We need to guide our users to provide correct and complete information.
Today, we'll bridge that gap. You will learn how to implement client-side form validation and display error messages conditionally. This is a critical skill for creating user-friendly and reliable applications. We'll also see how this fits into the submission process, ensuring we only proceed with valid data and then reset the form for the next entry.
1. The Core Concepts of Form Validation
Before we write any code, let's establish what we're trying to achieve. Form validation is the process of ensuring that user input meets a set of predefined criteria. This serves two main purposes:
- Data Integrity: To ensure the data sent to our server (or used in our app) is clean, correct, and in the expected format.
- User Experience (UX): To provide immediate and clear feedback to the user, helping them correct mistakes easily without having to guess what went wrong.

Common validation rules include:
- Required Fields: Ensuring a field is not left empty.
- Format Validation: Checking if an email address or URL looks correct.
- Length Validation: Enforcing a minimum or maximum number of characters (e.g., for a password or username).
- Pattern Matching: Using regular expressions (regex) for complex rules, like requiring a password to contain numbers and symbols.
- Custom Logic: Comparing fields, like ensuring a "Confirm Password" field matches the original password.
This brief article from Formspree provides a solid overview of these core concepts.
React Form Validation: The Ultimate Guide
Please read the section 'Core Concepts of Form Validation' to get a clear understanding of the different types of validation rules we can implement.
Read the first main section titled 'Core Concepts of Form Validation'. Focus on the different validation types listed, from 'Required Fields' to 'Custom Validation Logic'.
2. Manual Validation: The "From Scratch" Approach
Let's build a validation system using only the tools we already know: controlled components and the useState hook. The process involves a few key steps:
- Store Errors in State: We need a new state variable to keep track of any validation errors. An object is a good choice, where keys are the field names (
email,password) and values are the error messages. - Create Validation Logic: We'll write a function that takes the current form data, checks it against our rules, and returns an object of errors.
- Validate on Submit: We'll update our
handleSubmitfunction to call our validation logic. - Conditionally Display Errors: We'll use the errors object from our state to show or hide error messages in our JSX.
This flowchart illustrates the logic we'll implement:
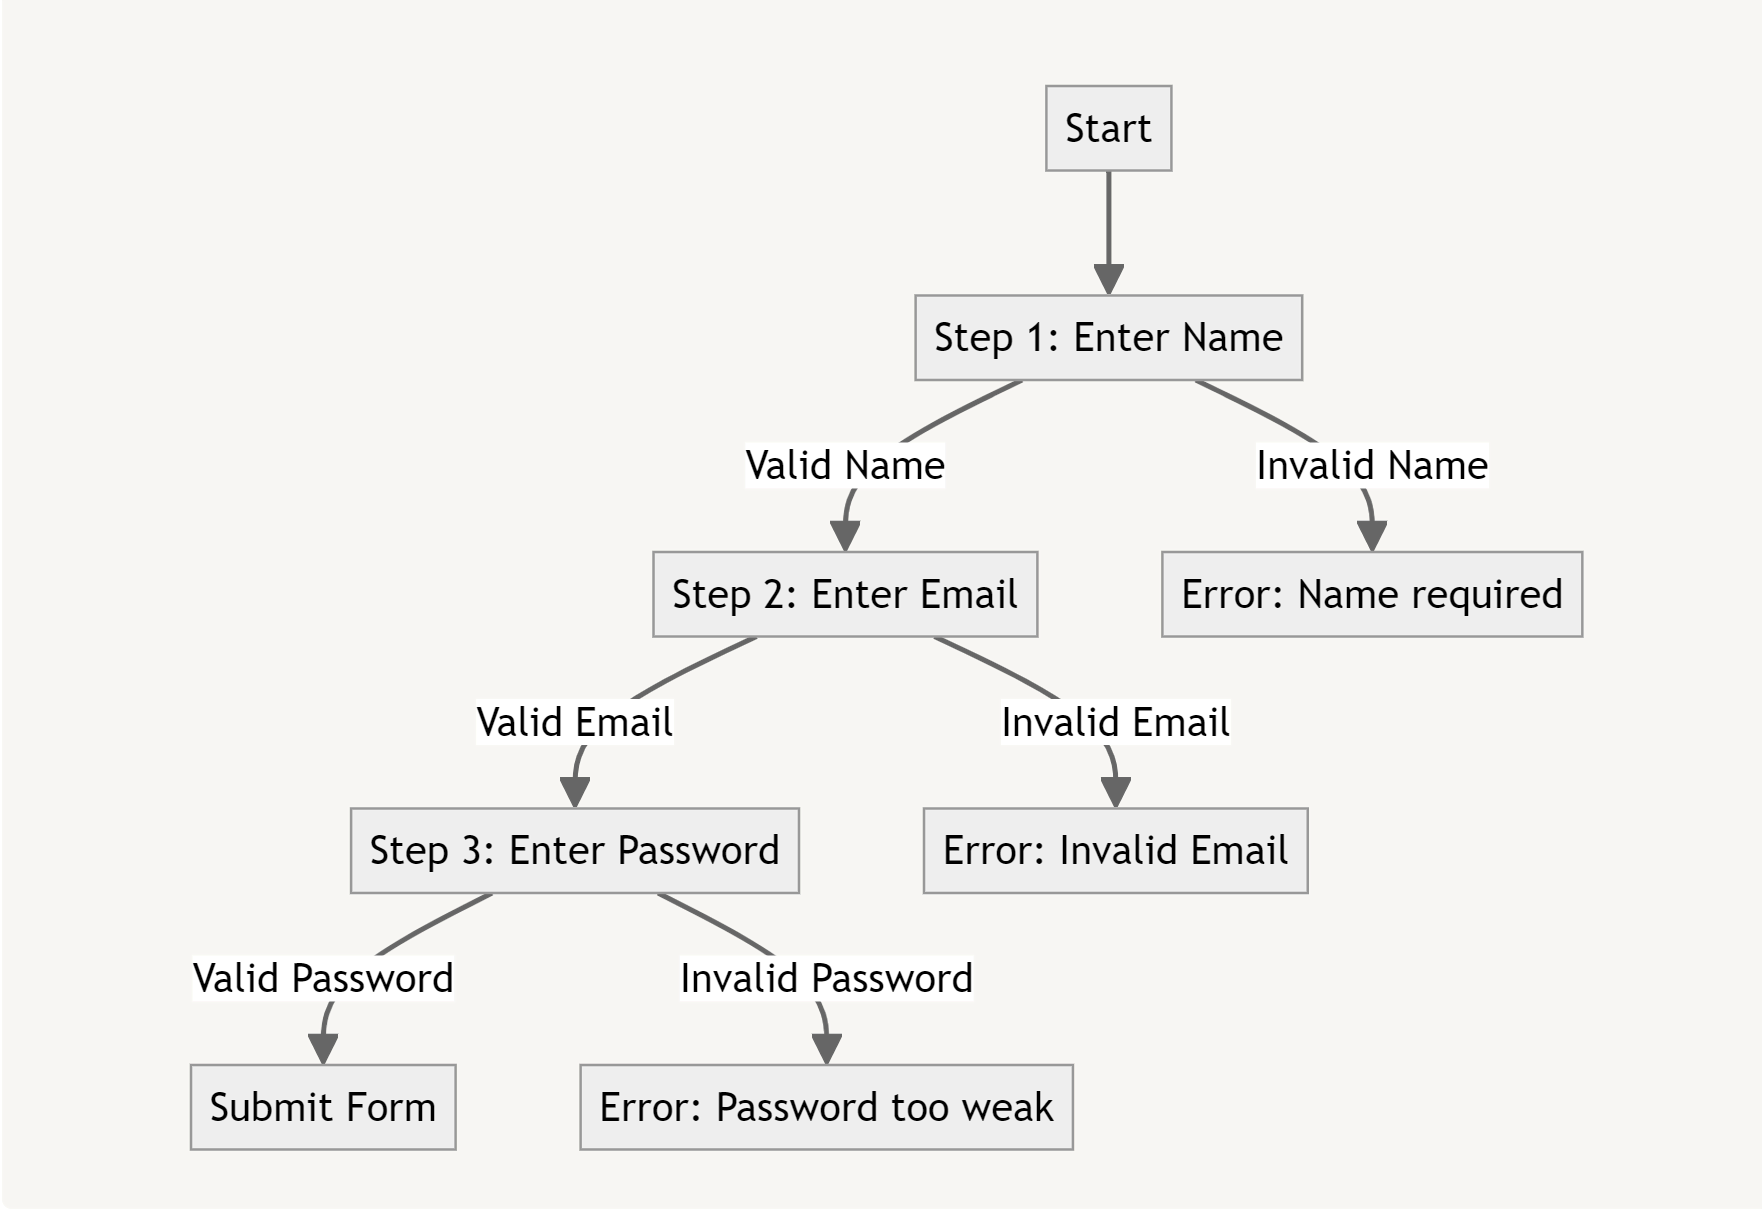
The following video provides an excellent, step-by-step walkthrough of this entire process.
Form Validation using React | React Forms Handling & Validation Tutorial | React Sign up Form
This video by Dipesh Malvia demonstrates how to build form validation from scratch. We will watch it in a few segments to focus on each part of the process.
First, watch from 04:10 to 11:52. This part covers the foundational setup: Creating a state for form values (formValues). Creating a state for errors (formErrors). Setting up the handleSubmit function to call a validate function. Passing the validation result into the formErrors state using setFormErrors.
Now that we have a shell for our validation, let's implement the rules.
Form Validation using React | React Forms Handling & Validation Tutorial | React Sign up Form
Let's continue with the video to see how the validation rules are actually written.
Watch from 11:52 to 13:14 and then from 16:36 to 18:07. These sections show how to: Create an errors object inside the validate function. Check for basic required fields. Add more complex rules like email format (using regex) and password length.
Finally, let's display these errors to the user and handle the submission.
Form Validation using React | React Forms Handling & Validation Tutorial | React Sign up Form
The last piece of the puzzle is rendering the errors and deciding whether to show a success message or not.
Watch from 15:33 to 16:36 to see how error messages are conditionally rendered in JSX. Then, watch from 13:14 to 15:05 and 18:11 to 20:44 to understand a common pattern for handling the final submission: using useEffect and a flag (isSubmit) to show a success message only when there are no errors and the form has been submitted.
The core logic inside handleSubmit now looks like this:
const handleSubmit = (e) => {
  e.preventDefault();
  // 1. Validate the form data and get the errors
  const formErrors = validate(formData);
  // 2. Set the errors in state to trigger a re-render
  setErrors(formErrors);
  // 3. Check if the returned errors object is empty
  if (Object.keys(formErrors).length === 0) {
    // 4. If no errors, proceed with submission
    console.log("Form is valid! Submitting:", formData);
    // 5. Reset the form for the next entry
    setFormData(initialState);
  } else {
    // If there are errors, do nothing. The UI will update to show them.
    console.log("Form has errors.");
  }
};
3. Improving UX: Real-Time Validation with onBlur
Validating only on submit works, but it can be frustrating for users to fill out an entire form only to find multiple errors at the end. A better user experience is to validate a field as soon as the user is done with it. This is typically done on the blur event, which fires when an input field loses focus.
To prevent showing an error before the user has even had a chance to type, we can introduce another piece of state to track which fields have been "touched".
This article provides a complete code example demonstrating this more advanced pattern. It combines onChange, onBlur, and onSubmit validation for an optimal user experience.
How to Handle Form Validation in React
This article from OneUptime gives a fantastic, complete code example of a form with robust validation.
Please read the section 'Basic Controlled Form Validation' and review the code block carefully. Pay attention to: The touched state: how it's initialized and updated in handleBlur. The handleBlur function: it marks a field as touched and validates it. The handleChange function: it only validates if the field has already been touched. Conditional rendering of errors: the check for {errors.email && touched.email} ensures an error is only shown after the user has interacted with the field. \nAfter that, quickly review the flowchart under 'Validation Strategies' to solidify your understanding of when onChange, onBlur, and onSubmit are best used.
4. A Better Way: Schema-Based Validation with Zod
While manual validation is a great way to learn, it can become repetitive and error-prone for larger forms. Imagine having to write if (!values.fieldName) for 20 different fields!
A more powerful and scalable approach is to use a schema validation library. With these libraries, you define a "schema" object that declares the shape and rules of your data. The library then handles the validation for you.
Zod is a very popular choice for this. It's lightweight and has a clear, chainable syntax. Let's see how it works.
Zod Validation in React (Complete Tutorial)
This video from Cosden Solutions provides a great introduction to Zod. We'll focus on how to define a schema and use it for manual validation.
Watch from 00:48 to 14:58. This comprehensive segment will teach you: What Zod is and how to define a basic object schema. The difference between .parse() (which throws an error) and .safeParse() (which returns a result object). safeParse is perfect for our use case. How to use Zod's built-in modifiers to define rules like .string(), .email(), .min(), and .optional().
With Zod, our handleSubmit function can become much simpler. Instead of a large, custom validate function, we use our schema's safeParse method.
Zod Validation in React (Complete Tutorial)
Now, let's see the pseudo-code for how you would use Zod inside a React form handler.
Watch from 20:06 to 21:28. This part shows exactly how you can use userFormSchema.safeParse() inside a handleSubmit function to check for success or failure, without needing a separate form library like React Hook Form.
The manual validation flow with Zod would look something like this:
import { z } from 'zod';

// Define the schema once
const formSchema = z.object({
  email: z.string().min(1, "Email is required").email("Invalid email address"),
  password: z.string().min(8, "Password must be at least 8 characters"),
});

function MyForm() {
  // ... (useState for formData and errors)

  const handleSubmit = (e) => {
    e.preventDefault();

    // 1. Use Zod to validate the formData
    const result = formSchema.safeParse(formData);

    // 2. Check the result
    if (!result.success) {
      // If validation failed, format errors and set them in state
      const formattedErrors = result.error.format();
      // Example: setErrors({ email: formattedErrors.email?._errors[0] })
      // (You would write a small loop to format all errors)
    } else {
      // 3. If validation succeeded, submit and reset
      console.log("Success!", result.data);
      setErrors({});
      setFormData(initialState);
    }
  };

  // ... (return JSX)
}
This approach cleanly separates your validation rules (the schema) from your component logic.
Practice Exercise
Let's build a simple sign-up form and apply the manual validation techniques we learned.
Goal: Create a SignUpForm component that validates user input for an email and password on submission. If validation passes, it should log the data and reset the form. If it fails, it should display corresponding error messages.
Starter Code:
import { useState } from 'react';

const initialFormState = {
  email: '',
  password: '',
};

function SignUpForm() {
  const [formData, setFormData] = useState(initialFormState);
  // 1. Create a state to hold validation errors.
  //    Initialize it as an empty object.
  const [errors, setErrors] = useState({});

  const handleChange = (e) => {
    const { name, value } = e.target;
    setFormData(prev => ({ ...prev, [name]: value }));
  };

  // 2. Create a `validate` function.
  //    It should accept the form data as an argument.
  //    Inside, check for the following rules:
  //    - email: must not be empty.
  //    - email: must be a valid email format (a simple regex is fine).
  //    - password: must not be empty.
  //    - password: must be at least 8 characters long.
  //    It should return an object containing any error messages.
  const validate = (data) => {
    const newErrors = {};
    if (!data.email) {
      newErrors.email = 'Email is required.';
    } else if (!/\S+@\S+\.\S+/.test(data.email)) {
      newErrors.email = 'Email is not valid.';
    }
    if (!data.password) {
      newErrors.password = 'Password is required.';
    } else if (data.password.length < 8) {
      newErrors.password = 'Password must be at least 8 characters.';
    }
    return newErrors;
  }

  const handleSubmit = (e) => {
    e.preventDefault();
    // 3. In `handleSubmit`, call your `validate` function.
    // 4. Set the returned errors into your errors state.
    // 5. Check if the errors object is empty.
    //    - If it is, log the form data and reset the form to its initial state.
    //    - If it's not, do nothing.
    const validationErrors = validate(formData);
    setErrors(validationErrors);

    if (Object.keys(validationErrors).length === 0) {
      console.log('Form submitted successfully:', formData);
      alert('Sign-up successful!');
      setFormData(initialFormState);
    }
  };

  return (
    <form onSubmit={handleSubmit}>
      <h3>Sign Up</h3>
      <div>
        <label htmlFor="email">Email</label>
        <input
          type="email"
          id="email"
          name="email"
          value={formData.email}
          onChange={handleChange}
        />
        {/* 6. Conditionally render the error message for the email field. */}
        {errors.email && <p style={{ color: 'red' }}>{errors.email}</p>}
      </div>
      <div>
        <label htmlFor="password">Password</label>
        <input
          type="password"
          id="password"
          name="password"
          value={formData.password}
          onChange={handleChange}
        />
        {/* 7. Conditionally render the error message for the password field. */}
        {errors.password && <p style={{ color: 'red' }}>{errors.password}</p>}
      </div>
      <button type="submit">Sign Up</button>
    </form>
  );
}

export default SignUpForm;
Click to see a possible solution
import { useState } from 'react';

const initialFormState = {
  email: '',
  password: '',
};

function SignUpForm() {
  const [formData, setFormData] = useState(initialFormState);
  const [errors, setErrors] = useState({});

  const handleChange = (e) => {
    const { name, value } = e.target;
    setFormData(prev => ({ ...prev, [name]: value }));
  };

  const validate = (data) => {
    const newErrors = {};

    // Email validation
    if (!data.email) {
      newErrors.email = 'Email is required';
    } else if (!/^[A-Z0-9._%+-]+@[A-Z0-9.-]+\.[A-Z]{2,}$/i.test(data.email)) {
      newErrors.email = 'Invalid email address';
    }

    // Password validation
    if (!data.password) {
      newErrors.password = 'Password is required';
    } else if (data.password.length < 8) {
      newErrors.password = 'Password must be at least 8 characters';
    }

    return newErrors;
  };

  const handleSubmit = (e) => {
    e.preventDefault();
    const validationErrors = validate(formData);
    setErrors(validationErrors);

    // Check if the validation passed (i.e., the errors object is empty)
    if (Object.keys(validationErrors).length === 0) {
      console.log('Form Submitted:', formData);
      alert('Sign-up successful!');
      setFormData(initialFormState); // Reset form
    }
  };

  return (
    <form onSubmit={handleSubmit} noValidate>
      <h3>Sign Up</h3>
      <div>
        <label htmlFor="email">Email</label>
        <input
          type="email"
          id="email"
          name="email"
          value={formData.email}
          onChange={handleChange}
        />
        {errors.email && <p style={{ color: 'red' }}>{errors.email}</p>}
      </div>
      <div>
        <label htmlFor="password">Password</label>
        <input
          type="password"
          id="password"
          name="password"
          value={formData.password}
          onChange={handleChange}
        />
        {errors.password && <p style={{ color: 'red' }}>{errors.password}</p>}
      </div>
      <button type="submit">Sign Up</button>
    </form>
  );
}

export default SignUpForm;
Conclusion
Excellent work! You've added a crucial layer of robustness and user-friendliness to your React forms. This is a fundamental skill that separates basic forms from production-ready ones.
Key Takeaways:
- Client-side validation improves both data integrity and user experience.
- The manual approach involves an
errorsstate object, avalidatefunction, and conditional rendering of error messages. - Validation can be triggered at different times (
onSubmit,onChange,onBlur). Using atouchedstate withonBlurprovides excellent real-time feedback. - For more complex forms, schema-based libraries like Zod offer a more declarative, scalable, and maintainable way to define and manage validation rules.
- The complete submission flow is: validate -> if valid, submit and reset -> if invalid, display errors.
Next Up:
So far, all our component logic has been self-contained. But what happens when a component needs to interact with the "outside world"? For example, fetching data from an API when it first loads, or setting up a subscription. These are called side effects, and in our next lesson, we will learn how to manage them cleanly using the useEffect hook.