Hello! Welcome back to our journey into building dynamic user interfaces with React.
In our last lesson, we dove into the event object. You learned how to capture user interactions with handlers like onClick and onSubmit, access valuable information through event.target, and control default browser actions with event.preventDefault().
Today, we'll connect that knowledge directly to what makes React apps feel alive: state. Our goal is to update component state in response to user events. We will close the loop on interactivity, taking user input and using it to trigger re-renders that reflect changes on the screen. This is the fundamental cycle of any interactive React application.
1. The Core Interaction Loop in React
The central pattern of interactivity in React is a three-step process:
- Trigger: A user performs an action, like clicking a button or typing in a field. This triggers an event.
- Update: An event handler function runs in response. Inside this function, you call a state setter function (like
setCount) to request a state update. - Render: React queues a re-render. On the next render, the component will receive the new state value, and the UI will be updated to match.
Let's see this in action with the classic counter example. We want to click a button and have a number on the screen increase.
Learn useState In 15 Minutes - React Hooks Explained
The video 'Learn useState In 15 Minutes' provides a perfect, concise demonstration of this core loop. We'll watch the parts where a counter is implemented.
Watch from 05:44 to 06:36, and then from 08:23 to 08:51. Notice how the onClick event triggers a handler function, which in turn calls setCount to update the state.
The code you saw in the video follows a clear structure that separates the UI declaration from the logic that handles updates.
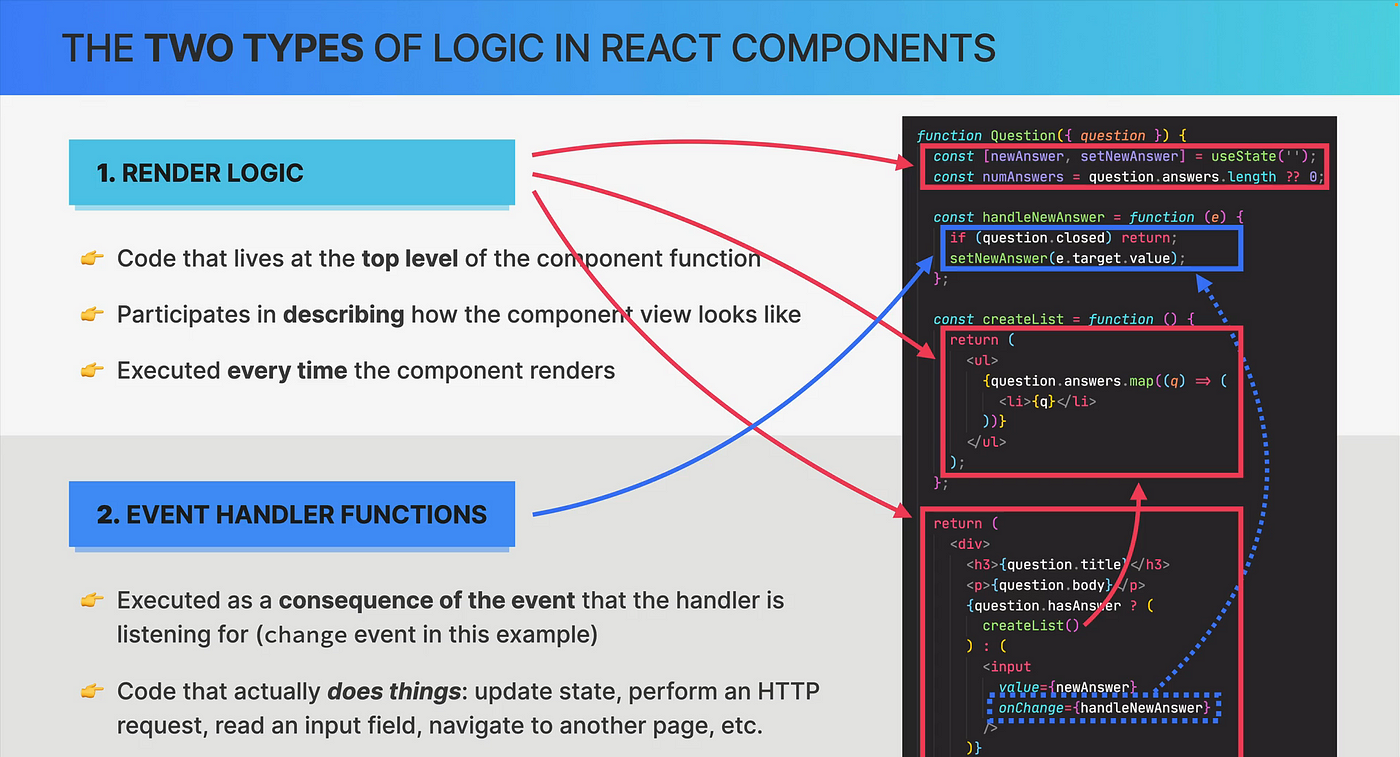
2. The "Controlled Component" Pattern
The most common way to update state is through form inputs. In React, we use a pattern called controlled components. This means:
- A piece of state is the "single source of truth" for an input's value.
- The input's
valueprop is bound to that state variable. - An
onChangeevent handler updates the state variable whenever the user types.
This ensures that the React state and the UI are always in sync.
Let's see how to implement this for a simple text input.
Learn the React onChange event handler 🚦
The video 'Learn the React onChange event handler' by Bro Code clearly explains and demonstrates how to create a controlled text input.
Watch from the beginning to 02:54. Pay close attention to how the useState hook, the <input> element's value and onChange props, and the handler function all work together.
To reinforce this, let's read the official documentation which walks through the same process.
React interactivity: Events and state
The MDN Web Docs article 'React interactivity: Events and state' provides a great textual explanation of capturing user input and updating state.
In the document, find the section 'Persisting and changing data with state'. Read the subsections 'Reading user input' and 'Updating state'. This will solidify your understanding of using event.target.value to update state with setName.
The key piece of code that brings it all together is the handler:
function handleChange(event) {
  // Get the new value from the input element
  const newValue = event.target.value;
  // Update the state, which will trigger a re-render
  setName(newValue);
}
3. Important: Updating State Based on Previous State
What if your new state depends on the old state? In our counter example, the new count is previous count + 1.
You might be tempted to write setCount(count + 1). While this often works, it can lead to bugs. State updates in React can be asynchronous and batched for performance. If you update the state multiple times in the same event, using the simple form might not work as you expect.
The correct and safe way to do this is to pass a function to your state setter. This function receives the previous state as its argument and should return the new state.
setCount(prevCount => prevCount + 1);
This guarantees you are working with the most up-to-date state value.
Learn useState In 15 Minutes - React Hooks Explained
Let's return to the 'Learn useState In 15 Minutes' video. The instructor gives an excellent explanation of this exact problem and why the functional update pattern is the solution.
Watch from 06:36 to 08:23. The video shows what happens when you call setCount(count - 1) twice and how using setCount(previousCount => ...) fixes the bug. This is a crucial concept.
4. Important: Updating Arrays and Objects in State
A fundamental rule in React is to treat state as immutable. You should never modify state variables directly. Instead, you always create a new array or object and pass it to your state setter function.
Let's say you have a list of tasks in state: const [tasks, setTasks] = useState([...]).
- To add a task: Create a new array by copying the old one and adding the new item.
setTasks([...tasks, newTask]); // Using spread syntax - To remove a task: Create a new array that contains all items except the one you want to remove.
setTasks(tasks.filter(task => task.id !== idToDelete)); // Using .filter() - To update a task: Create a new array by iterating over the old one. When you find the item to update, return a new object with the changes. Otherwise, return the original item.
setTasks(tasks.map(task => {
  if (task.id === idToUpdate) {
    return { ...task, completed: !task.completed }; // Return a new, updated object
  }
  return task; // Return the original, unchanged object
})); // Using .map()
Let's see how these patterns are used in a real application.
React interactivity: Events and state
The MDN article we looked at earlier has excellent sections that demonstrate these immutable array updates in the context of a to-do list app.
Read the sections titled 'Adding a task', 'Completing a task', and 'Deleting a task'. Pay close attention to how setTasks is always called with a brand new array created using spread syntax, .map(), or .filter().
Conclusion
You have now mastered the complete loop of interactivity in React. By connecting event handlers to state setter functions, you can make your components respond dynamically to user input.
Key Takeaways:
- React's interaction model is declarative: you update state, and React updates the UI.
- The controlled component pattern connects form inputs to state, creating a single source of truth.
- When new state depends on the previous state, always use the functional update form (
setState(prevState => ...)) to avoid bugs related to asynchronous updates. - State is immutable. When updating arrays or objects, always create new ones with the desired changes using methods like the spread syntax (
...),.map(), and.filter().
Next Up:
Now that we can effectively manage state based on user actions, we can start using that state to make bigger changes to our UI. In the next lesson, we will explore conditional rendering, where we'll learn how to show, hide, or switch between different components or JSX based on the current state.