Hello! Welcome to the next lesson in our journey with React Router.
In the last lesson, we successfully set up a multi-page application using BrowserRouter, Routes, and Route. We now have a HomePage, an AboutPage, and even a NotFoundPage. However, the only way to get from one page to another is by manually typing the URL into the browser's address bar. This isn't a great user experience.
Today, we'll fix that. This lesson focuses on making our application navigable. You will learn how to navigate between pages using the Link and NavLink components. These are the fundamental building blocks for creating navigation bars, menus, and any other clickable elements that change the view in your React application.
Why Not Use the <a> Tag?
You might be wondering, "Why not just use a standard HTML <a> tag with an href attribute?"
The reason is that <a> tags trigger a full page refresh. When you click one, the browser discards the current page (including your React app's state) and requests a brand new document from the server. This is the opposite of what we want in a Single Page Application (SPA). The goal of an SPA is to feel fast and fluid, like a desktop application, by only updating the parts of the page that need to change.
React Router provides its own components for navigation that prevent this full refresh, enabling true client-side routing. Let's explore the first of these: the <Link> component.
Creating a Navigation Bar with Link
To start, let's create a dedicated component for our navigation menu.
- Create a new folder named
componentsinside yoursrcfolder. - Inside
src/components, create a new file namedNavbar.jsx.
Paste the following basic structure into src/components/Navbar.jsx:
// src/components/Navbar.jsx

function Navbar() {
  return (
    <nav>
      <ul>
        <li>Home</li>
        <li>About</li>
      </ul>
    </nav>
  );
}

export default Navbar;
Now, let's turn those list items into actual navigation links using the <Link> component.
Ultimate React Router v6 Guide
The article 'Ultimate React Router v6 Guide' from Web Dev Simplified provides a concise introduction to the Link component. This will explain its purpose and basic usage.
Please read the section titled 'Handling Navigation'. It explains that React Router uses its own <Link> component instead of anchor tags and shows a simple implementation with the to prop. Stop before 'Advanced Route Definitions'.
As the article explains, the <Link> component is a simple replacement for an <a> tag. The main difference is that you use the to prop instead of href.
Let's watch a quick video that puts this into practice.
React Router Complete Tutorial | React Routing For Beginners | React Router DOM Tutorial
This clip from the 'React Router Complete Tutorial' by GreatStack clearly demonstrates how to import Link and wrap menu items to make them clickable.
Watch from 00:27:51 to 00:29:57. The video shows how to import Link from react-router-dom and use it to wrap the navigation items, assigning the correct paths to the to prop.
Now, let's apply this to our Navbar.jsx component.
Update src/components/Navbar.jsx:
// src/components/Navbar.jsx

import { Link } from 'react-router-dom';
import './Navbar.css'; // We'll create this file next for some basic styling

function Navbar() {
  return (
    <nav className="navbar">
      <Link to="/" className="nav-brand">MyApp</Link>
      <ul className="nav-links">
        <li>
          <Link to="/">Home</Link>
        </li>
        <li>
          <Link to="/about">About</Link>
        </li>
      </ul>
    </nav>
  );
}

export default Navbar;
For some basic styling, create src/components/Navbar.css and add this code:
/* src/components/Navbar.css */
.navbar {
  display: flex;
  justify-content: space-between;
  align-items: center;
  background-color: #333;
  padding: 0 20px;
  color: white;
}

.nav-brand {
  color: white;
  text-decoration: none;
  font-size: 1.5rem;
  font-weight: bold;
}

.nav-links {
  list-style: none;
  display: flex;
  margin: 0;
  padding: 0;
}

.nav-links li a {
  display: block;
  padding: 20px;
  color: white;
  text-decoration: none;
}

.nav-links li a:hover {
  background-color: #555;
}
Finally, let's add our new Navbar to the main App.jsx file so it appears on every page. Notice we place it outside the <Routes> container.
Update src/App.jsx:
// src/App.jsx

import { Routes, Route } from 'react-router-dom';
import Navbar from './components/Navbar'; // Import the Navbar
import HomePage from './pages/HomePage';
import AboutPage from './pages/AboutPage';
import NotFoundPage from './pages/NotFoundPage';

function App() {
  return (
    <div>
      <Navbar /> {/* Add the Navbar here */}
      <main style={{ padding: '20px' }}>
        <Routes>
          <Route path="/" element={<HomePage />} />
          <Route path="/about" element={<AboutPage />} />
          <Route path="*" element={<NotFoundPage />} />
        </Routes>
      </main>
    </div>
  );
}

export default App;
Run your app now. You should see the navigation bar at the top. Clicking "Home" and "About" will change the content below without the browser doing a full refresh. Congratulations, you've implemented client-side routing!
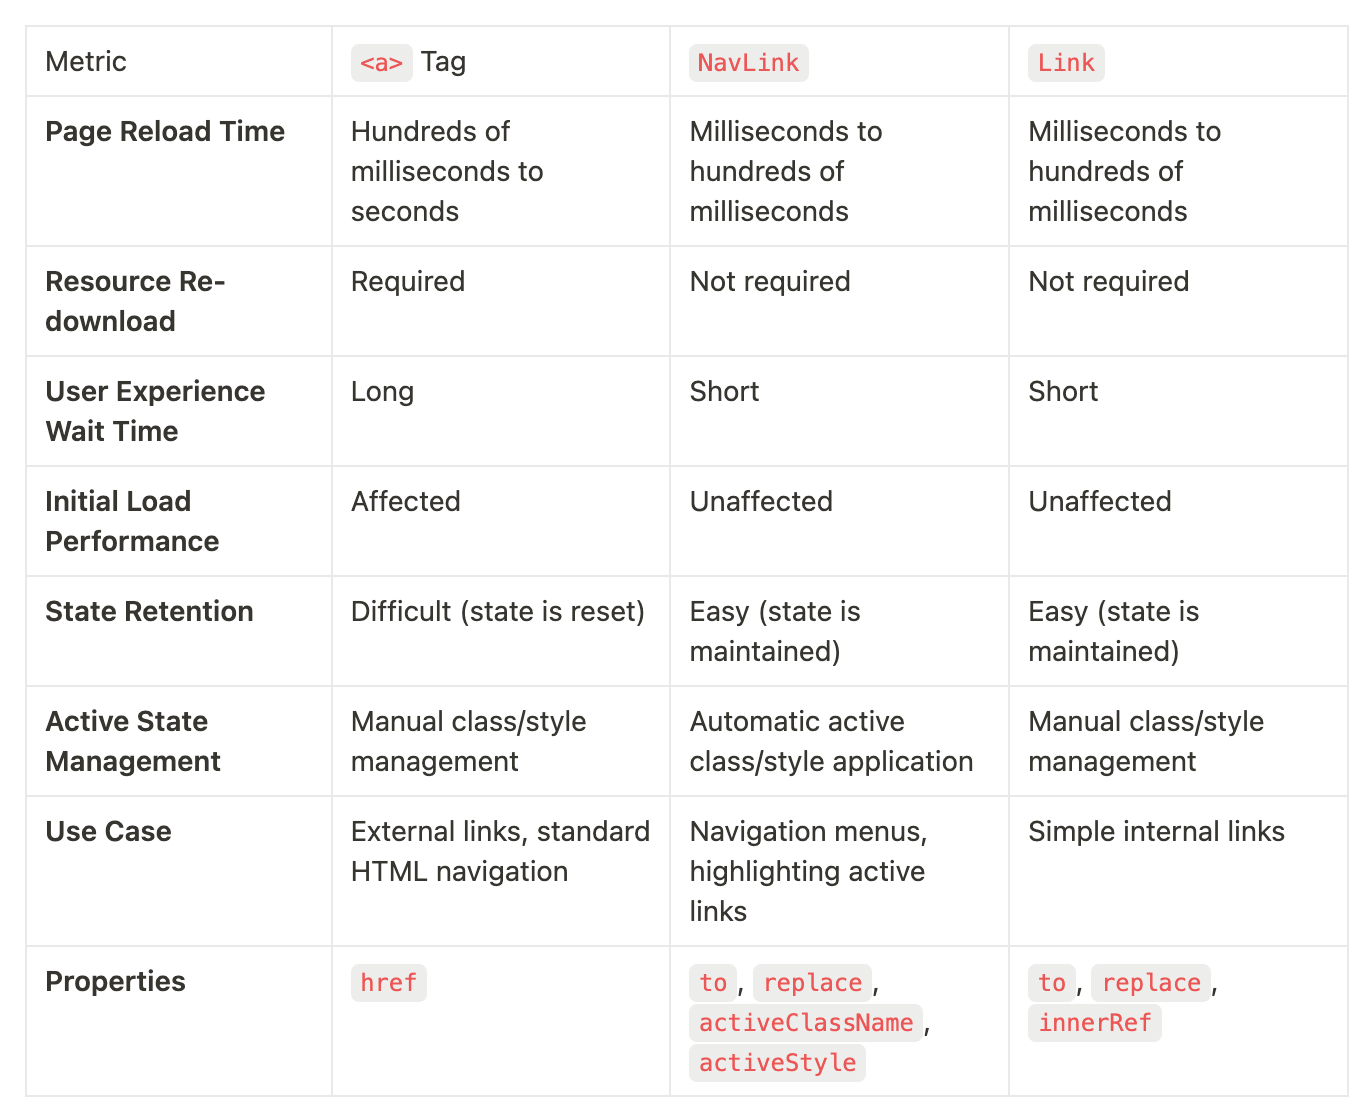
This image provides a great summary of the differences between the <a>, Link, and NavLink components.
Indicating the Active Page with NavLink
Our navigation works, but there's a problem: users can't visually tell which page they are currently on. Both the "Home" and "About" links look identical regardless of the current URL.
To solve this, React Router provides another component: <NavLink>. It's a special version of <Link> that is "aware" of whether its to prop matches the current URL.
React Router Tutorial - 5 - Active Links
The 'Active Links' video from Codevolution gives a perfect introduction to NavLink and how it helps style the active route.
Watch the beginning of this video, from 00:00:04 to 00:02:23. It explains the problem of unstyled active links and demonstrates how NavLink automatically applies an active class, which you can then target with CSS.
Let's implement this. We simply replace <Link> with <NavLink> in our Navbar.jsx file for the navigation links.
Update src/components/Navbar.jsx:
// src/components/Navbar.jsx

// 1. Import NavLink instead of Link for the main navigation
import { NavLink, Link } from 'react-router-dom';
import './Navbar.css';

function Navbar() {
  return (
    <nav className="navbar">
      {/* A simple Link is fine for the brand, as it doesn't need active styling */}
      <Link to="/" className="nav-brand">MyApp</Link>
      <ul className="nav-links">
        <li>
          {/* 2. Use NavLink for items that need active styling */}
          <NavLink to="/">Home</NavLink>
        </li>
        <li>
          <NavLink to="/about">About</NavLink>
        </li>
      </ul>
    </nav>
  );
}

export default Navbar;
By default, NavLink will add a class named active to the underlying <a> tag when it matches the current URL. We can add a style for this class in our CSS.
Add to src/components/Navbar.css:
/* ... existing styles ... */

.nav-links li a.active {
  background-color: #007bff;
  font-weight: bold;
}
Now, refresh your application. As you click between "Home" and "About", the active link will be highlighted, giving the user essential visual feedback.
When to Use Link vs. NavLink
The distinction is simple and is explained well in this short clip.
React Router Tutorial - 5 - Active Links
Let's finish the Codevolution video to understand the specific use cases for each component.
Watch from 00:04:33 to 00:05:24. This part clarifies that NavLink is for things like navigation bars or breadcrumbs where you need to highlight the current item, while Link is for all other general-purpose navigation.
In summary:
NavLink: Use for your main navigation menu (navbars, sidebars, tabs) where showing the active state is important.Link: Use for all other cases of navigating between routes, like a "Read More..." button on a blog post preview or a link to a user's profile.
Advanced Styling with NavLink
The active class is convenient, but NavLink offers an even more powerful way to apply styles or classes using a function. This is especially useful if you're using styling libraries or need more complex logic.
You can pass a function to the className or style prop. This function receives an object with an isActive boolean property.
Tutorial v6.30.3 - React Router
The official React Router documentation has a great section on NavLink that demonstrates this functional approach.
Read the section titled 'Active Link Styling'. It shows how to use NavLink and pass a function to the className prop. This function receives { isActive, isPending }, allowing you to return different class names based on the link's state.
Here is how you could apply an inline style using this method.
Example style prop (in Navbar.jsx):
<NavLink
  to="/about"
  style={({ isActive }) => {
    return {
      color: isActive ? 'red' : 'white',
      textDecoration: 'none'
    };
  }}
>
  About
</NavLink>
This approach gives you fine-grained control and is a very common pattern in modern React development.
Conclusion
You've now mastered one of the most fundamental parts of React Router! You can create a fluid, client-side navigation experience that is essential for any professional single-page application.
Key Takeaways:
- Always use the
<Link>component for navigation within your app to prevent full page reloads. - The
<Link>component uses atoprop to specify the destination path. - For navigation menus where you need to highlight the current page, use the
<NavLink>component. <NavLink>automatically adds anactiveclass to the link that matches the current URL.- For more dynamic styling, you can pass a function to
NavLink'sstyleorclassNameprop, which gives you access to anisActiveboolean.
Next Up:
Our pages are currently static. The real power of routing comes from creating dynamic pages. In the next lesson, we will explore dynamic routes. You'll learn how to create a route like /users/:userId that can render a unique page for any user, and we'll see how to access the userId from the URL using the useParams hook.