Hello! Welcome to our next lesson on advanced state management in React.
In our previous session, we built the engine: the reducer function. You learned how to write a pure function that takes the current state and an action, and returns a new, immutable newState. We successfully separated the logic of how state changes from our components.
Today, we're putting that engine into the car. We'll learn how to connect our reducer function to a React component using the useReducer hook. This is the crucial step that brings our state logic to life, allowing us to manage complex state within a component in a clean, predictable way.
By the end of this lesson, you will be able to manage state in a component using the useReducer hook.
Connecting the Pieces: The useReducer Hook
The useReducer hook is the bridge between your component's UI and the reducer logic you've written. When you call it, you provide your reducer and an initial state, and in return, you get everything you need to manage that state.
The syntax is as follows:
const [state, dispatch] = useReducer(reducer, initialState);
Let's break this down:
reducer: This is the reducer function you wrote in the last lesson. It contains all the logic for updating the state.initialState: The starting value of your state, just like inuseState.state: The first item returned in the array. This is the current state value for the component, which you can use to display information in your JSX. It is read-only.dispatch: The second item returned. This is a special function. You calldispatchfrom your event handlers (likeonClick) to "send" an action to your reducer. This is how you tell your reducer to update the state.
The official React documentation has a concise reference for this hook.
Let's start with the official definition. This section from the React docs clearly lays out the signature of the useReducer hook and what it returns.
Please read the sections under the 'Reference' heading: useReducer(reducer, initialArg, init?), the dispatch function description, and the first part of the 'Usage' section, 'Adding a reducer to a component'. This will give you a solid grasp of the core syntax.
The useReducer Data Flow
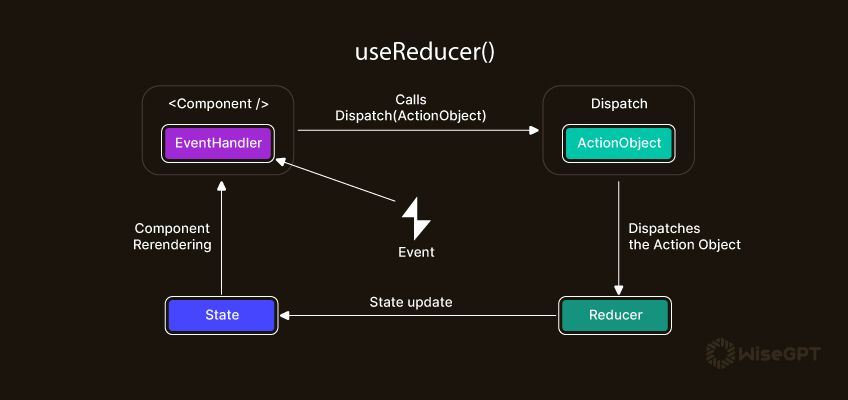
When you use this hook, you establish a clear, one-way data flow. It might seem like a few steps at first, but this structured process is what makes useReducer so powerful and easy to debug.
- User Interaction: A user clicks a button, types in a field, or performs some other action in the UI.
- Event Handler: This interaction triggers an event handler function in your component (e.g.,
handleClick). - Dispatch Action: Inside the event handler, you call
dispatchwith an action object (e.g.,dispatch({ type: 'INCREMENT' })). - Reducer Execution: React takes the current
stateand theactionyou dispatched and passes them to yourreducerfunction. - State Calculation: Your reducer's logic runs, computes the next state, and returns it.
- Re-render: React detects that a new state has been returned and re-renders your component (and its children) with the updated
statevalue.
The following diagram provides a perfect visual summary of this entire cycle.
From Theory to Practice: A Counter Example
Let's see this in action. The best way to understand the flow is to see a simple useState implementation get converted to useReducer. The counter example is perfect for this.
Learn useReducer In 20 Minutes
This video from Web Dev Simplified provides an excellent, step-by-step walkthrough of implementing useReducer, starting with a simple counter.
Watch from 01:47 to 07:39. The video first shows a simple counter with useState. Pay close attention to how it's refactored to use useReducer. Notice where the reducer function is defined, how useReducer is called in the component, and how dispatch is used in the button's onClick handlers.
Let's solidify what you just saw with a code breakdown.
import React, { useReducer } from 'react';

// 1. Define initial state and action types (optional but good practice)
const ACTIONS = {
  INCREMENT: 'increment',
  DECREMENT: 'decrement'
}

const initialState = { count: 0 };

// 2. The reducer function (logic lives outside the component)
function reducer(state, action) {
  switch (action.type) {
    case ACTIONS.INCREMENT:
      return { count: state.count + 1 }; // Return a new state object
    case ACTIONS.DECREMENT:
      return { count: state.count - 1 };
    default:
      return state;
  }
}

function Counter() {
  // 3. Call useReducer inside the component
  const [state, dispatch] = useReducer(reducer, initialState);

  return (
    <>
      {/* 4. Use the state value in JSX */}
      <span>{state.count}</span>

      {/* 5. Dispatch actions from event handlers */}
      <button onClick={() => dispatch({ type: ACTIONS.DECREMENT })}>-</button>
      <button onClick={() => dispatch({ type: ACTIONS.INCREMENT })}>+</button>
    </>
  );
}
This pattern centralizes all state transitions in one place (reducer function) and makes your component's event handlers clean and descriptive. They simply say what happened, not how to do it.
Handling Complex State: A To-Do List
The real power of useReducer becomes evident when you're managing more complex state, like a list of items where you need to add, delete, and update them.
This is where you'll see two key patterns emerge:
- Using a
payloadin your action to pass data to the reducer. - Passing the
dispatchfunction down to child components as a prop.
Learn useReducer In 20 Minutes
Let's continue with the same video, which now builds a to-do list. This is a fantastic, practical example that showcases the real-world benefits of useReducer.
Watch from 07:39 to 19:51. This is a longer segment, but it's packed with value. Focus on these key points: Action Payloads: Notice how adding a new to-do requires sending data. The dispatch call looks like dispatch({ type: 'ADD_TODO', payload: { name: 'My new task' } }). Passing dispatch: See how the dispatch function is passed as a single prop to the Todo component. This child component can then dispatch any action (like 'toggle' or 'delete') without needing separate handler functions for each one. This dramatically simplifies prop drilling.
The to-do list example clearly illustrates why useReducer is preferred for complex state logic:
- Centralized Logic: All the ways the to-do list can change (add, toggle, delete) are defined together in one
reducerfunction. This makes the logic easier to find, understand, and test. - Clean Prop Passing: Instead of passing
handleAddTask,handleToggleTask, andhandleDeleteTaskdown as three separate props, you pass onlydispatch. The child component is empowered to signal any event it needs to without the parent needing to know the details.
This pattern is analogous to an event system in other programming paradigms. The dispatch function acts as a message bus, and the reducer acts as the central event handler that processes those messages.
Conclusion
You have successfully connected the state logic (the reducer) to the component UI. You now have a complete, powerful pattern for managing state in React.
Key Takeaways:
- You call
useReducerinside a component with yourreducerfunction andinitialState. useReducerreturns the currentstateand adispatchfunction:const [state, dispatch] = useReducer(reducer, initialState).- The
statevalue is read-only and is used to render the UI. - The
dispatchfunction is called from event handlers to send actions to your reducer (e.g.,dispatch({ type: 'ADD_ITEM', payload: newItem })). - React then executes your reducer, gets the new state, and re-renders the component.
- Passing the single
dispatchfunction as a prop is a powerful way to simplify communication between parent and child components.
Next Up:
We've mastered how to manage complex local state within a single component tree. But what happens when multiple, distant components need to share the same state? Passing dispatch down one or two levels is fine, but passing it through many intermediate components ("prop drilling") can become cumbersome.
In the next lesson, we will solve this by learning how to combine Context and useReducer to create a global state management solution, making your state accessible anywhere in your app without prop drilling.